|
|
|
Radschool Association Magazine - Vol 44 Page 4 |
|
Privacy Policy | Editorial Policy | Profit Policy | Join the Association | List of Members | Contact us | Index | Links |
|
Computers and stuff
Sam Houliston. |
|
Back Go to page: 1 2 3 4 5 6 7 8 9 10 11 12 13 14 15 16 17 18 19 20 Forward |
|
Dropbox.
Like a lot of people, I take our tablet when traveling or to meetings when it is not convenient to take a laptop. The tablet is a great little gadget for taking notes, reading and sending emails, taking photos etc but it’s not much good for serious office work – or is it?
Microsoft doesn’t make an Android or iPad version of Office so you can’t use that, but there is an excellent substitute called QuickOffice Pro HD. Files created in QuickOffice can be read and worked on in Microsoft’s Office and it works the other way too, MS Office files can be read and worked on in QuickOffice. It’s not a free App, it costs $20, but it’s a once-only cost and if you want to be able to use your tablet for serious office work, it’s definitely worth it. (You can get or read more about the iPad version HERE and the Android version HERE.)
However, it doesn’t end there! If you’ve got an iPad and a Windows powered PC, transferring the data from your iPad to your PC can be a bit of a problem as they don’t want to talk to each other. Android tablets to a PC is not a problem and iPad to Apple computers is easy too, but mix them up and up go the barriers.
But, there is an easy fix and it’s Dropbox which we spoke about back in Vol 36. (You can see a video describing it HERE). There is still a FREE version available and once you’ve loaded it onto both your tablet and computer moving files from one to the other is a breeze.
If you have an Android or an Apple powered smart phone or tablet, you’ll find Dropbox has a very useful little tool for handling your photos and/or videos. These days we take photos with our phones or tablets and e-mail them to friends or family or post them on Facebook for all to see.
But the people who made Dropbox have loaded it with a feature that is super handy. Provided you have loaded Dropbox onto your computer as well as your phone/tablet, whenever you take a photo, and provided your phone/tablet and computer are connected to the internet, Dropbox immediately and automatically uploads the pic or video to its servers, then downloads it to a folder on your PC computer.
This is a fantastic little feature, you could be in Spain, taking photos of the Alhambra in Granada and provided you can find a WiFi your photos will flash through the ether and end up on your computer, ready for you when you get home. All automatically.
This is how to make it all happen.
From an Android powered device.
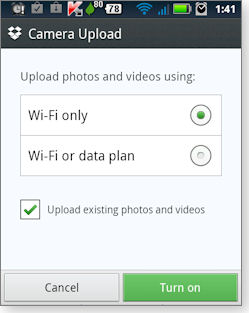
Open Dropbox on the camera, then press the Menu button. Tap Settings and then find and tap Turn on Camera Upload. The resulting screen will give you two settings, shown in the pic at right.
The first is Upload photos and videos using: Wi-Fi only or Wi-Fi or data plan. If you don't want to have to mortgage the house again, select Wi-Fi only.
The second option, Upload existing photos and videos, will transfer all existing photos and videos to your computer. If you have a lot, it could take quite a while so it could be better to wait until you can connect your phone and computer by cable. Quicker that way.
From an iPhone or iPad to PC.
Setting up Dropbox's photo-exchange system on iPhones and iPads is
similar to the procedure for Android. Open the Dropbox app, tap the
Settings icon in the lower-right
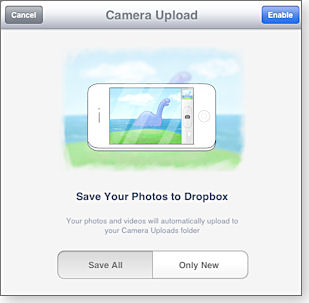
Next, a pop-up dialog box will ask whether you want to Save All or Only New (below). In other words, do you want Dropbox to upload the photos already on your device? If you answer Only New, it will ignore those photos and upload only the pictures you take from now on. As with Android, make your choice and tap Enable.
All that is good, but where do the pics end up on your PC??
Dropbox automatically creates a new sub-directory (folder) called Camera Uploads on your C drive. To go there, click the Dropbox icon on your desktop, select Camera Uploads and there they are.
It's important to note that this is a one way sync, photos and videos will only go from your phone/tablet to your computer, not the other way around. If you delete photos from your camera they will also be deleted from your computer but if you delete them from your computer they will not be deleted from your phone.
|
|
Some people can look so busy doing nothing that they seem indispensable.
|
|
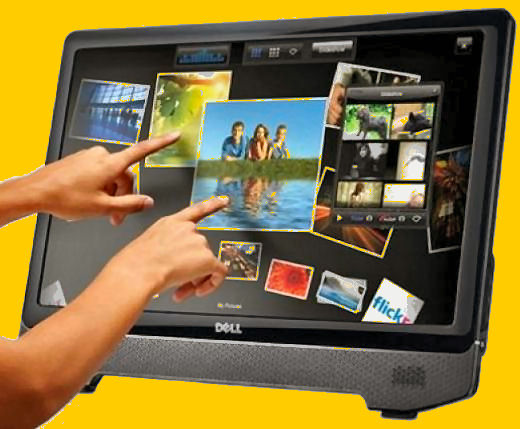
Touch-screen monitors.
Today touch-screen monitors are common place, nearly everyone has one in his or her pocket (smart phones). Computer monitors, which use the touch screen facility, have come down in price and are now starting to pop up more and more and now that Microsoft has released Windows 8 (with 8.1 coming soon) it won’t be long before every laptop will have one - but who knows how they work??
There are three basic systems that are used to recognize a person's touch on a screen:
The
resistive system consists of a normal glass panel that
is covered with a conductive and a resistive
metallic layer. These two layers are held apart by
spacers and a scratch-resistant layer is placed on top of the whole
setup. An electrical current runs through the two layers while the
monitor is operational. When a user touches the screen, the two layers
make contact in that exact spot. The change in the electrical field is
noted and the coordinates of the point of contact are calculated by the
computer. Once the coordinates
In the capacitive system, a layer that stores electrical charge is placed on the glass panel of the monitor. When a user touches the monitor with his or her finger, some of the charge is transferred to the user, so the charge on the capacitive layer decreases. This decrease is measured in circuits located at each corner of the monitor. The computer calculates, from the relative differences in charge at each corner, exactly where the touch event took place and then relays that information to the touch-screen driver software. One advantage that the capacitive system has over the resistive system is that it transmits almost 90 percent of the light from the monitor, whereas the resistive system only transmits about 75 percent. This gives the capacitive system a much clearer picture than the resistive system.
On the monitor of a surface acoustic wave system, two transducers (one receiving and one sending) are placed along the x and y axes of the monitor's glass plate. Also placed on the glass are reflectors -- they reflect an electrical signal sent from one transducer to the other. The receiving transducer is able to tell if the wave has been disturbed by a touch event at any instant, and can locate it accordingly. The wave setup has no metallic layers on the screen, allowing for 100-percent light throughput and perfect image clarity. This makes the surface acoustic wave system best for displaying detailed graphics (both other systems have significant degradation in clarity).
Another area in which the systems differ is in which stimuli will register as a touch event. A resistive system registers a touch as long as the two layers make contact, which means that it doesn't matter if you touch it with your finger or a rubber ball. A capacitive system, on the other hand, must have a conductive input, usually your finger, in order to register a touch. The surface acoustic wave system works much like the resistive system, allowing a touch with almost any object -- except hard and small objects like a pen tip.
As far as price, the resistive system is the cheapest; its clarity is the lowest of the three and its layers can be damaged by sharp objects. The surface acoustic wave setup is usually the most expensive.
Tips for traveling with digital devices.
If you go overseas you have to give a lot of thought to how/when you use your smart phone or you could come back to a huge bill. Gone are the days when we took off without our phones (and lap tops), now they're as essential as shorts and sandals.
Traveling around Australia is not a problem, no matter where you go, (apart from the Outback) our phones will find a tower within range and you can make and receive calls and in our towns and cities, free WiFi is becoming quite common.
But go overseas and it’s a different story.
Our mobile phones will work in most places in the world, all you have to do is contact your provider and get them to put you onto International roaming then when you land in Asia or Europe or wherever, your phone will find a tower and log on. As long as you don’t make any calls there’s no charge but if someone rings you, you pay the call costs from Oz to wherever you are. As long as you don’t get into hour long chats, the costs are not too bad, but try and do a bit of net surfing without being on a free WiFi network and you’ll have to mortgage the house to pay the bill.
As long as you have access to free WiFi, there are a couple of ways you can eliminate the telephone call costs too.
First, before you leave Oz, download Viber (it’s free) onto your smart phone and get all your friends to do the same, then, no matter where you are and provided you have access to WiFi, you can call and speak to your friends for as long as you want – for free!!
Secondly, once again before you leave, download and install Skype onto your smart phone then purchase a personal Skype phone number. This will cost you about $25 for 3 months but it will allow anyone to call you while you are in most countries, from a normal land line phone, for free (apart from the $25 upfront fee). You can see more info on how to get a Skype number and in which countries this works HERE. The Skype system doesn’t require you to find a WiFi network, it works through the other country’s mobile phone network.
Adding text to a pic in Word.
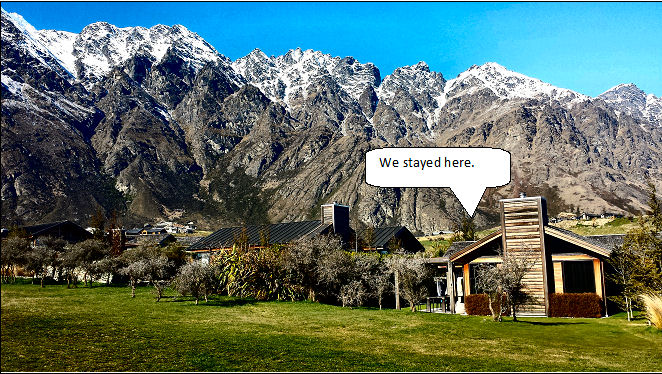
Adding some text, an arrow or graphic to an image should be an easy task in Word, and it is, once you know the trick. You can insert an image into Word or a Word created email in Outlook but the defaults make it hard to add overlays. Look at this image below and the caption. The image was inserted normally then to add the caption, you click Insert, Shapes then click the shape you want, and the caption appears on your image. You can then size and move the shape to where you want and voila. |
 |
|
But!!! If you want to add some words or another pic somewhere in the document before this pic, or if you want to reformat the document or move or reshape the pic, you’ll find image and the caption are separate and will move independently. But you can fix that!!
Back in earlier versions of Word, all you did was hold down the Ctrl key and click the pic and the overlay then when both were selected you just right clicked the pic, selected Group and then they both moved as one.
But with some versions of Office 2010 you can’t do that anymore, however there is a way. Here’s how!!
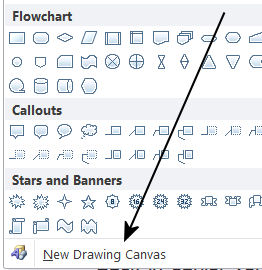
First thing you do is select INSERT, then SHAPES, then way down the bottom select NEW DRAWING CANVAS.
That opens a window in your document. Now go to INSERT, then PICTURE and place your pic into the New Drawing Canvas window. You’ll find the pic will nearly fill the window but the outside edges of the window have crop marks so you can remove any white space you don’t want later (best not to). Now that you have your pic in place, go back to INSERT, then SHAPES, select the shape you want, and size and insert it where you want it. (You can add as many shapes or other pics as you want).
When you have everything in place, hold down the CTRL key and individually left click each shape and then the pic, then when all are selected, right click the pic, select GROUPING, then GROUP and that’s it.
|
|
"You look sad, Fred, what's the trouble," asked Bill. "Domestic trouble." says Fred "But you're always bragging that your wife is a pearl," says Bill. "She really is," replies Fred. It's the mother-of-pearl that's giving me the trouble!"
|
|
Sandboxing.
Another term you are going to hear more about in the months ahead is “Sandboxing”. Sandboxing, another silly name thought up by some pony-tail somewhere, is a security mechanism for separating computer programs. It is often used to run untrusted programs from unverified third-parties or untrusted websites.
Sandboxing technology is used to test unverified programs which may contain a virus or other malignant code, without allowing the software to harm your computer.
If you spend a lot of time on the Internet and typically find yourself searching all kinds of topics and maybe even have been infected in the past, you might want to consider Sandboxing. This basically allows you to run programs such as your web browser in a virtual environment, thus protecting your computer from infections. You can find more info HERE.
|
|
|
|
|
|
iOS 7. If you have an apple device, you should hold off upgrading your operating system to iOS 7 for a month or so since a significant security hole was found hours after it first became available. |
|
Back Go to page: 1 2 3 4 5 6 7 8 9 10 11 12 13 14 15 16 17 18 19 20 Forward |

 are known, a special driver translates
the touch into something that the
operating system
are known, a special driver translates
the touch into something that the
operating system