|
|
||
|
||
|
Privacy Policy | Editorial Policy | Profit Policy | Join the Association | List of Members | Contact us | Index | Links |
||
|
Back Go to page: 1 2 3 4 5 6 7 8 9 10 11 12 13 14 15 16 17 18 19 20 Forward
|
||
|
Computers and Stuff.
Sam Houliston.
|
||
|
Report scams to the ACCC via www.scamwatch.gov.au or by calling 1300 795 995.
|
||
|
All about spyware.
When you go online, don't assume that your privacy is secure. Prying eyes often follow your activity-and your personal information with a pervasive form of malicious software called spyware. In fact, it's one of the oldest and most widespread threats on the Internet, secretly infecting your computer without permission in order to initiate a variety of illegal activities. It's easy to fall prey to and can be hard to get rid of, especially since you're most likely not even aware of it. But relax; we've got your back with all you need to know about what spyware is, how you get it, what it tries to do to you, how to deal with it, and what to do to avoid future spyware attacks.
What is spyware?
Although it sounds like a James Bond gadget, it’s actually a generic term for malicious software that infects your PC or mobile device and gathers information about you, your browsing and Internet usage habits, as well as other data. No big surprise—spyware is sneaky, usually finding its way onto your computer without your knowledge or permission, attaching itself to your operating system and maintaining a presence on your PC. You might have even inadvertently given permission for the spyware to install itself when you agreed to the terms and conditions of a seemingly legitimate program you downloaded without reading the fine print.
But no matter how spyware invades your PC, it runs quietly in the background, collecting information or monitoring your activities in order to trigger malicious activities related to your computer and how you use it. That includes capturing keystrokes, screen shots, authentication credentials, personal email addresses, web form data, Internet usage information and other personal information, such as credit card numbers.
And even if you discover its unwelcome presence on your system, it does not come with an easy uninstall feature.
How do I get spyware?
Spyware can infect your system in the same ways that any other malware does, by means of a Trojan, a virus, worm, exploit, and other types of malware. Here are a few of spyware’s main techniques to infect your PC or mobile device:
Security vulnerabilities. Here’s a top-of-the-list no-no: clicking on an unfamiliar link or attachment in an email, which either runs an executable attachment or links to a website program that downloads and runs (“executes”) a program. Even worse, it’s even possible that just visiting a malicious website and viewing a page and/or banner ad will result in a drive-by download, or clicking some option in a deceptive pop-up window can trigger an infection. Even trading software or documents with friends may result in the stealthy delivery of a spyware program hidden within. That includes executable programs, music files, and documents. All it takes is one bad click.
Misleading marketing. Spyware authors love to present their spyware programs as useful tools to download. It might be an Internet accelerator, new download manager, hard disk drive cleaner, or an alternative web search service. Beware this kind of “bait,” because installing it can result in inadvertent spyware infection. And even if you eventually uninstall the “useful” tool that initially introduced the infection, the spyware remains behind and continues to function.
Software bundles. Who doesn’t love free software (freeware)? except when it’s a host program that conceals a malicious add-on, extension, or plugin. They may look like necessary components, but they are nonetheless spyware, which, again, remains even if you uninstall the host application.
Misc. Trojans, worms, and backdoors often distribute spyware in addition to their primary malicious intent.
Mobile device spyware. Mobile spyware has been around since mobile devices became mainstream. Since mobile devices are small and users can’t see activity, these behaviours can run behind the scenes. Both Mac and Android devices become infected when you install an app with malicious code. These apps include legitimate apps recompiled with malcode, straight up malicious apps with a fake name, and apps with fake download links. Apps can also be secretly installed onto devices by abusers who want to stalk unsuspecting victims.
Types of spyware
In most of the cases, the functionality of any spyware threat depends on the intentions of its authors. For example, some typical functions designed into spyware include the following:
Password stealers are applications designed to harvest passwords from infected computers. The types of collected passwords may include stored credentials from web browsers, system login credentials, and sundry critical passwords. These passwords may be kept in a location of the attackers’ choosing on the infected machine, or may be transmitted to a remote server for retrieval.
Banking Trojans are applications designed to harvest credentials from financial institutions. They take advantage of vulnerabilities in browser security to modify web pages, modify transaction content, or insert additional transactions, all in a completely covert fashion invisible to both the user and host web application. Banking Trojans may target a variety of financial institutions, including banks, brokerages, online financial portals, or digital wallets. They might also transmit collected information to remote servers for retrieval.
Infostealers are applications that scan infected computers and seek out a variety of information, including usernames, passwords, email addresses, browser history, log files, system information, documents, spreadsheets, or other media files. Like banking Trojans, Infostealers may exploit browser security vulnerabilities to collect personal information in online services and forums, then transmit the information to a remote server or store it on your PC locally for retrieval.
Keyloggers, also referred to as system monitors, are applications designed to capture computer activity, including keystrokes, websites visited, search history, email discussions, chatroom dialogue, and system credentials. They typically collect screenshots of the current window at scheduled intervals. Keyloggers may also collect functionality, allowing for stealthy capture and transmission of images and audio/video from any connected devices. They might even allow attackers to collect documents that are printed on connected printers, which can then be transmitted to a remote server, or stored locally for retrieval.
History of spyware
Public references to the term “spyware” date back to late 1996, when it appeared in an industry article. By 1999, it was used in an industry press release, described as we define it today. The term was an instant hit in the mass media and among its audiences. Soon after, in June 2000, the first anti-spyware application was released.
In October 2004, America Online and the National Cyber-Security Alliance performed a survey. The result was startling. About 80% of all Internet users have their system affected by spyware, about 93% of spyware components are present in each of the computers and 89% of the computer users were unaware of their existence. Out of the affected parties, almost all, about 95%, confessed that they never granted permission to install them.
Mac spyware.
Spyware authors have historically concentrated on the Windows platform because of its large user base when compared to the Mac. However, the industry has seen a big jump in Mac malware in 2017, the majority of which is spyware. Although spyware authored for the Mac has similar behaviours as the Windows variety, most of the Mac spyware attacks are either password stealers or general-purpose backdoors. In the latter category, the spyware’s malicious intent includes remote code execution, keylogging, screen captures, arbitrary file uploads and downloads, password phishing, and so on.
The industry has seen a big jump in Mac malware in 2017, the majority of which is spyware. In addition to malicious spyware, there's also so-called "legitimate" spyware for Macs. This software is actually sold by a real company, from a real website, usually with the stated goal of monitoring children or employees. Of course, such software is a two-edged sword, as it’s very often misused, providing the average user with a way of accessing spyware capabilities without needing any special knowledge.
Mobile spyware.
Mobile spyware hides undetected in the background (creating no shortcut icon) on a mobile device and steals information such as incoming/outgoing SMS messages, incoming/outgoing call logs, contact lists, emails, browser history, and photos. Mobile spyware can also potentially log your keystrokes, record anything within the distance of your device’s microphone, secretly take pictures in the background, and track your device’s location using GPS. In some cases, spyware apps can even control devices via commands sent by SMS messages and/or remote servers. The spyware can send your stolen information via data transfer to a remote server or through email.
Also, it's not just consumers that mobile spyware criminals target. If you use your smartphone or tablet in the workplace, hackers can turn their attack to your employer organization through vulnerabilities in mobile devices. Moreover, your corporation’s incident response team may not detect breaches that originate through a mobile device.
Spyware breaches on smartphones commonly occur in three ways:
Who do spyware authors target?
Unlike some other types of malware, spyware authors do not really target specific groups or people. Instead, most spyware attacks cast a wide net to collect as many potential victims as possible. And that makes everyone a spyware target, as even the slightest bit of information might find a buyer. For instance, spammers will buy email addresses and passwords in order to support malicious spam or other forms of impersonation. Spyware attacks on financial information can drain bank accounts or can support other forms of fraud using legitimate bank accounts.
Information obtained through stolen documents, pictures, video, or other digital items can even be used for extortion purposes, so, at the end of the day, no one is immune from spyware attacks, and attackers usually care little about whom they are infecting, as opposed to what they are after.
What do I do if I get infected?
If your spyware infection is working as designed, it will be invisible unless you’re technically savvy enough to know exactly where to look. You could be infected and never know. But if you suspect spyware, the first order of business is to make sure your system has been cleaned of any infection so that new passwords are not compromised. Get yourself a robust cybersecurity program with a reputation for aggressive spyware removal technology. Aggressive spyware removal thoroughly cleans up spyware artifacts and repairs altered files/settings.
How do I protect myself from spyware?
The best defence against spyware, as with most malware, starts with your behaviour. Follow these basics of good cyber self-defence:
But as people have got smarter about cyber self-defence, hackers have turned to more sophisticated spyware delivery methods, so installing a reputable cybersecurity program is necessary to counter advanced spyware.
Look for cybersecurity that includes real-time protection. Real-time protection automatically blocks spyware and other threats before they can activate on your computer. Some traditional cybersecurity or antivirus products rely heavily on signature-based technology—these products can be easily circumvented, especially by new threats.
You should also look out for features that block the delivery of spyware itself on your machine, such as anti-exploit technology and malicious website protection, which blocks websites that host spyware. The premium version of Malwarebytes has a solid reputation for spyware protection but there are othes. Digital life comes with ubiquitous dangers in the daily online landscape. Fortunately, there are straightforward and effective ways to protect yourself. Between a cybersecurity suite and common sense precautions, you should be able to keep every machine you use free from spyware invasions and their malicious intent.
|
||
|
RETIREMENT BONUS
The Army found they had too many officers and decided to offer an early retirement bonus. They promised any officer who volunteered for Retirement a bonus of $1,000 for every inch measured in a straight line between any two points in his body. The officer got to choose what those two points would be. The first officer who accepted asked that he be measured from the top of his head to the tip of his toes. He was measured at six feet and walked out with a bonus of $72,000.
The second officer who accepted was a little smarter and asked to be measured from the tip of his outstretched hands to his toes. He walked out with $96,000. The third one was a non-commissioned officer, a grizzly old Warrant officer who, when asked where he would like to be measured replied, 'From the tip of my weenie to my testicles.'
It was suggested by the pension man that he might want to reconsider, explaining about the nice big cheques the previous two Officers had received. But the old W.O. insisted and they decided to go along with him providing the measurement was taken by a Medical Officer.
The Medical Officer arrived and instructed the W.O. to 'drop 'em,' which he did. The medical officer placed the tape measure on the tip of the W.O.’s weenie and began to work back. "Dear Lord!", he suddenly exclaimed, ''Where are your testicles?'' The old W.O. calmly replied, ''Vietnam''.
|
||
|
Format your Microsoft Word documents with Templates.
Do you sometimes struggle to format your Word documents a certain way? Maybe you’re trying to create a resume or a report or a brochure but are having trouble with the design. Well, here comes Word to your rescue. The software offers one key feature that can help you in your goal, namely templates. Templates give your documents a certain look and layout right from the start. By using a preformatted template, all you need do is add your text. Let’s check out templates to see how they can enhance your documents.
Although these tips relate to Word 2016, they also apply to the past few versions of Word.
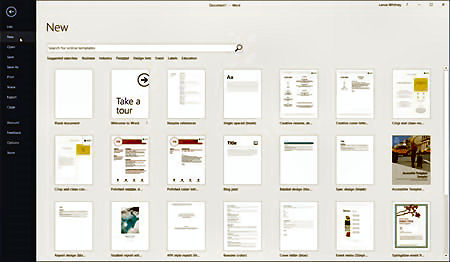
The purpose of a template is to provide you with the necessary layout and design so you can more quickly and easily create a specific type of document. Word comes with several templates, including ones for resumes, cover letters, blog posts, reports, flyers, brochures, and thank-you cards. Each template contains certain design and layout elements already created. You can leave the existing elements in place or tweak them to your own preferences. You then just add your text and other content to the document. You can access templates one of two ways depending on how Word is configured. If Word is set to show the Start screen when it launches, the page of template thumbnail images automatically appears. If you set Word to bypass the Start screen, (If you want, we’ll show you how to do this later) then click on the File menu and select New to view the list of templates.
You’ll find a few basic templates to get you started. But what if you don’t see the template you need? You can conjure up more from Microsoft’s online collection. Click on one of the categories at the top, such as Business, Industry, Personal, or Education.
You can also hunt for a specific template by typing a key word or phrase in the field to “Search for online templates.” In return, the list refreshes based on your selection or search phrase. When you find a template you like, click on it to preview it and then click on the Create button to open it.
A typical template may contain tables or columns to organize your text, images to flavour your document and placeholders for inserting your text. You can change the built-in layout elements but the trick is to find a template that requires little or no modification so all you have to do is add your text. If you need to edit any existing elements, though, you can do that as you normally would in Word. We’ll explain how to do that, but for now let’s assume you want to keep all the design and layout elements just as they are.
If you’re fine with the layout of the template, your job now is to add the text. Click or double-click on each piece of placeholder text and type the replacement text. As you type, the placeholder text should disappear. After you’ve added your text, save the document, and you’re done.
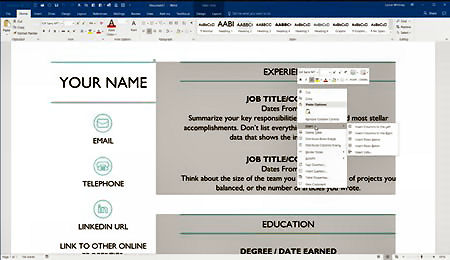
Okay, now let’s say you want to change some of the design and layout elements in a template. In some cases, the task is relatively simple. For example, to replace an image, right-click on it and choose the command to Change image from the popup menu. To alter the properties of a table, right-click anywhere in the table and choose the appropriate table command from the menu.
However, you may bump into trouble trying to edit the placeholder text fields as they’re likely constrained by content controls, which restrict what you can do with the content. How can you tell if a placeholder field has a content control? Right-click on the placeholder. If you see a command to “Remove Content Control” in the popup menu, then that’s the tipoff.
The process for changing the text or other properties in such controls are involved, but here are the steps. You first need to enable the Developer toolbar. To do this, click on File, then click on Options, and then click on Customize Ribbon. From the “Customize the Ribbon and keyboard shortcuts” window, click on the checkmark for Developer in the right sub window. Then click OK to close the Customize Ribbon window. You’ll now see a new tab for Developer. Click on that tab to display the Developer ribbon. Then click on the Design Mode icon on the Developer ribbon. Your document switches to design mode so you can now change any of the placeholder items that have content controls.
You can also modify the properties for a content control. To do this, click on a placeholder item and then click on Properties from the Developer ribbon. From the Properties window, you can change the title, tag, colour, and other attributes for the item you selected. When done, click on the Design Mode button to switch back to normal view. Add your text and save your document.
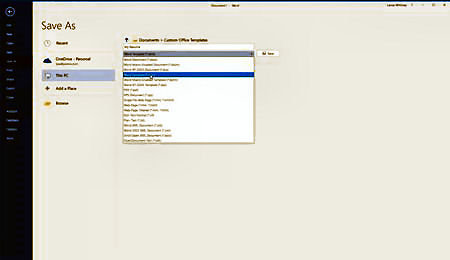
There’s more you can do with templates. You can modify an existing template and then save it as a new template. To do this, open an existing template and alter the design elements, such as the images, tables, and placeholder text. Now when you want to save it, click on the File menu and then click on Save as. Name your template. In the Save field, change the format from Word document to Word template. Then click the Save button. By default, Word saves your template in your Documents folder in a subfolder called Custom Office Templates.
Another option is to create a template from scratch using tables, images, placeholder text, and other design elements. But you may find it easier to modify an existing template. Either way, if you want to use your new template to create a document, make sure you’re at the Startup page showing the built-in templates. Then click on the link for PERSONAL. Word then displays any templates stored in your Custom Office Templates folder.
Finally, you can share your customized templates with other people so they can use them to create their own documents. One way to do that is to save your template on OneDrive. From there, you can share the template with others by emailing them a link or generating a link that you can send to anyone.
|
||
|
I need to re-home a dog. It’s a small terrier and tends to bark a lot. If you’re interested, let me know and I’ll jump over the neighbour’s fence and get it for you.
|
||
|
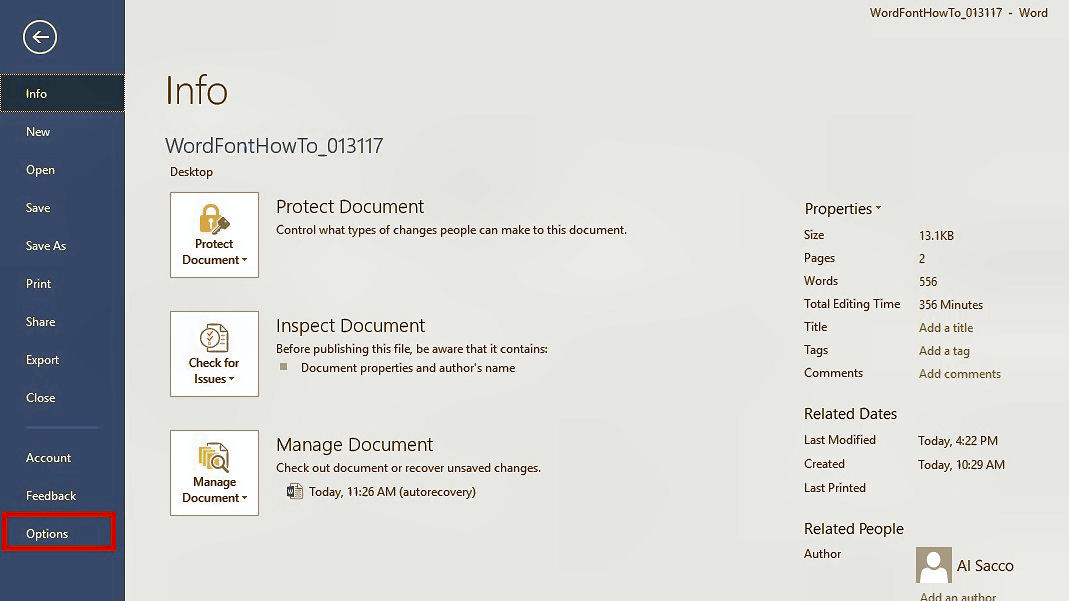
How to by-pass the Start screen in Word.
Microsoft Word 2016 for Windows automatically shows an annoying Start screen every time you open it, to provide quick access to a variety of document types. However, the majority of Word users use the same type of document 99 percent of the time, most likely the trusty "blank document." If you fit this bill and want to disable Word's default Start screen, a simple fix exists.
Click OK to save your changes.
That's it. If ever you want to re-enable the Word Start screen, just follow this process again and recheck the Start screen box.
|
||
|
I saw this girl today at the Coffee Club, she had no phone, no tablet, no laptop. She just sat there drinking coffee. Like a psychopath!
|
||
|
Tips for using Word.
If you use Microsoft Word as your core application for creating and editing documents, you may find that performing certain tasks takes too long or is too awkward. Fortunately, there are steps you can take to enhance Word to make it faster, more powerful, and more efficient. Let’s look at several ways of refining your daily experience in Microsoft Word 2016.
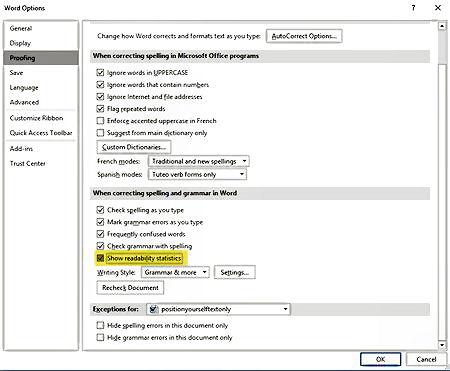
Tweak the Readability Setting in Word
This is a good feature to use when working with technical documents, to check them for how well they read. The Readability function is a step above the normal checking you get with Word.
To enable it, go to File: Options: Proofing and under the heading When correcting spelling and grammar in Word, enable the checkbox beside Show Readability Statistics and click on OK. Next, go to the Reviews tab and click on the Spelling and Grammar icon on the left. Potential errors in your document will show up in a pane on the right side of your document.
Browse the Web Within Word.
You can conduct searches and look up information without having to switch applications. To do so, click the References tab then click on Researcher. This opens a pane on the right side of your document and you can do searches for relevant topics. When you do a search, it will open a list of topics, click on one and it will fill the entire screen.
Customize the Ribbon
Some people may hate the Ribbon, but I find it a handy way to access frequently used features, especially since you can add your own commands to it. The ribbon is the “blue bit” across the top of the page and contains tabs such as Home, Insert, Design, Layout etc.
To tweak the Ribbon, right-click on the Quick Access Tool-bar (this is above
the ribbon and contains small icons) until you see its popup menu. From the
menu, click on the command to Customize the Ribbon. On the right side of the
Word Options window are all the Ribbon tabs; on the left side are all
available commands in Word. Click on the tab that you wish to customize and
then click on the area where you wish to place your new Ribbon tab. Click on
the New Group button at the bottom of the right pane. Click Rename to name
the group and choose an icon if you wish. Then from the left
Customize the Quick Access Toolbar
The Quick Access Toolbar rests at the top of your Word screen, just above the Ribbon. You can access existing commands from the toolbar and add new ones. As one example, I’ve added Table which will allow me to add a table anywhere in a Word doc. To add to it, right-click on the Quick Access Toolbar, from the popup menu, click on the command to Customize Quick Access Toolbar. The Word Options window appears and points to the Quick Access Toolbar. By default, the left pane displays popular commands that you can add to the toolbar, but you can change that view. Click on the field that says: Popular Commands. You can change the view to Commands not in the Ribbon, All Commands, Macros, and more.
Use Styles and Themes.
Styles and themes are two great ways to quickly format text and other content in Word. You can use Word’s built-in styles or create and apply your own. You can use styles on a single word or a whole paragraph. If you want to format an entire document, then themes are the way to go as they can alter all parts of your document. Click on the Home tab and by default some of the built-in paragraph styles appear on the toolbar via a Style Gallery. Hover your mouse over one of the Style icons, and you’ll see a preview of how the style would change your current paragraph.
|
||
|
|
||
|
Right-click on any of the styles on the gallery, and a menu pops up with commands to update the style based on your current selection, modify the style, rename it, or remove it from the gallery. To create a new style, format a word or paragraph with specific attributes, such as bold, underline, or full justification. Select the word or paragraph. Click on the small arrow icon in the bottom right corner of the Style Gallery. From the Styles menu, click on the first icon at the bottom for New Style. At the Create New Style from Formatting window, name your style and change any of the other settings if you wish. Click OK, and your new style is created.
To apply a theme, click on the Design menu. Click on a theme from the Theme Gallery or click on the down arrow under the Themes button and click on a theme from the list. That theme is then applied to your entire document.
To create a new theme, format your document a certain way. Click on the Theme button and then click on “Save Current Theme”. Name your theme and then click Save.
Tell Me What You Want To Do.
Here’s a cool feature that many Word users may not know exists. If you want to run a certain command or task but have forgotten where or how to access it Word can help you. At the end of the Menu tabs is a field that says: “Tell me what you want to do”. Type the task you want to perform in that field. Word conjures up a list of commands that match what you’re trying to do. You can choose the matching command, which hopefully will help you run the task. You can also get help on how to perform the task or run a Smart Lookup, which delivers more details on how to run that task.
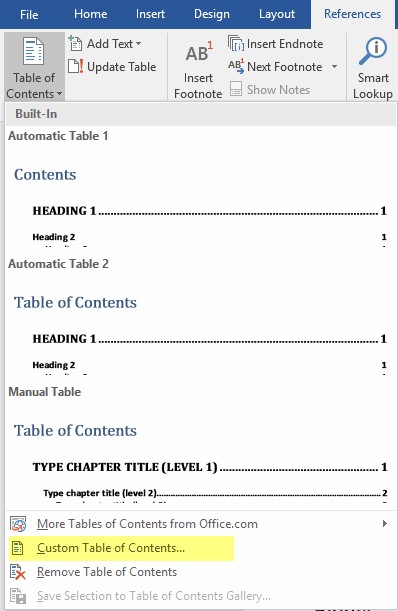
Create a Table of Contents.
While not a new feature, this is something that can save you a lot of time. MS Word allows you to create a table of contents using several pre-defined options, but those can create problems. A better way is to customize a table of contents: Go to References, then click on the Table of Contents tab at the far left. At the bottom of the drop-down menu, click on Custom Table of Contents.
In the Table of Contents dialog box, you can choose to show the page numbers, right-align them, choose the format, and the number of levels. This controls how many table of contents headers will be displayed. This depends on how many headers you have used throughout your document.
In the case of the Table of Contents at right, only two levels were used. The process took only minutes.
|
||
|
|
||
|
O’Leary, your glass is empty, will you be having another one?” And what would I be doing with two empty glasses?” O’Leary replied.
|
||
|
Top Add-Ins for Microsoft Word
Microsoft Word packs a lot of features and functionality into one single application. But there’s always room for more. Perhaps you wish Word included a built-in dictation feature that converted your speech into text. Or maybe you’d like a Word feature that reads your documents aloud to you. Or perhaps you’d like a built-in translator that can translate your text from one language to another. Well, Word may not include these items, but you can tap into them by installing an add-in. Add-ins provide greater functionality and flexibility to an Office application, so you can do so much more with the program.
You’ll find an array of Word add-ins through Microsoft’s online Office Store, but here are some of the top and most interesting add-ins to give you a head start.
Windows 10, 8.1, and 7 already come with built-in speech recognition and dictation. But now there’s a new kid on the block. A Microsoft Garage project, Dictate is a free add-in designed for Word, PowerPoint, and Outlook. Tapping into the technology behind Cortana, Dictate uses speech recognition to convert your words into text. After installing this add-in, launch Word and you’ll see a new menu called Dictation. Click on that menu to display the Dictation toolbar.
Click on the Start button in the Dictate toolbar and begin speaking. As you dictate, you can see the text as interpreted by the Dictate add-in appear in the Response field next to the Start button. You can speak punctuation marks and other non-alphanumeric items, such as periods, commas, and quotes. You can say “new line” or “new paragraph” to move to a new line or paragraph.
The add-in supports 29 spoken languages and can handle real-time translation to 30 languages, so you can speak your text in one language and have it converted into the text of a different language. Initially you’ll find that Dictate will get a few words wrong but the more you use it and it gets used to your voice, you’ll find it is pretty good.
Windows 8.1 and 10 have their own Speech Recognition feature which you access from the search panel. Just type Speech Recognition – it does work but Dictate is better.
This App is very handy wnen you want to proofread or edit your documents. TextAloud reads your text aloud to you, so you can listen for any mistakes and hear how your documents sound. After you install TextAloud, open Word and click on the new TextAloud menu. From the TextAloud toolbar, you can opt to hear your entire document, the part starting from the cursor, or only selected text. You can pause, stop, and resume the speaking of your document. You can also alter the speed at which the voice speaks.
TextAloud isn’t free. The software by itself costs $29.95. If you want more natural sounding voices, you can add two AT&T Natural Voices for an additional $25. But if you need a reliable tool to help you listen to and verbally proofread your documents, TextAloud is worth the price.
If you want a no-frills but free add-in that can read your documents then download “Read my Document.” Add Read My Document to Word. You have to trust the add-in and follow a few more steps. You then control it from the right pane and can access it by clicking on the Insert menu and selecting My Apps from the Add-ins button. Select the text you wish to hear or select the entire document and then click on the Read selected text button. You can pause or play the reading. The voice used by Read My Documents doesn’t quite have the smoothness of the AT&T Natural Voices but it’s not bad. It has a certain accent to it that makes it pleasing to the ear. You can’t switch voices or control the speech as you can with TextAloud. But for a free program, Read My Document is quite effective.
|
||
|
Young Teresa came home with some dreadful news. “I’m pregnant” she cries. “And how do you know it’s yours?” shouts her father.
|
||
|
Using the power behind Microsoft’s own Translator app, the free Translator add-in can translate text in a document into a different language. After adding Translator, you’re prompted to open Word and trust the program. You can then access it by clicking on the Insert menu and selecting My Apps from the Add-ins button. The program pops up in the right pane. Choose the source and target languages. Select text in your document or select the entire document, and Translator displays the translation in the right pane. You can change the target language, and the displayed text automatically switches to your new language.
Translator is a cool and convenient tool if you need to translate text on the fly.
This helpful and free add-in provides a dictionary, thesaurus, and translator in one package, and can even pronounce words for you. Add Collins Dictionary from its page at the Office Store and then open it in Word. After you trust it, the add-in appears in the right pane. Select a word in your document, and the dictionary serves up a definition. In some cases, you can click on a speaker icon to hear the word spoken aloud.
Click on the link for the Thesaurus, and Collins offers synonyms for the word you selected. Then click on the Translator link, select a source language, and Collins translates the text into your chosen language, courtesy of Microsoft Translator.
Yes, you can always access Wikipedia directly from the Web, but this free add-in provides access to the online encyclopedia within Word. After you add Wikipedia, the usual right pane pops up. Writing about a specific topic, and want to learn more about it? Just type a word or phrase in the search field and click on the search icon, or just select text in your document. The program displays the Wikipedia entry about your subject. Scroll down the pane and you’ll find more information and a link to expand the article to get even more details. Clicking on a link within the article brings you to a new article corresponding to the link, and all within the same pane. If you use Wikipedia as a source of information, you’ll find this a helpful and handy add-in.
|
||
|
Mrs Murphy said: “I don’t tink me husband has been faithful to me”. “Why’s that?” said Mrs O’Toole. “Me last child don’t look anything like him”.
|
||
|
How to Recover a Lost Word Document
Uh, oh. That Word document you spent the past few hours writing has mysteriously vanished. Do you have to start it from scratch? Not necessarily. Your Word documents can sometimes either disappear completely or just lose the latest changes. Those scenarios can occur if a document crashes or freezes or just doesn’t save properly.
So how can you find the document? You have a few options. You can scour the Recycle Bin. Depending on your settings in Word, you may be able to dig up a backup or an AutoRecovered version of your document. If those searches come up empty, you can look for temp files and files with the tilde (~) character. Let’s check out the different ways to recover a lost Word document.
Let’s start by assuming that you’d been working on a document and now can no longer find it, or maybe you’ve opened your document only to discover that none of your recent changes appear. You’ve been saving it regularly or perhaps you neglected to save it at all.
Open File Explorer and look in the default document location and other locations throughout your hard drive for the file. If you use a file backup service, such as OneDrive, search your online storage as well as any synced computers for the file. Don’t forget to look in the OneDrive Recycle bin. If you run Windows 10 or 8.1 and have enabled File History, check the location of your file backups for the missing document. Still coming up empty? Okay, let’s move on.
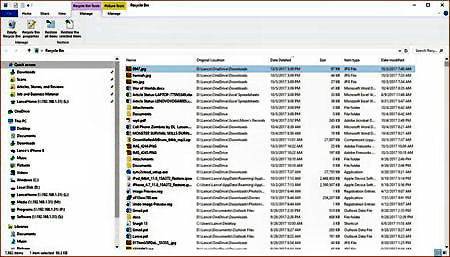
The next spot to look is the Windows Recycle Bin. Open the Bin from your desktop and search for the document. If the Bin opens in icon view, click on the View menu and change the view to Details. You can now sort the list of deleted items by name, location, date deleted, or date modified.
You can also run a search for the document by specifying its filename or at least its extension, e.g., *.doc or *.docx. If you find the file, great. Just right-click on it and click on Restore to bring it back to life. If not, let’s go to the next step.
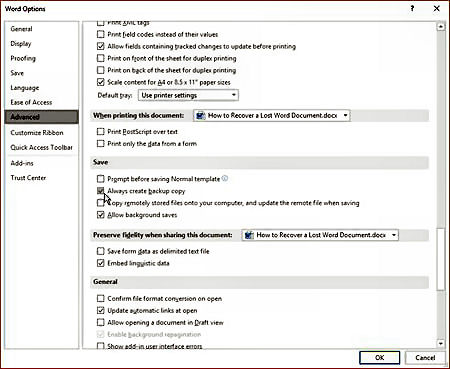
If you configured Word to always save a backup copy of your documents, you may be able to recover the backup file. To check this setting, click on the File menu and select Options. At the Word Options window, click on Advanced. Scroll down to the Save section and make sure the option to Always create backup copy is checked.
If the option is turned off, then check it to avoid trouble in the future. If it is checked, then open File Explorer and navigate to the default file location for your Word documents. Look for files with a .wbk extension by specifying *.wbk in the Search field. If a backup of the file exists, it will pop up with the words Backup of at the beginning of the filename. Open that file, and you should be in business. If not, let’s try the next step.
By default, Word saves backups of your current document into an AutoRecover location. This even includes documents that you neglected to save on your own. To confirm the location, click on the File menu and select Options . At the Word Options window, click on Save. In the Save documents section, you should see an entry for AutoRecover with the interval for saving a document and the location in which the document is saved. Select and copy the path for the AutoRecover file location.
There are two locations that could house a lost or unsaved document. Close the Word Options window. Click on the File menu and (in Word 2016 or 2013) click on the Manage Document button and then select Recover Unsaved Documents. In the Open window look for any files with an ASD extension. Open any of those files with Microsoft Word to see if your lost document appears.
If not, close Word. Open File Explorer and paste the path for the AutoRecover file location in the address field. Search through the different folders in that location for the missing document. Again, look for any documents with an ASD extension and open them with Microsoft Word.
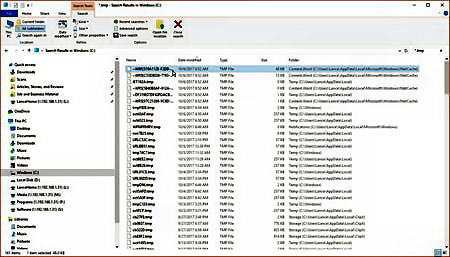
If you’re still coming up empty, you can search for temporary files in the hopes that one of them might be your missing document. This is the way I managed to find the document that had lost all my recent changes. Open File Explorer. Select your primary drive and include the entire drive in the search to cover all locations. Change the view to Details so you can sort the files. In the search field, type *.tmp. After all the file results appear, click on the Date Modified header to sort the files by date, starting with the most recent ones first.
Assuming you started work on the document today, limit yourself to checking just files with today’s date. You can also bypass any files with a 0KB size. Then open each qualifying file with Microsoft Word to see if you recover your lost document. If not, then run another search, this time specifying ~*.* as the search parameter. If you still can’t find the file, you may want to try a file recovery tool, such as Recuva. Such programs can dig deep to hunt down files you may not be able to find otherwise.
Losing an important document that you slaved over for hours can be frustrating. But by following these steps, hopefully you’ll be able to recover such a document the next time it goes missing.
|
||
|
|
||
|
PADDY: “Hey Shaun, what’s Mick’s surname?” SHAUN: “Mick who?”
|
||
|
Twitter Problem.
What’s happened?
As a precaution, Twitter is urging more than 330 million users to change their password after a glitch left log-in details exposed in the company's internal computer system.
When you set a password for your account, Twitter uses technology that masks it, so no one can see your password. The company recently identified a bug that stored unmasked passwords in an internal log. Twitter found this error itself, removed the passwords and is now looking at how it can prevent this from happening again. Twitter has advised it has fixed the bug, and has no reason to believe the passwords left Twitter’s systems or were misused by anyone.
Does it affect me?
If you have a Twitter account, you should you change your password on that account and on all accounts where you’ve used the same password. You can change your Twitter password anytime by going to the password settings page.
How do I stay safe?
There are a few simple steps you can take to help keep your account safe:
More information
Read more about creating strong passwords and two-factor authentication.
|
||
|
|
||
|
|
||
|
|
||
|
|
||
|
|


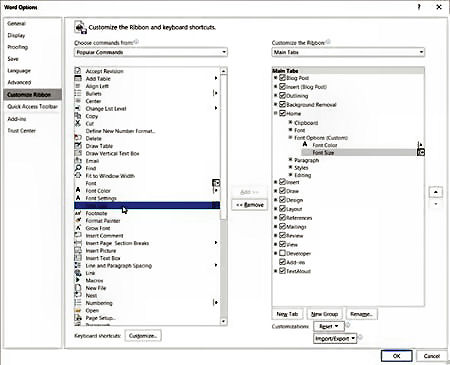 pane, click on a command you want to add to the new tab and click Add. Do
that for each command you wish to add. When you’re done, click OK. Back in
Word, click on the Ribbon that you customized and you’ll see your new tab
group with the commands you added.
pane, click on a command you want to add to the new tab and click Add. Do
that for each command you wish to add. When you’re done, click OK. Back in
Word, click on the Ribbon that you customized and you’ll see your new tab
group with the commands you added.