|
|
||||||
|
||||||
|
Privacy Policy | Editorial Policy | Profit Policy | Join the Association | List of Members | Contact us | Index | Links |
||||||
|
Back Go to page: 1 2 3 4 5 6 7 8 9 10 11 12 13 14 15 16 17 18 19 20 Forward
|
||||||
|
Computers and Stuff.
Sam Houliston.
|
||||||
|
Report scams to the ACCC via www.scamwatch.gov.au or by calling 1300 795 995.
|
||||||
.jpg) |
||||||
|
This edition we welcome Jaycar as a sponsor of Sam's "Computers and Stuff" page. As an introduction, and in line with the release of their 2019 annual catalogue, they are offering the catalogue FREE to members of the Radschool Association. To get your FREE copy, click the pic above, register and a copy of the catalogue will be mailed to you.
As they are prepared to support us, please show your appreciation and support them. There's always a store near you, click HERE to find the closest.
|
||||||
|
Contents:
Batteries - cheap Vs expensive Bose Speakers - are they that good? How to unlock the Windows Product Key. Trojans - what are they and how do you protect yourself. What gives the best sound, record or DVD. Upgrade to Windows 10 for free.
|
||||||
|
Spring clean your desktop computer.
Just like your car, your house and even your body, your desk top computer needs a good cleaning every once in a while to prevent dust build up and overheating. Cleaning a desktop PC is easy to do and only takes about 20 minutes. Laptops are a different matter though, best to leave them to the man.
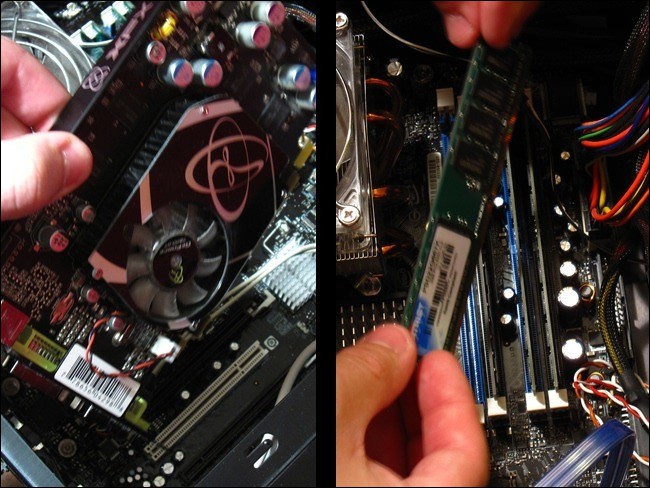
This article shows how to completely clean everything inside of the computer case. You don’t necessarily have to remove the RAM and video card if you don’t want to. Before you touch the RAM card, grab hold of the frame to earth yourself out first, static electricity can do bad things to RAM cards.
How often should I clean my computer?
Cleaning at least once a year is a good idea, but computer placement is an important variable and you might have to do it more often. Keeping your computer on the floor lets dust, hair and carpet particles get inside easier. If you keep your computer above the floor, on your desk for example, particles are less prone to getting inside. If you smoke near your computer, tar, ash, and other gunk can build up in your computer’s fans and on inside surfaces. Ridding your computer of these things every 6 months can increase your computer’s performance.
If you’re the owner of a pet that sheds, you might want to clean your computer more often. The inside of your computer is just as susceptible to fur clogging fans and other areas of your computer. In short, if you keep your computer off the floor, don’t smoke, and don’t have shedding pets, you can probably get away with cleaning your computer once per year. If any of those things do pertain to you, you might want to clean your computer every 6, or even 3, months. And, as always, if your computer starts getting hotter than usual, open it up to check for any dust or hair build-up and then clean it.
Preparation
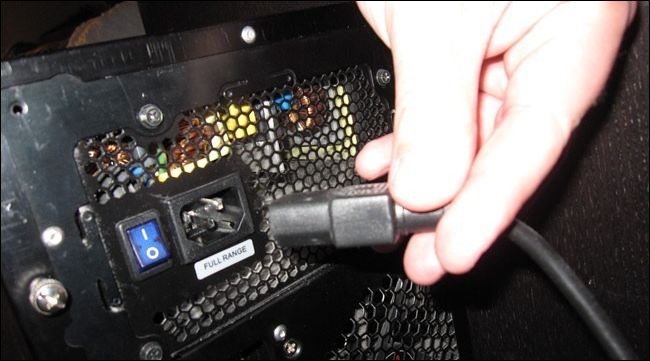
Do not open your computer while it is running or with any cables attached to it. It is always safer to remove all peripherals such as USB cables, audio cables, video cables, and especially the power cable. Next, move your computer to a well-ventilated area such as your backyard or garage. This is especially important to consider if your computer has built up a lot of dust that will be blowing around. Breathing all that old, accumulated dust isn’t good for you and if you’re in an enclosed space, the dust is just going to settle back on your stuff—including back on your computer.
If you’re limited on space just be sure to keep a vacuum (not for cleaning the inside of the computer; more on that soon) nearby for a quick clean up afterwards, and if you’re worried about inhaling dust, you can always stop at your local hardware stop to pick up a cheap dust mask for less than $5.
It’s bad to clean the inside of your computer with a vacuum cleaner because vacuuming creates a large static build up that could (and most likely will) discharge into the sensitive electronics inside your computer case. There are specialized vacuum cleaners designed for cleaning out computers and electronic equipment but given the limited amount of use a single user would get from such a purchase it’s not a very wise one, they start at $300+ and can easily break the $1000 price barrier.
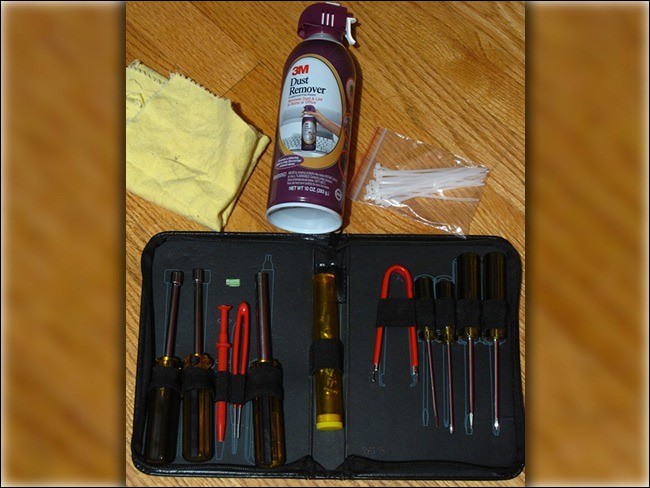
Gather Your Tools
Before you begin opening your computer’s case, you’ll need to gather your cleaning tools. We highly recommend not using a vacuum cleaner, it’s just a bad idea, so spare yourself the agony and pick up a compressed air can. You can get these from Jaycar and they are cheap. That said, a vacuum cleaner can come in handy if you’re dusting out your computer inside. Run the cleaner and hold the hose near, but not touching, your PC. Blow the dust out of the PC in the direction of the vacuum cleaner hose, so the cleaner can suck most of it right up.
There are a few tools you will need to clean your computer:
Open Your Case
Now that you’re in a well-ventilated area with all your tools gathered, we can start the preparation process by opening up your computer’s case. |
||||||
|
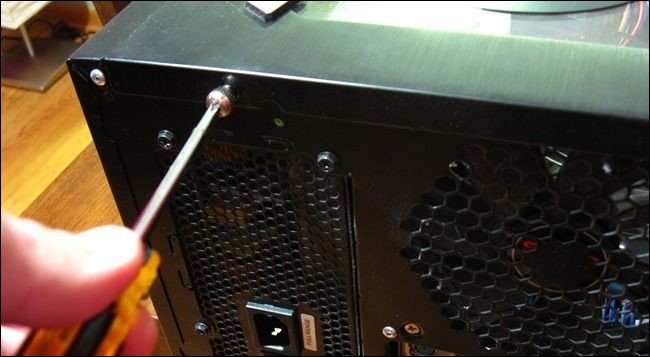
All computer cases are different. If you’ve never opened yours before and are having trouble opening it, consult your computer’s manual or try searching online for guides specifically about your opening your model.
Some cases hinge open but for most cases all it takes is unscrewing one or two screws, and then sliding the side-panel outward. If your side panel has an attached fan, you may have to disconnect a power cables to get the panel completely off.
To make the cleaning process easier, it’s best to take out any components that can be easily removed. Most desktop computers allow you to remove RAM sticks, video cards, and hard drives. You don’t need to do this, but you can clean more thoroughly if you do.
We recommend not removing your CPU because thermal paste that is used to transfer heat from the top of the processor to the fan needs to be replaced every time the fan is removed. If you are equipped with thermal paste and want to remove your CPU, just be sure to clean off the old thermal paste on your CPU with rubbing alcohol and a soft cloth. Then apply a fresh coat of thermal paste once you’re done cleaning your computer.
Most people shouldn’t need to remove their CPU and CPU fan. It just doesn’t make sense considering barely any dust makes its way into the CPU socket. Then again, if you’re cleaning your computer, why not go all the way? The choice is yours.
Some people cause happiness wherever they go, others, whenever they go.
Cleaning
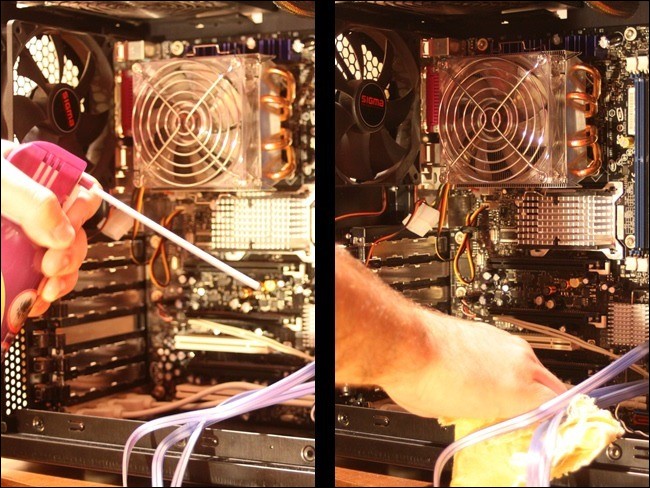
To start the cleaning process, begin with the peripherals we just removed. Grab your can of compressed air and hold the trigger to release a burst of air onto an area with a lot of dust buildup. Canned compressed air is best as it does not contain moisture. If you’re cleaning a video card with a fan, you can use a pen or pencil to prevent the blades from spinning while you blow the compressed air.
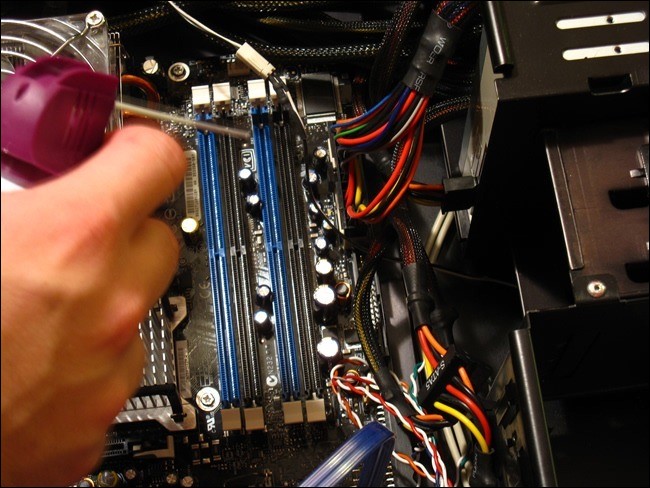
Next, move inside the computer case. Start by removing any dust particles that may have found their way inside the RAM slots. Take your compressed air can, aim it at a RAM slot, hold the trigger, and move it down the entire slot. Repeat this for every slot in your computer case.
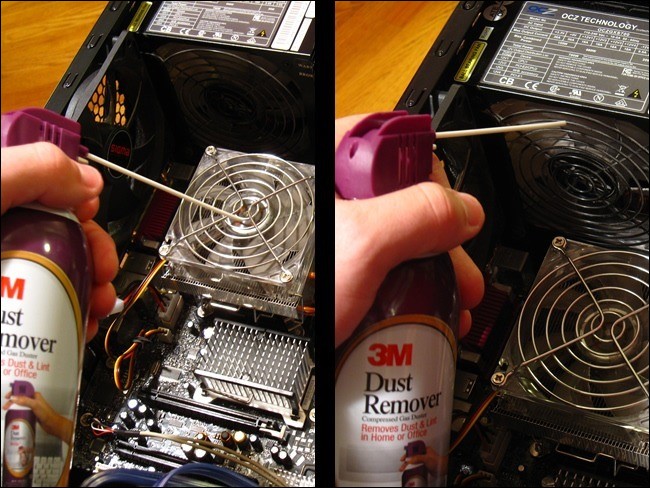
Now we’ll move onto the bigger equipment inside such as your CPU fan and power supply unit. Again, it’s recommended to use a pen or pencil when cleaning fans to prevent the blades from spinning. Use your compressed air can to blow out any loose dust particles.
You can also use a cotton swab to clean the fan by rubbing the swab against the blades to stick the dust particles. It’s a little tedious, but it makes for a nice, clean fan in the end.
The bottom of your case will undoubtedly have dust buildup. You can begin with blowing the dust away with your compressed air. If there is still dust stuck to the case, you can use a damp cloth to wipe it. Make sure your cloth is not wet, but damp.
Finally, don’t forget to also clean out any other fans, ports, or enclosures
If you’ve got a fan that’s particular gunked up, don’t be afraid to use a cotton swab with a bit of isopropyl alcohol to get the blades clean. Give the fans a quick spin to make sure that the blades move freely after cleaning. If they don’t, it’s probably best to go ahead and replace those fans. You can buy these from Jaycar.
|
||||||
|
He is a self-made man and worships his creator.
|
||||||
|
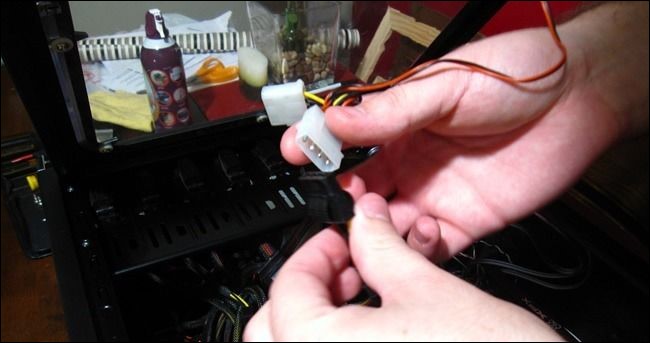
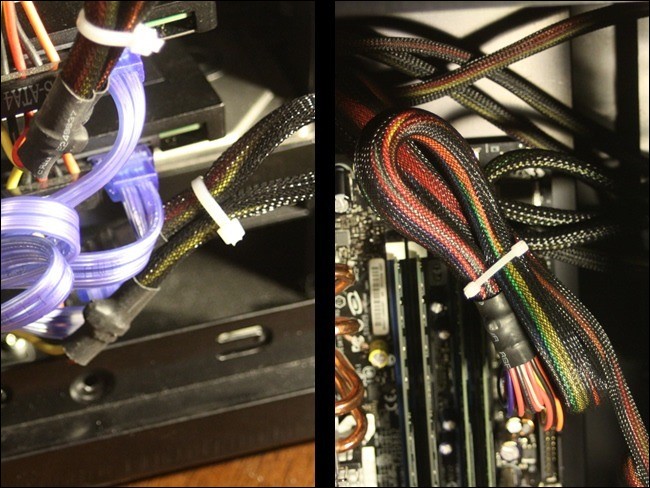
Decluttering Cables (Optional)
This next step is optional and is recommended for custom built computers. Unlike professionally manufactured computers, custom built computers don’t arrive with nicely tucked away cabling that fits just right. The best way to make your case more secure and organized is to use zip ties. You also don’t want your CPU fan or any other fans scraping away at cables if they’re not neatly tucked away.
To start you’ll need a pack of zip ties. It doesn’t matter what size or colour they are, as long as they can fit around all your cables. We’ll be using 4-inch zip ties.
Begin by disconnecting all cables that need to be tied. Be sure to write down how they were connected for reference later and take pictures.
When you have a cable or set of cables grouped to your liking, wrap a zip tie around it and run the thin end through the fastener. Then tighten the zip tie by pulling the thin end until you can no longer tighten it. Grab your scissors and cut off the excess.
Repeat this step for as many cables as possible. You can then tuck them away to reduce their visibility and give your computer’s guts a cleaner look.
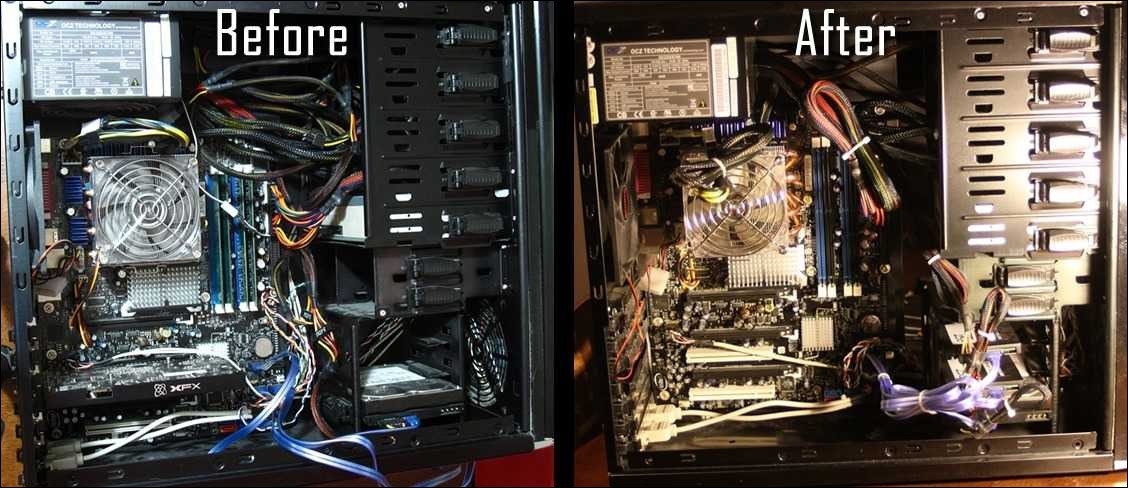
The Aftermath
Plug your cables back into their correct sockets. Refer to your document or pictures from earlier if you don’t remember where each cable goes. Also remember to put back any removed peripherals, such as a video card or sticks of RAM, back into their appropriate sockets.
Your computer, inside and out, should be looking as good as new. Your cables should be neatly managed and out of the way of fans and other sensitive equipment. If you were having heating issues before, you’ll begin to notice that it’s a thing of the past. And don’t forget to clean your computer regularly to keep that performance up!
|
||||||
|
Trouble in marriage often starts when a man gets so busy earning his salt that he forgets his sugar.
|
||||||
|
If you’re still using Windows 7 or 8/8.1, you should consider upgrading to Windows 10. Next year Microsoft will stop mainstream support for its Windows 7 operating system after which there will be no more service packs and without paying Microsoft a service fee, your computer will be susceptible to baddies getting in. You can still get Win 10 for free, and you should. See later.
Some features now available through Win 10, which were made available via an update include:
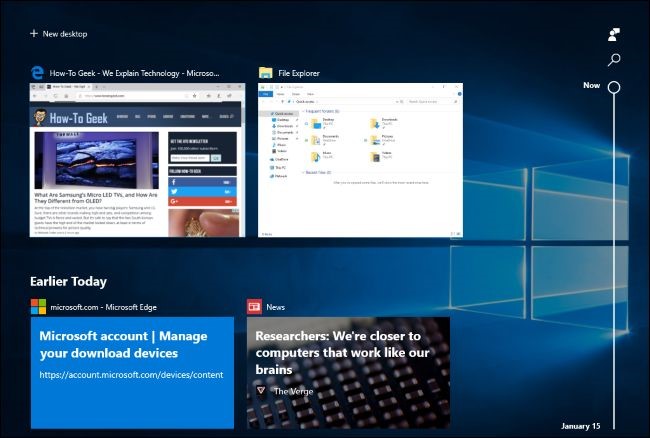
Timeline feature.
The Timeline feature enhances the “Task View” with a history of activities you’ve previously performed on your computer. When you click the “Task View” button (bottom left on your taskbar) or press Windows+Tab, you’ll see activities from “Earlier Today” as well as previous days below your currently open application. This might include web pages you had open in Microsoft Edge, articles you were reading in the News app, documents you were working on in Microsoft Word, and places you were viewing in the Maps app.
The point of this feature is to make it easier to resume “activities” you were previously undertaking. These will even sync across your devices, so you can resume activities on a different PC. Cortana will also pop up and provide you with a list of activities to “Resume from your other devices” when you move between two devices with activities enabled.
You can use the scroll bar or search box to scroll back through activities. They’re categorized by day, and if you view all activities from a specific day they’ll be categorized by hour. You can right-click an activity and find options to clear all activities from that day or hour. There are new options for controlling how this feature works under Settings > Privacy > Activity History.
You can see more info HERE
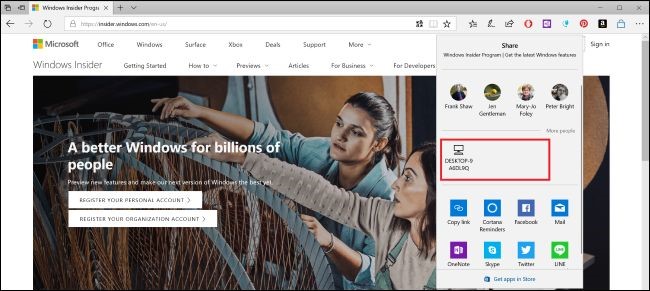
“Nearby Sharing” brings easy Wireless File Sharing
Windows 10 now has a “Nearby Sharing” file sharing feature that works a lot like Apple’s AirDrop. This feature has also been called “Near Share.”
Assuming your PCs have Bluetooth enabled, you can click the “Share” button in any app and nearby devices with Nearby Sharing enabled will appear in the list. Click one of the devices, and you’ll share the content with it wirelessly.
This works in any app with Share functionality. You can use it to share photos in the Photos app, share web page links in Microsoft Edge, or even share files wirelessly in File Explorer. The Diagnostic Data Viewer Shows What Windows Sends to Microsoft
You can see more info HERE
Diagnostic Data Viewer
Microsoft occasionally sends diagnostic data from your computer to itself to help keep Windows 10 secure and up to date. There was a bit of flack when this feature was incorporated and MS is still trying to alleviate the privacy concerns by being more transparent. To that end, there’s a new “Diagnostic Data Viewer” application which shows you, in plain text, the exact diagnostic information your Windows 10 PC is sending to Microsoft. It even shows all the information stored in Microsoft’s cloud about your specific hardware device.
If you’re worried about your privacy you can enable this feature and see exactly what information is being sent to Microsoft. If you’re like a lot of people with nothing to hide – you don’t care one bit and won’t worry.
If you’re worried, you can enable this feature by heading to Settings > Privacy > Diagnostics & feedback. Toggle the “Diagnostic data viewer” option “On”. The Viewer needs up to 1G of space on your hard drive to collate all that info, so if you’re on the red line with disk space, you should consider doing it. Once you’ve enabled it, you can click a “Diagnostic Data Viewer” button to go to the Microsoft Store and download the free Diagnostic Data Viewer application for your PC, which will allow you to view the information. You can use the search box to find specific data or filter by different types of events.
You also have the option of sending only Basic data to MS or Full data, previously, only system administrators could change this setting, and you now have the option of deleting all the diagnostic data collected from your device. Just click the “Delete” button under Delete diagnostic data on the Settings > Privacy > Diagnostics & feedback screen.
Quick Pairing for Bluetooth Devices
A “quick pair” feature that will make it easier to pair Bluetooth devices with your PC is now available. Just place a Bluetooth device in pairing mode near your PC and you’ll see a notification asking you to pair it, so you won’t even have to open the Settings app and navigate to Bluetooth settings.
Initially, this feature only works with the MS Surface Precision Mouse and device manufacturers will have to add support for it but it’s the Windows version of a feature that’s coming to every modern platform, including Fast Pair on Android and the easy pairing process of Apple’s AirPods or a W1 chip-enabled set of Beats headphones on an iPhone. Along with Bluetooth 5.0, this should make using Bluetooth devices easier to use and more powerful on every platform.
You can see more info HERE
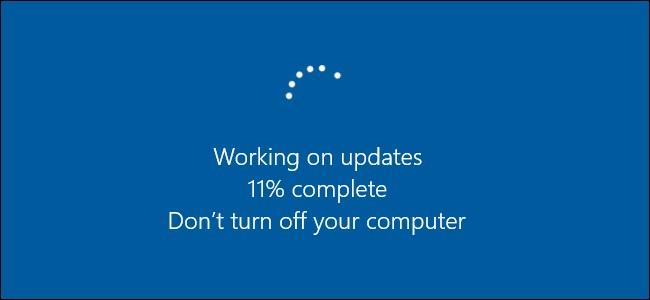
Faster Update Installation
Even if you don’t care about Windows 10’s updates, or especially if you don’t care about Windows 10’s updates, you’ll like this one. This update will speed up the installation of these twice-a-year updates in the future. More of the update process is done in the background while you’re using your PC, which means the time you have to sit and wait for the update to install is decreased. This online update process is run at a low priority, so it shouldn’t slow your PC down while using it.
According to Microsoft’s tests, the “offline” update time, that is, the time you have to wait while staring at an “Updating” screen after rebooting your computer, has decreased by more than 50%
You Can Now Manage Fonts in Settings and Install them from the Store
As part of the process of retiring the old Control Panel and moving everything to the new Settings app, there’s now a Fonts screen at Settings > Personalization > Fonts that will allow you to view, install, and uninstall fonts.
Fonts are also available in the Microsoft Store for easier installation. Click the “Get more fonts in Microsoft Store” link on this screen and you’ll open the Fonts collection in the Microsoft Store, allowing you to download and install fonts in an easier, more convenient way.
Microsoft Edge Improvements
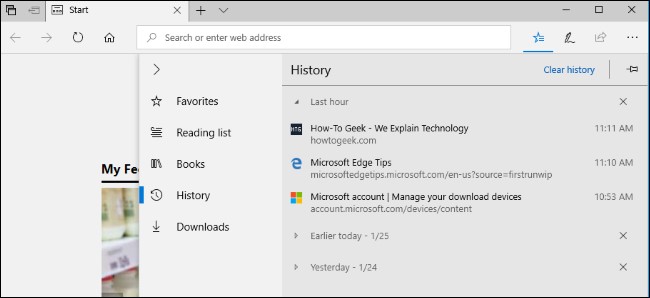
Edge now has a redesigned “hub” (the 3 little dots top right) the popup that shows your bookmarks, history, downloads, and even eBooks from the Microsoft Store. When right-clicking a book in the library view, you can now choose to pin it to your start screen. Edge’s favourites bar now automatically appears on the new tab screen assuming you have at least one favourite. There’s also a redesigned dark theme with darker blacks and more contrast, as well as more acrylic-style fluent design throughout Edge’s interface.
Microsoft’s web browser can now remember information like your name and address and automatically fill in forms on websites, something competing browsers have been doing for years. It can sync this information across your devices an even automatically fill your credit card information on websites, if you like. It doesn’t remember the CVV code, so you still have to enter that at checkout.
You can now right-click a tab and select “Mute Tab” to silence it. When browsing in InPrivate mode, you can choose to allow certain extensions to run and optionally fill in passwords, if you like. You can choose to never save a password for a specific website and Edge will never ask you to save your password on that site again.
The full-screen mode you can access by pressing F11 has been improved. You can now hover your mouse cursor near the top of the screen or swipe down from the top of the screen with a finger to access the navigation bar without first leaving full-screen mode. There’s also a new “Clutter-free printing” option. When printing in Edge, set the Clutter-free printing option to “On” and Edge will print the web page without ads and other unnecessary clutter. This won’t work on every website, however. (If you can’t see this feature on your computer, get it HERE)
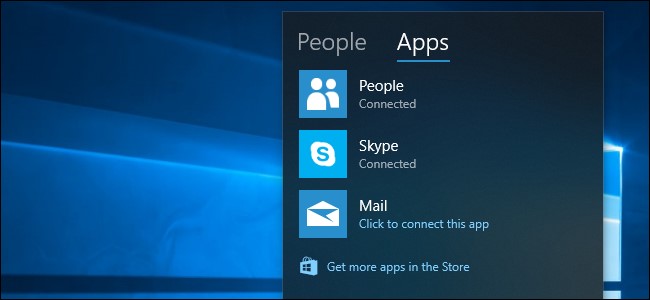
My People Settings
The My People feature that debuted some time ago has had a number of improvements, too. My People now supports drag and drop, so you can drag and drop contacts in the My People popup to reprioritise them or drag and drop the people icons on your taskbar. Previously My People only allowed you to pin three people to your taskbar, but you can now choose how many you want to pin, from a drop down box, from one to ten. Head to Settings > Personalization > Taskbar to find this option. People pinned to the My People popup can now send you animated emoji notifications, too.
Windows will now suggest apps you may be interested in that integrate with My People. You can disable this from Settings > Personalization > Taskbar, if you like.
My People is a handy little feature, you can see more info HERE
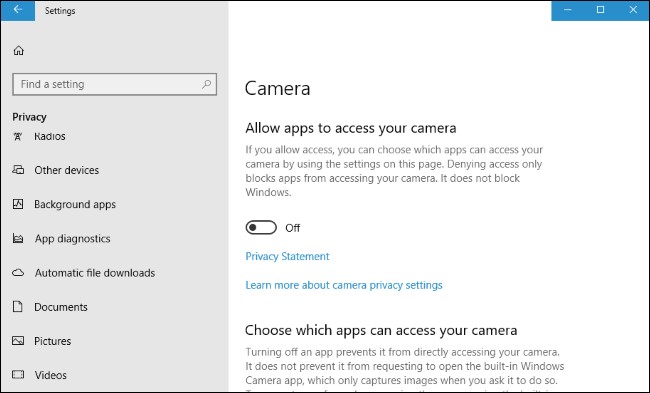
App Permission Options
Ten years ago the idea that people, be they government agents, hackers, or just law-breaking voyeurs, could actively spy on you through your computer’s webcam would be the considered the ramblings of a paranoid conspiracy theorist. A bunch of news stories over the intervening years, however, have revealed that what was once considered paranoia is now an uncomfortable reality.
If you’re worried about this, you can deny access to your web cam very easily by clicking just a few buttons. When you toggle “Let apps use my camera hardware” under Settings > Privacy > Camera to “Off”, legacy desktop apps will not be able to use your webcam. This means Windows now has an easy software option that will disable access to your webcam for all applications. However, because what’s done in software can be overridden by software, you may still want to cover your webcam or unplug it when you’re not using it.
There’s no way to control which legacy desktop apps can access your webcam. If access is on, all desktop apps can view it. If access is off, no desktop apps can view it. But! Windows now allows you to control which UWP (Store) applications have access to your full file system, or your Pictures, Videos, and Documents folders. When an application wants access, it has to ask you for permission. Under Settings > Privacy, you’ll find tabs for controlling access to your File System, Pictures, Videos, and Documents.
|
||||||
|
|
||||||
|
|
||||||
|
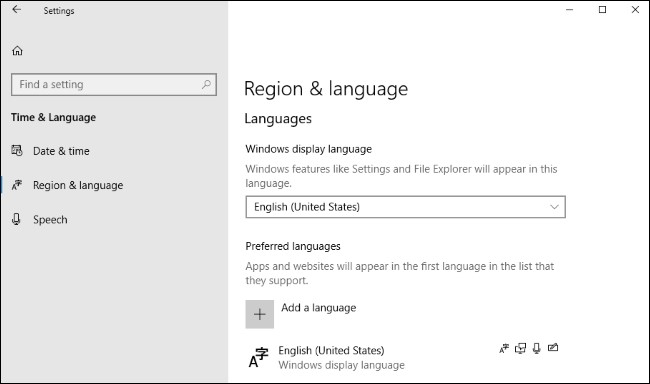
Language Packs in the Windows Store
Language packs are now delivered via the Windows Store and you can install them by heading to the Windows Store or using the Settings > Time & Language > Region and language screen, which has been redesigned.
Microsoft says they’ve started using artificial intelligence and machine learning for their translations, and that having language packs in the Store means they can be updated with improvements more frequently.
Display and DPI Scaling Options
Windows 10 still struggles to get older apps looking good on high DPI displays, but there’s a new “Fix scaling for apps” option under Settings > System > Display > Advanced scaling. When you enable it, Windows will try to automatically adjust apps so they don’t look blurry. Even if you don’t have this setting enabled, Windows will display a “Fix apps that are blurry?” popup if it detects there may be blurry apps on your screen.
You can see more info HERE
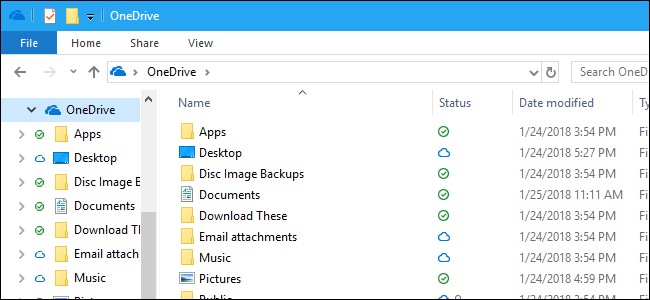
HomeGroup is now Discontinued
We hope you’re no longer using the HomeGroup feature on your home network, as it’s now been disabled. Microsoft encourages you to use modern solutions like OneDrive file sharing, or the Windows 10 Share functionality for folders and printers.
|
||||||
|
New Settings and Other Changes
Microsoft always makes a number of small changes, adding little features throughout Windows 10 and redesigning bits of the interface. Here are a few of them:
|
||||||
|
|
||||||
|
|
||||||
|
All the Ways you can still Upgrade to Windows 10 for Free.
Windows 10’s free upgrade offer is over, according to Microsoft, but this isn’t completely true. There are a bunch of ways you can still upgrade to Windows 10 for free and get a legitimate license, or just install Windows 10 and use it for free.
· you can install Windows 10 with a 7 or 8 key, or · install Windows without a key, it will work just fine, except for a small watermark reminding you to purchase a license.
Here’s how each of those methods work.
Provide a Windows 7, 8, or 8.1 Key
While you can no longer use the “Get Windows 10” tool to upgrade from within Windows 7, 8, or 8.1, it is still possible to download Windows 10 installation media from HERE and then provide a Windows 7, 8, or 8.1 key when you install it. (See HERE).
If you haven’t got the case in which Win 7 or 8/8.1 came and you don’t have the key see later how to unlock it from your current version.
Windows will contact Microsoft’s activation servers and confirm the key to the previous version of Windows is real. If it is, Windows 10 will be installed and activated on your PC. Your PC acquires a “digital license” and you can continue using and reinstalling Windows 10 on it in the future. If you head to Settings > Update & security > Activation after installing Windows in this way, you’ll see the words “Windows is activated with a digital license”.
Microsoft hasn’t communicated what’s going on here, or whether it will block this method in the future. But it still works right now. Even if Microsoft blocks this trick in the future, your PC will keep its digital license and Windows 10 will remain activated.
Reinstall Windows 10 if You’ve Already Upgraded
If you’ve taken advantage of any free upgrade offer–either the original free upgrade offer during the first year, the accessibility offer, or by installing Windows 10 and providing a key for an eligible previous version of Windows – you can continue to “get Windows 10 for free” on the same hardware.
To do this, just download the Windows 10 installation media (from HERE) and install it on that computer. Don’t provide any key during the installation process. It should automatically activate after it contacts Microsoft’s servers.
Sure, you can only do this if you’ve already upgraded to Windows 10, but you can continue to install Windows 10 for free on the same computer in the future–even if you replace its hard drive or other components. The new activation wizard in Windows 10’s Anniversary Update will even help you troubleshoot hardware changes and reassociate the digital license with the correct PC.
Skip the Key and Ignore the Activation Warnings
Here’s the real secret: You don’t need to provide a product key to install Windows 10. (See HERE) You can download Windows 10 installation media from Microsoft and install it on a PC, on Apple’s Boot Camp on a Mac, or in a virtual machine without providing a product key. Windows will continue to work normally and you can do practically whatever you want.
Windows 10 will keep nagging you to activate it and won’t allow you to change any of the options under Settings > Personalization, but otherwise it will work just fine. It’s not something you’d necessarily want to do on your main computer, but it’s a very convenient way to set up a quick virtual machine, test Windows 10 on a PC, or install Windows 10 in Boot Camp. You can even pay to upgrade to a legal, activated version of Windows 10 from within your unactivated Windows 10 system after installing it.
This isn’t technically allowed by Microsoft’s guidelines, but they’ve specifically designed Windows to work this way. If Microsoft doesn’t want people doing this, it’s free to change Windows to block this in the future–and it might. But Windows has worked this way for years. This was even possible with Windows 7.
You can also head to Microsoft’s website and download a 90-day evaluation version of Windows 10 Enterprise - HERE. It will continue working for 90 days–about three months. It’s designed for organizations to evaluate Windows 10 Enterprise.
This evaluation copy comes with the extra features built into Windows 10 Enterprise, (see HERE) so it’s also a convenient way to test these Enterprise features. However, you can upgrade any edition of Windows 10 to the Enterprise edition if you have a key (see HERE).
Unfortunately, other free offers—like the Accessibility offer from Microsoft—are now over. But these methods should cover you pretty well. Of course, you can also just buy a new PC that comes with Windows 10. It’s not really free because the manufacturer has to pay for the Windows license, but, if you’re looking to upgrade from Windows 7, 8, or 8.1, it makes a lot more sense to buy a new computer that comes with Windows 10 for a few hundred bucks rather than spend $120 on a Windows 10 Home license to upgrade an old PC. PC manufacturers get a good deal and pay less than normal Windows users do for those licenses.
What are Nits of Brightness on a TV or Other Display?
The competition between TV and display manufacturers has been heating up rapidly, and everyone is talking about how many “nits” their displays have. But what is a nit? And why should you care?
Nits Are a Unit of Brightness.
No, we’re not talking about head lice here, but rather a piece of terminology used in the tech world. Long story short, a nit is the unit of measurement that describes how bright a television, smartphone, computer monitor, laptop screen, or another type of display is. The higher the number of nits, the brighter the display. Sounds simple, right? But doesn’t “lumens” describe brightness? and why are nits so important to you as a consumer? Let’s answer some of these questions.
What Exactly Is a “Nit” anyway?
Interestingly enough, nit (which comes from the Latin word nitere, meaning “to shine”) isn’t an official unit of measurement since it’s not technically a part of the International System of Units or any other measurement system. The official term is actually “candela per square metre.” But we guess “nit” is easier to remember.
So let’s break it down. Since you now know that “nit” is just slang for “candela per square metre,” then you also now know that a nit is measuring two things:
As you might have guessed, “candela” is Latin for “candle.” So one candela is equal to the brightness of a single average candle. Two candelas is equal to the brightness of two candles, and so on. When you add in square metres, you now measure the luminous intensity spread out over a surface. So, one candela per square metre (or one nit) is the brightness of one candle shining onto a surface that measures one metre across and one metre down.
Putting that into simpler terms, imagine that you’re holding a piece of board that measures one metre by one metre, you then light a single candle and hold it up in front of your piece of board. The amount of light that hits your poster board from the candle is equal to one nit (or one candela per square metre).
If measuring brightness in terms of candles seems a bit strange, remember that we still use the word “horsepower” when talking about engines.
What’s the difference between Nits and Lumens?
You might be thinking that we already have a unit of measurement for measuring light intensity—the lumen. After all, it’s what we use to measure the light intensity of light bulbs, flashlights, projectors, and more. But nits and lumens measure different things. One big difference is that lumens don’t indicate light over a specific area like nits do. Rather, lumens indicate the intensity of light coming from the source, however big or small it. Light bulbs, flashlights, and projectors are all measured in lumens.
Another way of putting it is that lumens indicate the amount of light that a projector itself emits, whereas nits measures the amount of light coming off the projector screen.
Why should you care about Nits?
So now that you know all of the technical mumbo jumbo about nits, you might be asking yourself the most important question: Why should you even care? The gist is that the higher number of nits a TV has, the brighter the display is. This may not be a huge factor for you when shopping for a new television, but for what it’s worth, the brighter a TV can get, the better the image will look in a bright room.
Nits are even more important when it comes to smartphones, which you’re more likely to use outdoors in the bright sunlight. A screen with a lot of nits will look bright and clear even on the sunniest of days.
|
||||||
|
What is the “God Mode” Folder in Windows 10, and how do I enable it?
What if Windows let you quickly access administrative tools, backup and restore options and other important management settings from a single window? If that sounds good, look no further than the so-called “God Mode.”
No, God Mode doesn’t unlock any extra secret features in Windows or let you do any tweaking that you can’t do in the regular Windows interface. Instead, it’s simply a special folder you can enable that exposes most of Windows’ admin, management, settings, and Control Panel tools in a single, easy-to-scroll-through interface.
And yes, you can also find a lot of this stuff by searching the Start menu, but to do that, you kind of need to know what you’re looking for begin with. The God Mode folder offers an easier way to browse through 206 of these tools and get to know them.
Here are the categories of tools you’ll find in God Mode:
|
||||||
|
||||||
|
Enabling God Mode in Windows 10
To make this work, you must be using an account with administrative privileges. You change your user account to give yourself Administrator Privileges as below:
You will need to log out then log back in again.
Go to your desktop and create a new folder by right-clicking any open area, pointing to “New” on the context menu, and then clicking the “Folder” command. The new folder icon will appear, rename the folder to the following:
GodMode.{ED7BA470-8E54-465E-825C-99712043E01C}
The characters that follow (including the period) must remain exactly as listed above. Best to copy and paste it. Once you’ve properly renamed the folder, you’ll notice the folder icon will change to a control panel icon.
Double-click the icon to open the newly-created God Mode. The major categories are organized alphabetically and so are the more than 200 settings you’ll find within those categories.
The God Mode folder offers a handy introduction to all the tools available and a great way to search for things when you’re not quite sure what they’re named.
|
||||||
|
|
||||||
|
|
||||||
|
What gives the best sound, the old analogue vinyl record or the new digital format.
A lot of people will tell you that the answer lies in the difference between analog and digital recordings. A vinyl record is an analog recording, and CDs and DVDs are digital recordings. A digital recording takes snapshots of the analog signal at a certain rate (for CDs it is 44,100 times per second) and measures each snapshot with a certain accuracy (for CDs it is 16-bit, which means the value must be one of 65,536 possible values).
This means that, by definition, a digital recording is not capturing the complete sound wave, it is approximating it with a series of steps. Some sounds that have very quick transitions, such as a drum beat or a trumpet's tone, will be distorted because they change too quickly for the sample rate.
In your home stereo the CD or DVD player takes this digital recording and converts it to an analogue signal, which is fed to your amplifier. The amplifier then raises the voltage of the signal to a level powerful enough to drive your speaker. A vinyl record has a groove carved into it that mirrors the original sound's waveform. This means that no information is lost. The output of a record player is analogue. It can be fed directly to your amplifier with no conversion.
This means that the waveforms from a vinyl recording can be much more accurate and that can be heard in the richness of the sound. But there is a downside, any specks of dust or damage to the disc can be heard as noise or static. During quiet spots in songs this noise may be heard over the music. Digital recordings don't degrade over time, and if the digital recording contains silence, then there will be no noise.
But – see HERE
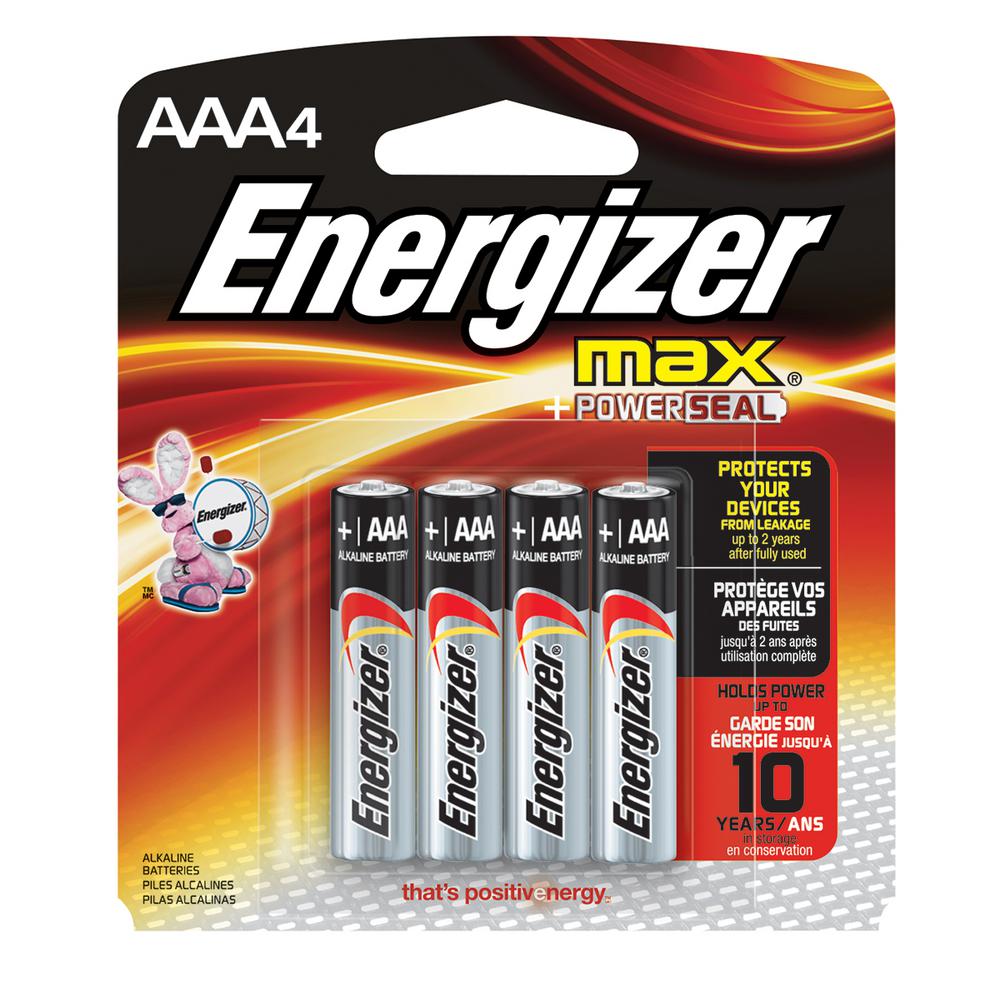
Batteries – Cheap V’s Expensive.
Batteries can range in price from a ton of money to cheap as chips – but how do the cheapies which you can get from Coles or Woollies or Bunnings etc compare to the brand name batteries that are also sold from most supermarkets. You would expect the more expensive battery would outlast the cheaper one, but when you introduce price against longability, how do they measure up. Do two cheap batteries last longer and are cheaper than the one dear one. How do they stack up in cost per hour.
Very interesting – see HERE
Beware of Greeks bearing gifts
In Virgil’s epic poem, The Aeneid, a clever Greek war strategist named Odysseus devises a plan to get his men inside the walled city of Troy. Instead of destroying or climbing the city’s walls, Odysseus sees another way in, with deception. Trojan soldiers watch as the Greeks appear to sail away, leaving behind a giant wooden horse as a token of surrender. Drunk on victory, the Trojans bring the horse inside their walls, only to discover Odysseus and his men were hidden inside the whole time.
People sometimes think of a Trojan as a virus or a worm, but it is really neither. A virus is a file infector which can self-replicate and spread by attaching itself to another program. Worms are a type of malware similar to viruses, but they don’t need to be attached to another program in order to spread. Most viruses are now seen as legacy threats. Worms have also become rare, though they do pop up from time to time.
Like its namesake, Trojan horse attacks, or simply “Trojans” use deception and social engineering to trick unsuspecting users into running seemingly benign computer programs that hide malicious ulterior motives. Think of Trojans as an umbrella term for malware delivery, because there are various kinds of Trojans. Depending on the criminal programmer’s intent, a Trojan can be like a Swiss Army knife of hacking, acting as a bit of standalone malware, or as a tool for other activities, such as delivering future payloads, communicating with the hacker at a later time, or opening up the system to attacks just as the Greek soldiers did from inside the Trojan fortress.
Put another way, a Trojan is a delivery strategy that hackers use to deliver any number of threats, from ransomware that immediately demands money, to spyware that conceals itself while it steals valuable information like personal and financial data.
Keep in mind that adware or PUPs (potentially unwanted programs) can be confused with Trojans because the delivery method is similar. For example, sometimes adware sneaks onto your computer as part of a bundle of software. You think you’re downloading one piece of software, but it’s really two or three. The program authors usually include the adware for marketing affiliate reasons so they can monetize their installer with offers, usually clearly labelled. Such adware bundlers are typically less malicious than Trojans, also, they do not conceal themselves as Trojans do. But since the adware distribution vector resembles that of a Trojan, it can cause confusion.
Trojan infection methods
Trojans can look like just about anything, from free software and music, to browser advertisements to seemingly legitimate apps. Any number of unwise user behaviours can lead to a Trojan infection. Here are a few examples:
How do I prevent Trojans?
Since Trojans rely on fooling users into letting them into the computer, most infections are avoidable by remaining vigilant and observing good security habits. Practice a healthy scepticism about websites offering free movies or gambling, opting instead to download free programs directly from the producer’s site rather than from unauthorized mirror servers.
Another precaution to consider, change the default Windows settings so that the real extensions of applications are always visible. This avoids getting tricked by an innocent looking icon.
Other good practices besides installing Malwarebytes for Windows, Malwarebytes for Android, and Malwarebytes for Mac include:
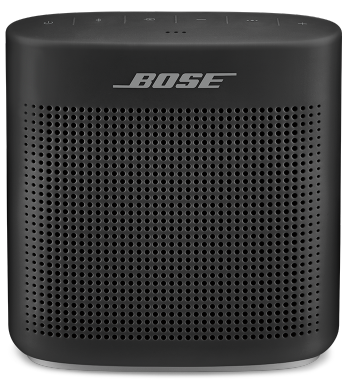
The average person thinks (knows?) that Bose is the be all, end all of speakers. But, are they?
See HERE,
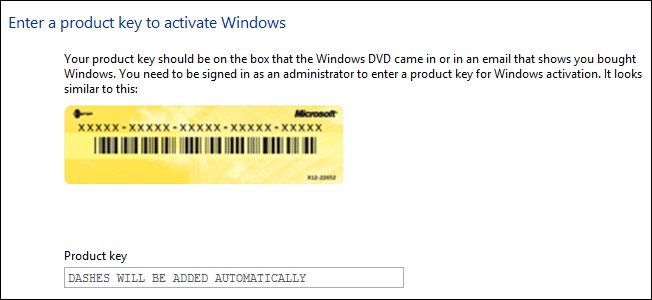
How to unlock the Windows Key.
Normally, this product key is on a sticker on your computer or located with the manual or on the disc sleeve or on the download advice that came with Windows 7 or 8/8.1. However, if you don't have a physical copy of your product key, that doesn't mean it's gone forever.
Fortunately, a copy of your Windows 7, 8/8.1 key is stored in the registry. It's encrypted, meaning it's not easily readable, but there are several free programs that can help fix that problem very easily.
The manual techniques used to locate the product key for older versions of Windows won't work in Windows 7 or 8/8.1. Those manual procedures will only locate the product ID number for those versions of Windows, not the actual product key used for installation, so if you've done this kind of thing before in Windows XP or Vista, you'll need to instead use the process outlined below.
There are many free little programs that will open the registry and show you your product key, probably the best is Belarc Advisor. This will not only show you your Windows 7 or 8/8.1 product key, it will also locate your MS Office keys as well. You can get it from HERE.
|
||||||
|
|
||||||
|
|
||||||
|
|
||||||
|
|
||||||
|
|
||||||
|
|