|
|
|||||
|
|||||
|
Privacy Policy | Editorial Policy | Profit Policy | Join the Association | List of Members | Contact us | Index | Links |
|||||
|
Back Go to page: 1 2 3 4 5 6 7 8 9 10 11 12 13 14 15 16 17 18 19 20 Forward
|
|||||
|
Computers and Stuff.
Sam Houliston.
|
|||||
|
Report scams to the ACCC via www.scamwatch.gov.au or by calling 1300 795 995.
|
|||||
|
|
|||||
|
Welcome again to Jaycar as the sponsor of Sam's "Computers and Stuff" page. As they are prepared to support us, please show your appreciation and support them. There's always a store near you, click HERE to find the closest.
Click on any of the features above for further details.
|
|||||
|
Contents:
Change the "Reply to" address in an email. Creating an Excel workbook from within Word. Disable Bing in the Windows 10 Start menu. How to find your Private and Public IP addresses. What's the difference between a Modem and a Router. Why re-boot your modem/Router.
|
|||||
|
Paddy takes his new wife to bed on their wedding night. She undresses, lies on the bed spread-eagled and says “You know what I want, don't you?" "Yeah," says Paddy. "The whole 'friggin' bed by the looks of it!"
|
|||||
|
|
|||||
|
Creating an Excel
workbook from within Word.
There are two ways you can do this and the one you choose depends on what, exactly, you want to accomplish.
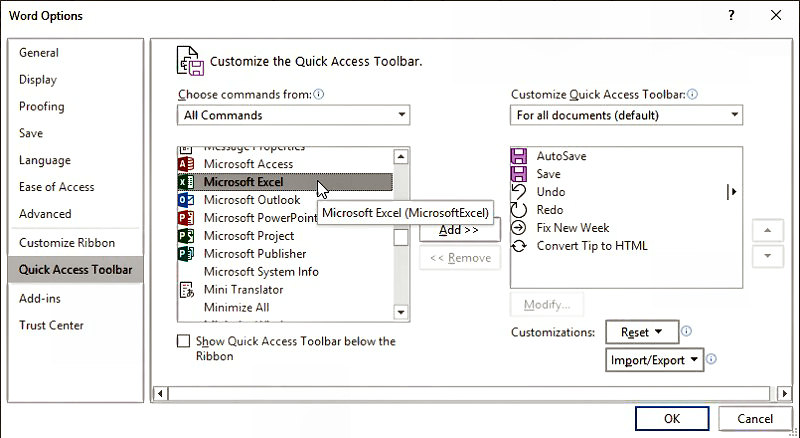
If you want to simply open Excel from within Word, you can follow these steps:
|
|||||
|
|
|||||
|
Now you can click the Microsoft Excel tool on the Quick Access Toolbar and the Excel program is started. If, instead, you want the Microsoft Excel tool somewhere in the ribbon itself, you could simply choose Customize Ribbon at step 2. (You cannot do this in Word 2007, as there is no such choice in that version of the program.)
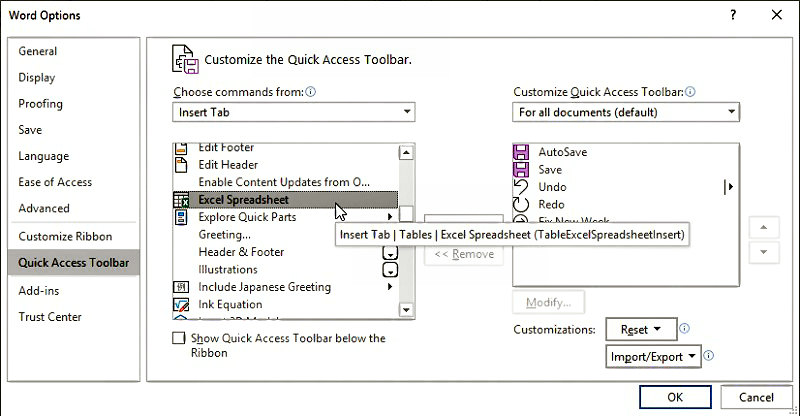
If, instead of opening Excel, you want to insert an Excel worksheet into your current document, you can add the proper tool by following a variation on the foregoing steps:
|
|||||
|
|
|||||
|
When you use this tool, Word embeds a blank worksheet at the insertion point and you can then enter information into that worksheet.
|
|||||
|
Ralph and Edna were both patients in a mental hospital. One day while they were walking past the hospital swimming pool, Ralph suddenly jumped into the deep end. He sank to the bottom of the pool and stayed there. Edna promptly jumped in to save him. She swam to the bottom and pulled him out. When the Head Nurse Director became aware of Edna's heroic act, she immediately ordered her to be discharged from the hospital, as she now considered her to be mentally stable. When she went to tell Edna the news she said, 'Edna, I have good news and bad news. The good news is you're being discharged, since you were able to rationally respond to a crisis by jumping in and saving the life of the person you love. I have concluded that your act displays sound mindedness. The bad news is, Ralph hung himself in the bathroom with his bathrobe belt right after you saved him. I am so sorry, but he's dead.' Edna replied, 'He didn't hang himself, I put him there to dry. How soon can I go home?'
|
|||||
|
How do Internet Speed Tests work? (and how accurate are they?)
Speed tests are a quick way to see just how fast your internet is. ISPs promise “up to” a certain speed in optimal conditions, but a speed test will confirm how fast—or slow—your connection is.
What is a Speed Test?
An internet speed test is the best way to get an idea of how fast your internet connection is right now. The service you connect to often limits your download and upload speeds based on the plan you chose, local congestion, any throttling rules it has, and so on. The catch is the promises your Internet Service Provider (ISP) makes nearly always include the phrase, “up to.” This gives an ISP wriggle room, if it promised you “up to 30 Mbps,” and you consistently only get 28 Mbps, then the company can say it’s kept its promise. But if you see 10 Mbps, then you’re not getting what you pay for and it’s time to call your ISP.
A Speed test measures your ping and download and upload speeds. Measuring the latter two is essential because most ISPs make separate promises for download and upload speeds. Usually, the download speed features prominently, but if you dig into the details, the ISP typically specifies a slower upload speed for each level. For instance, your local ISP might offer a plan with a 50 Mbps download speed, but 25 Mbps upload speed. |
|||||
|
|||||
|
How a Speed Test Works.
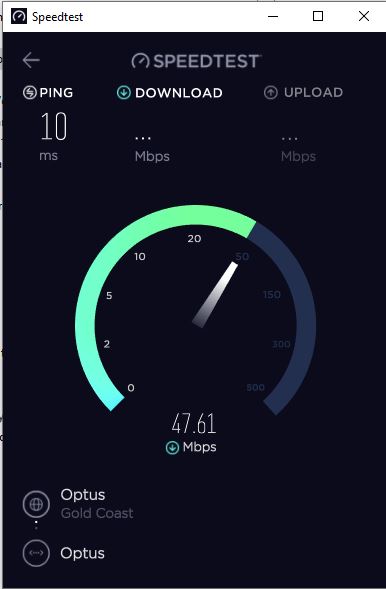
When you start a speed test, multiple things occur. First, the testing program determines your location and the closest test server to you, this part is important. Some versions, like Ookla’s Speedtest.net, have an option to change the server. With the test server in place, the Speed Test sends a simple signal (a ping) to the server, and it responds. The test measures that roundtrip in milliseconds so the smaller the number you receive, the better. Anything under 50 ms is pretty good.
After the ping is complete, the download test begins. The test program opens multiple connections to the server and attempts to download a small piece of data. At this point, two things are measured: how long it took to grab the fragment of data, and how much of your network resources it used. If the program detects you have room to spare, it opens more connections to the server and downloads more data. The general idea is to tax your internet connection and see how much it can do simultaneously.
Imagine your internet service as a highway with a speed limit. Opening additional connections is like adding more lanes to the highway. The speed limit hasn’t changed, but more cars can pass through the same space at a faster rate; thus, the 50th car will arrive sooner using a four-lane highway than it would on a two-lane.
Once the the program determines it has the correct connections to test your internet service, it downloads additional chunks of data, measures the amount downloaded in the time allotted, and presents a download speed.
Next is the upload test. It’s essentially the same process as the download test but in reverse. Instead of pulling data from the server to your PC, the program uploads data from your PC to the server.
If you want to get into the nuts and bolts of it you’ll find info for Radtechs HERE
Are Speed Tests Accurate?
Speed tests sound simple, but it’s much harder than it might seem to measure how fast your connection is accurately. Consider the first step of the process: choosing a test server. Often the closest server might be incredibly close, perhaps even in the same city. That proximity is an optimal situation, so the data doesn’t have as far to travel. Businesses know that proximity makes a difference, and that’s why some, like Netflix, use a content delivery network to bring the data closer to you.
But the entire internet isn’t close to you. Much of it is on computers far away, sometimes across the world. So, while your speed test may show incredibly fast streams, you might find that downloading a program is very slow if the server hosting the data is far away. In that scenario, your results may reflect a faster performance than your real-world usage.
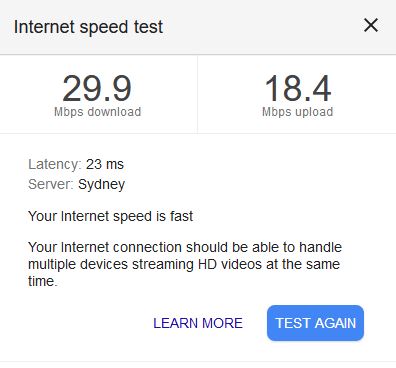
The difference in server locations is why you will likely see different speed results when trying different tests, like Ookla’s, Netflix’s, or Google’s (at right). Your ISP might also offer a speed test, like Comcast, Spectrum, or AT&T, however, you probably shouldn’t rely on an ISP-generated speed test. Their tests are optimized for ideal conditions, using servers close to you that are often maintained on the same ISP network you’re testing from. That means you’ll get a faster result than you might with a Netflix or Google speed test. It’s fine if you just want to brag about how great your ISP is (that’s the idea), but it’s bad for getting an idea of your real-world speeds.
In step two of the testing process, the program attempts to open additional connections and maximize your network usage. If you’re already taxing your network, then the speed test can’t take full advantage of your resources. If you test while streaming Netflix or downloading a large update, for instance, your results will likely be lower than testing without those running.
How you’re connected and which devices you’re testing on also affect the results. An ethernet-connected PC should have a faster speed result than a Wi-Fi-connected one because, generally, Wi-Fi is slower than ethernet. You might also find that results vary on different devices, even if they’re using the same connection.
How to Get the Most Accurate Results.
Getting accurate test results depends on what you intend to measure. Do you want to see if your ISP is genuinely providing the speeds it promised? Then, go for optimal conditions. Use an ethernet-connected device, choose the test server closest to you and stop anything that might be taxing the internet connection (like a streaming service). You might even want to restart your router (see below) before running a speed test.
Ultimately, no matter which steps you take or how you measure, you won’t get a perfectly accurate result, however, you can get a good enough result to either satisfy your curiosity or check in on the speeds promised by your ISP.
|
|||||
|
All those who believe in psycho kinesis, raise my hand. |
|||||
|
Why rebooting your Modem/Router fixes so many problems. (and why you have to wait 30 seconds) |
|||||
|
|
|||||
|
The internet is down, but you know what to do, just unplug your modem or router, wait thirty seconds, then plug it back in. It’s second nature at this point, but why does it actually work? And is there some magic to the thirty second number?
And the even bigger question: is there some way you can stop doing this?
Routers can feel mysterious, but they’re not. And if you know what’s going wrong, you can usually solve the problem.
Your Router is a Computer
You might not think of it this way, but your router is a computer. Inside that plastic box is a CPU, memory and local storage, all running an operating system. And like a computer, things can go wrong from time to time. Maybe a bug is causing a memory leak, maybe the CPU is overheating, or maybe a full blown kernel panic has taken down the entire system.
What’s the simplest fix for these sorts of computer problems? Turning it off and on again. Your modem/router is the same. Just like on your computer, you’re not actually solving whatever is causing the modem to crash, but you are allowing it to run properly again. Sure, this doesn’t fix systematic problems, but it generally solves things in the short term.
Do You Really Need to Wait 30 Seconds?
That answers why unplugging helps, but why do you need to unplug for 30 seconds? Have you ever unplugged a gadget only to see the power indicator light stay on for a few seconds? There’s a reason that happens. Most electronics make liberal use of capacitors, which are basically tiny batteries. You’ve seen these before if you’ve ever taken apart a computer or gadget.
|
|||||
|
|
|||||
|
They don’t store a lot of energy but can at times have just enough to keep a memory chip running for a few seconds. Waiting 30 seconds ensures that every capacitor is fully discharged and thus every bit of memory is cleared ensuring all the settings on your modem/router are actually reset, including anything that might have caused the crash in the first place.
There are multiple reasons your modem/router might need to be reset and not all of these problems will require a 30 second discharge, which is why some problems can be solved without the wait. If you’re troubleshooting a new problem, however, the 30 second wait might be the difference between working and not working.
What causes Modem/Routers to Crash?
As with any piece of hardware, there are all sorts of potential reasons your modem/router might crash and require a restart. Here are a few potential reasons:
There are more potential reasons, but these are the most common. And there are a few relatively simple solutions for them.
One Solution: Care for your Modem/Router
When your computer has persistent bugs, a software solution is often the fix. The same goes for your router: it needs updates too. Every other device you own is shielded behind the router and isn’t publicly addressable. Your router essentially functions as a firewall, shielding your other devices from inbound connections by keeping them all to itself. But, by design, your router is the one point in your home network that’s exposed directly to the Internet. As any attacker could contact your router, it’s crucial your router is secure.
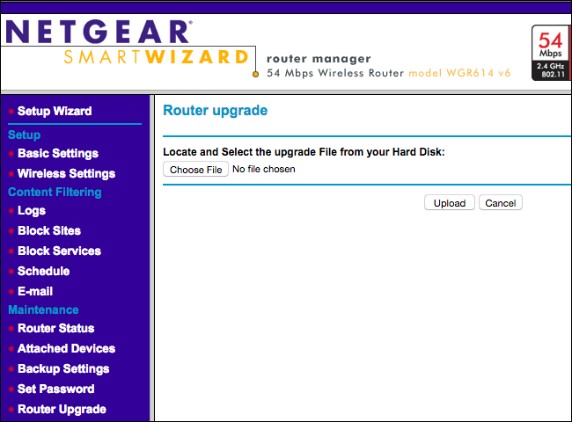
Normally your modem/router will automatically update itself so you don’t have to worry there, but overheating could be a problem
Computers crash when they overheat, and your router is the same way. If it feels hot when you unplug, consider trying to solve for heat. Your router likely has vents; ensure that they aren’t covered up, just like you do for your computer. If your router is full of dust, consider cleaning it out with some compressed air.
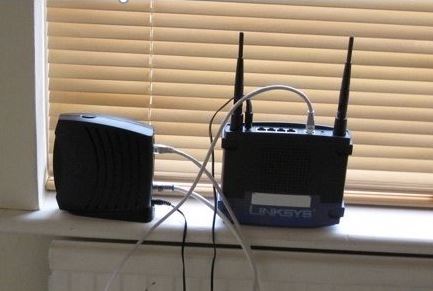
It’s also a good idea to make sure your router is out in the open, not in a small cabinet surrounded by other electronics. Try and keep your modem/router as far away as you can from those little power supplies that power everything from your modem, your mobile phone, laptop etc. Those little rectifier power supplies generate a small amount of RF and this can affect your modem. Modem/routers need to be out in the open, it’ll help with heat management and give you better signal range, so it’s really win-win.
Something else you could consider, if you’re having the occasional drop out,
is to reboot your modem/router every couple of weeks or so, if you turn
If none of this helps, it may be time to bite the bullet and upgrade to a new modem/router. Just like a computer that won’t stop having problems, sometimes it’s just time to move on. You’ll remove a piece of hardware that is constantly causing problems and you’ll get access to all kinds of new features. Wireless technology has come a long way in the past few years, so if you’re using something a bit older, you’ll definitely get your money’s worth by upgrading to something more modern anyway.
And you won’t need to do the unplug/reset-wait ritual anymore.
|
|||||
|
The early bird may get the worm, but the second mouse gets the cheese |
|||||
|
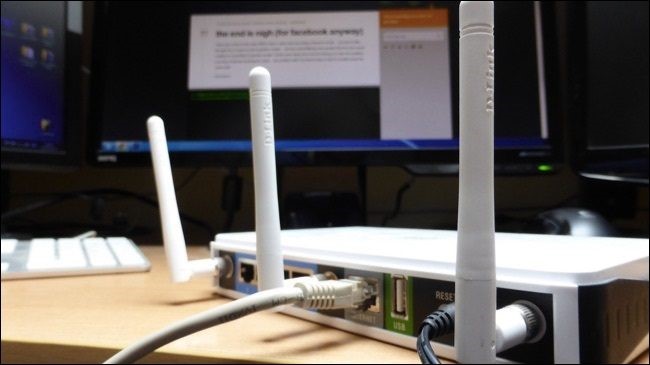
What’s the difference between a Modem and a Router?
If you’ve been on the Internet for a while, you’ve no doubt heard the terms “modem” and “router” thrown around, but might not have taken the time to understand what they are. In short, your router creates a network between the computers in your home, while your modem connects that network and thus the computers on it to the internet. When you connect to Wi-Fi, you’re really connecting to your router, which forwards traffic between the internet and your computer. Most internet providers offer a combined modem/router unit that performs both these functions in one device.
The router sits in between your Internet connection and your local network. It lets you connect multiple devices to the Internet through one physical Internet connection and also lets those devices communicate with one another over the local network. In addition, the router offers some protection to your devices over being exposed directly to the Internet. To the Internet, all the traffic coming from your house looks like it’s coming from a single device. The router keeps track of what traffic goes to which actual device on your network.
But you can’t connect directly to the Internet with just a router. Instead, your router must be plugged into a device that can transmit your digital traffic over whatever type of Internet connection you have. And that device is a modem.
Your modem serves as a bridge between your local network and the Internet. Historically, the term “modem” is shorthand for modulator-demodulator. Modems were used to modulate the signals down the line so that digital information could be encoded and transmitted over them and then demodulated and decoded on the other end.
How a modem attaches to your network depends on the type of connection you have. The modem plugs into whatever type of infrastructure you have, cable, telephone, satellite or fibre and gives you a standard Ethernet cable output that you can plug into any router (or a single computer) and get an Internet connection.
Most ISPs offer a modem and router in a single device. That device has the electronics and software in it to provide both functions, acting as a modem that communicates with your ISP and functioning as a router to create a home network. Some ISPs also bundle a phone interface into the same box so you can use their VOIP offerings.
How to find your Private and Public IP addresses.
Each device on your network has a private IP address only seen by other devices on the local network. But your ISP assigns you a public IP address that other devices on the Internet can see. Here’s how that works and how you can find those IP addresses.
An IP address (or Internet Protocol address) identifies each networked computer and device on a network. When you sign up for internet service and connect your modem, your ISP assigns you a public IP address. This address is how you communicate with all the other devices out there on the public internet, but, you’ve likely got multiple computers and other devices on your network, each of which needs its own IP address, so how does that all work and how can you find out what all those IP addresses are?
In a typical home network, a router has a public IP address on the Internet. The computers, smartphones, game consoles and other devices behind the router each have a unique private IP address on the home network. The router acts as an intermediary, forwarding traffic to the local IP addresses that request it. From an outside perspective, all devices on the home network are communicating with the Internet from a single public IP address.
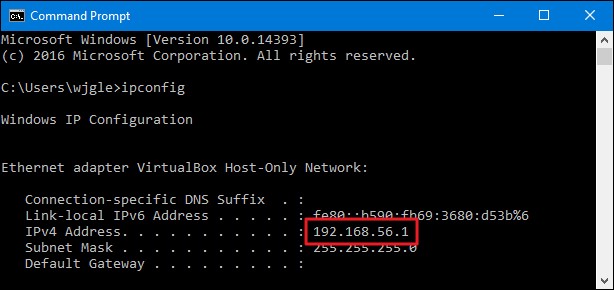
It’s not difficult to find a device’s private IP address. On most full computing platforms, like Windows, MacOS, and Linux, you can often find the information quickly using the Command Prompt or Terminal. In Windows, open the Command Prompt, then type ipconfig in the Command Prompt and press Enter, you’ll get to what you’re looking for in no time.
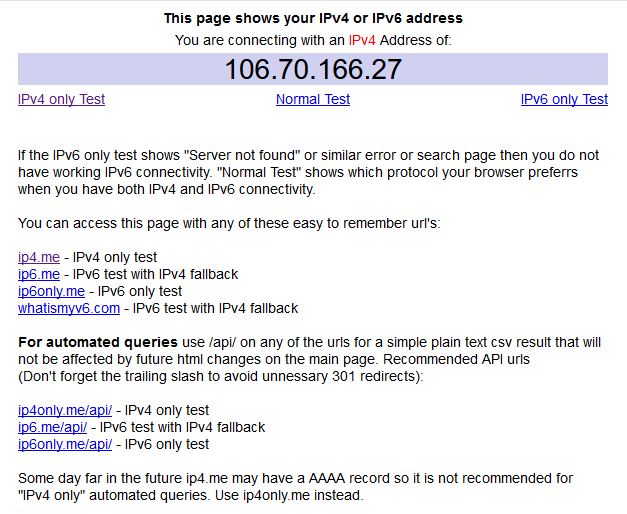
The easiest way to find your public IP address is by logging onto ip4.me. It’s quick, ad-free, and will show your IPv4 address, the four part address you’re most likely looking for rather than the more complicated IPv6 address that your network is likely also configured to use. Just visit the site and it will show you your public IP address. |
|||||
|
|
|||||
|
You should also know that unlike street addresses, IP addresses aren’t necessarily fixed. Unless you’ve purchased a static address from them, your ISP may occasionally assign you a new public IP address and, unless you’ve configured static IP address assignments for your local devices, your router may occasionally assign your devices new IP addresses.
|
|||||
|
What happens if you get scared half to death twice? |
|||||
|
|
|||||
|
How to change the “Reply To” address in an Email you send from Outlook.
If you’re sending an email on behalf of someone else, you might want people to reply to that person instead of you. Microsoft Outlook gives you the option to choose a different default Reply address to cover this situation.
Once you’ve created your mail, switch to the “Options” tab and then click the “Direct Replies To” button. (Depending on your version of Outlook, you might need to click File > Properties instead.) |
|||||
|
|
|||||
|
Once the Properties window opens, change the address in the “Have replies sent to” box from your address to the address (or addresses, if there is more than one) to which you want replies sent.
|
|||||
|
|
|||||
|
Click the “Close” button and then send the mail as usual.
When the recipient receives the mail and clicks “Reply” or “Reply All,” Outlook will automatically fill in the address you’ve chosen. This won’t stop them changing it back to your address (or anyone else’s), just like a normal email, but it will make it obvious to whom they are supposed to reply.
|
|||||
|
If at first you don't succeed, destroy all evidence that you tried. |
|||||
|
|
|||||
|
How to disable Bing in the Windows 10 Start Menu.
Windows 10, by default, sends everything you search for in the Start Menu to their servers to give you results from their Bing search engine, so it’s a good idea not to type anything private into your own PC’s Start Menu - or, you could just disable the Bing integration in the Start Menu.
It’s worth noting that Android’s default search and even iOS will also send your search results to their servers to try and get more relevant results but somehow it seems different when you’re on your personal computer in your house trying to search through your personal files.
Also, if you want to use Cortana to search for you, you don’t have any choice in whether the Start Menu uses Bing, so you’re going to have to disable Cortana to disable the web integration.
If you just want the Search Function to search your computer only and not do a web search (we’d rather use Google) you need to disable the web search capability. To disable web searches in the Start menu, you must edit the Windows registry. The Registry Editor is a powerful tool and making the wrong change can make your system unstable or even inoperable. So be careful – back up before you start to make sure you’re safe – not sorry.
This is a straightforward change and if you follow the instructions, you should be fine. To start, open the Registry Editor by hitting Start and typing “regedit”. Double-click the “Registry Editor” shortcut that appears (or press Enter) and click Yes to the UAC prompt.
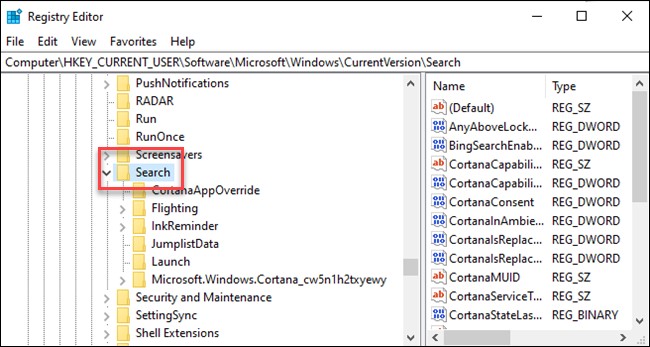
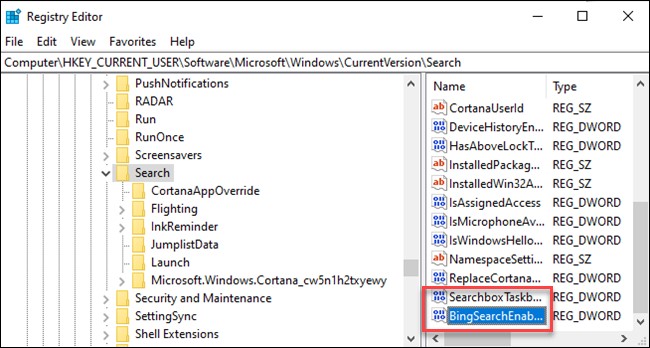
In the Registry Editor use the left sidebar to navigate to the following key:
HKEY_CURRENT_USER\SOFTWARE\Microsoft\Windows\CurrentVersion\Search
|
|||||
 |
|||||
|
Right-click Search and choose New > DWORD (32-bit) Value. Name the new value BingSearchEnabled.
|
|||||
|
|
|||||
|
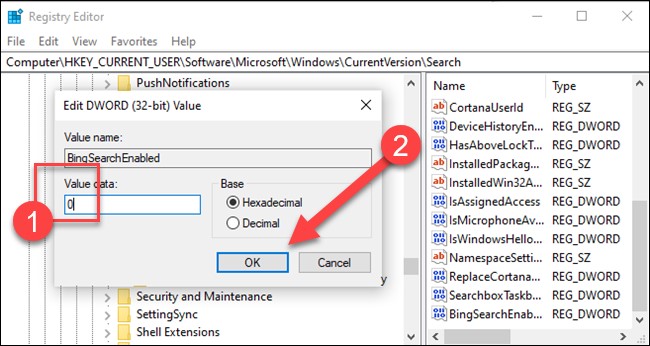
Double-click the new BingSearchEnabled value to open its properties dialog. The number in the “Value data” box should already be 0—just ensure it’s still 0. Click OK to continue.
|
|||||
|
|
|||||
|
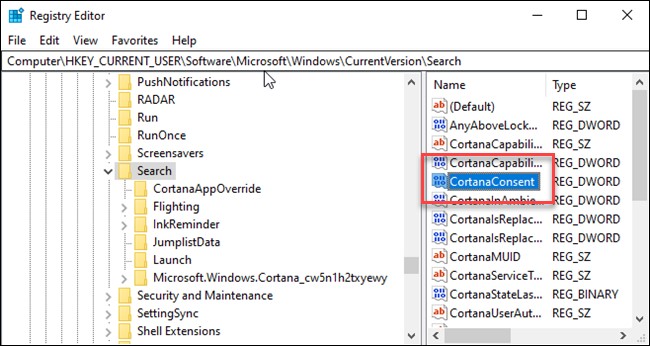
Below BingSearchEnabled, you should see CortanaConsent. Double-click this value to open its properties dialog. Change its “Value Data” box to “0”. If you don’t see CortanaConsent, create it by following the same steps you used to create BingSearchEnabled.
|
|||||
|
|
|||||
|
You can close the Registry Editor now. If you search from your start menu, you should now see only local results. If the change doesn’t take effect immediately, restart your PC.
If you want web search results back, all you have to do is open the Registry Editor and change the BingSearchEnabled and CortanaConsent values back to 1.
|
|||||
|
A conclusion is the place where you got tired of thinking. |
|||||
|
|
|||||
|
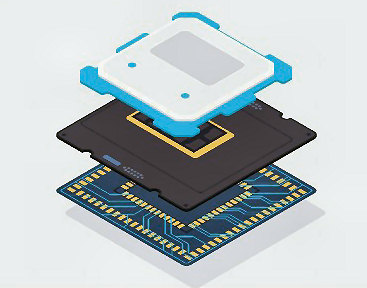
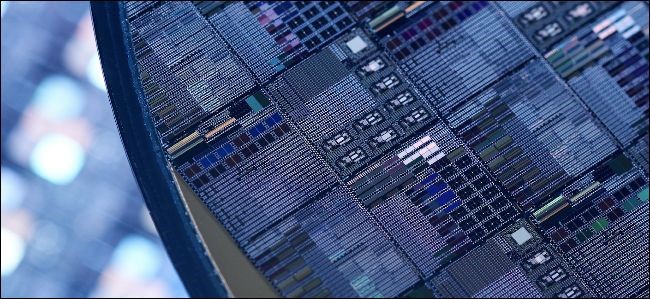
While the way CPUs work may seem like magic, it’s the result of decades of clever engineering. As transistors, the building blocks of any microchip, shrink to microscopic scales, the way they are produced grows ever more complicated. They start from a chunk of silicon and result in a device with millions and millions of transistors that now run almost everything in your life. Silicon is rather common in earth’s crust and is a semiconductor. This means that depending on what materials you add to it, it can conduct when a voltage is applied to it. It is the switch that makes a CPU work.
Transistors are now so impossibly small that manufacturers can’t build them using normal methods. While precision lathes and even 3D printers can make incredibly intricate creations, they usually top out at micrometre levels of precision (that’s about one thirty-thousandth of an inch – about 0.0008mm) and aren’t suitable for the nanometre scales at which today’s chips are built.
The first stage in making a CPU is to make the wafers that they are built on. This process begins with the melting of polysilicon, together with minute amounts of electrically active elements such as arsenic, boron, phosphorous or antimony in a quartz crucible (a container that won't melt at high temperatures).
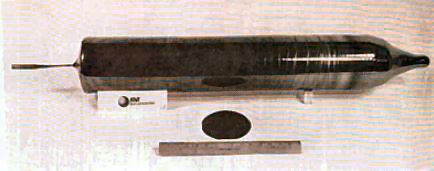
Once the melt has reached the desired temperature, they lower a silicon seed
crystal, or "seed" into the melt. The melt is slowly cooled to the required
temperature and crystal growth begins around the seed. As the growth
continues, the seed is slowly extracted or "pulled" from the melt. As the
Next 1-2mm thin wafers are sliced from the ingot. The wafers are then ground and polished both chemically and mechanically to produce a very flat, mirror like surface.
Now you’ve got to etch the circuit into the wafer to make it a usable chip but as modern chips are so small, how do you do it?
Photolithography solves this issue by removing the need to move complicated machinery around very precisely. Instead, it uses light to etch an image onto the chip, like a vintage overhead projector you might have found in classrooms, but in reverse, scaling the stencil down to the desired precision.
The image is projected onto a silicon wafer, which is machined to very high precision in controlled laboratories, as any single speck of dust on the wafer could mean losing out on thousands of dollars. The wafer is coated with a material called a photoresist, which responds to the light and is washed away, leaving an etching of the CPU that can be filled in with copper or doped to form transistors. This process is then repeated many times, building up the CPU much like a 3D printer would build up layers of plastic.
It doesn’t matter if you can make the transistors smaller if they don’t actually work and nano-scale tech runs into a lot of issues with physics. Transistors are supposed to stop the flow of electricity when they’re off, but they’re becoming so small that electrons can flow right through them. This is called quantum tunnelling and is a massive problem for silicon engineers.
Defects are another problem. Even photolithography has a cap on its precision. It’s analogous to a blurry image from the projector; it’s not quite as clear when blown up or shrunk down. Currently, foundries are trying to mitigate this effect by using “extreme” ultraviolet light, a much higher wavelength than humans can perceive, using lasers in a vacuum chamber. But the problem will persist as the size gets smaller.
Defects can sometimes be mitigated with a process called binning, if the defect hits a CPU core, that core is disabled, and the chip is sold as a lower end part. In fact, most line-ups of CPUs are manufactured using the same blueprint, but have cores disabled and sold at a lower price. If the defect hits the cache or another essential component, that chip may have to be thrown out, resulting in a lower yield and more expensive prices. Newer process nodes, like 7nm and 10nm, will have higher defect rates and will be more expensive as a result.
Packaging it Up
Packaging the CPU for consumer use is more than just putting it in a box with some styrofoam. When a CPU is finished, it’s still useless unless it can connect to the rest of the system. The “packaging” process refers to the method where the delicate silicon die is attached to the PCB most people think of as the “CPU.”
This process requires a lot of precision, but not as much as the previous steps. The CPU die is mounted to a silicon board, and electrical connections are run to all of the pins that make contact with the motherboard. Modern CPUs can have thousands of pins, with the high-end AMD Threadripper having 4094 of them.
Since the CPU produces a lot of heat and should also be protected from the front, an “integrated heat spreader” is mounted to the top. This makes contact with the die and transfers heat to a cooler that is mounted on top. For some enthusiasts, the thermal paste used to make this connection isn’t good enough, which results in people delidding their processors to apply a more premium solution. (Once upon a time these things were called heat sinks).
Once it’s all put together, it can be packaged into actual boxes, ready to hit the shelves and be slotted into your future computer. With how complex the manufacturing is, it’s a wonder most CPUs are only a couple hundred bucks.
|
|||||
|
Experience is something you don't get until just after you need it |
|||||
|
|
|||||
|
|
|||||
|
|
|||||
|
|
|||||
|
|


.png)


 ingot
is pulled it is slowly rotated. This is done to help normalize any
temperature variations in the melt. The temperature of the melt and the
speed of extraction govern the diameter of the ingot and the concentration
of an electrically active element in the melt governs the electrical
properties of the silicon wafers to be made from the ingot. This is a
complex, proprietary process requiring many control features on the
crystal-growing equipment. The crystals naturally tend to a circular shape
due to the crystal structure itself, and the surface tension on the liquid.
The result is an ingot like that above.
ingot
is pulled it is slowly rotated. This is done to help normalize any
temperature variations in the melt. The temperature of the melt and the
speed of extraction govern the diameter of the ingot and the concentration
of an electrically active element in the melt governs the electrical
properties of the silicon wafers to be made from the ingot. This is a
complex, proprietary process requiring many control features on the
crystal-growing equipment. The crystals naturally tend to a circular shape
due to the crystal structure itself, and the surface tension on the liquid.
The result is an ingot like that above.