
|
Vol 77 |
Page 4 |
Privacy Policy | Editorial Policy | Profit Policy | Join the Association | List of Members | Contact us | Index | Links
Back Go to page: 1 2 3 4 5 6 7 8 9 10 11 12 13 14 15 16 17 18 19 20 Forward

Computers and Stuff
Sam Houliston.
Contents.
Add rows and columns to a table in Word.
Copy text from pics using OneNote.
Download PDFs instead of previewing them.
Edge.
Folders get lost in the forest.
Why is Windows called Windows?
How to download PDFs instead of previewing them in Chrome, Firefox or Edge

When you click a PDF link in most browsers, the browser opens the PDF preview in a web browser window.
To download a PDF and not preview it, you need to change a setting in your browser. This works in Chrome, Firefox, and Edge.
Here’s how to do it:
Google Chrome uses its built-in PDF viewer to let you preview PDFs. You can turn this PDF viewer off and Chrome will then prompt you to save your PDFs rather than preview them.
|
Open Chrome then click the Chrome menu (three dots) in the top-right corner of your window, then select “Settings.” |
|
|
|
|
|
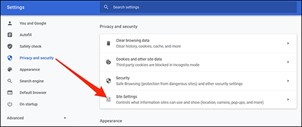
In Chrome settings, click “Privacy and security” in the left sidebar then “Site Settings” on the right. |
|
|
|
|
|
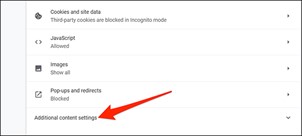
Scroll down in Site Settings and click “Additional content settings” at the very bottom. |
|
|
|
|
|
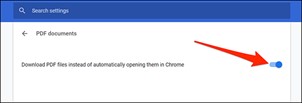
Toggle on the “Download PDF files instead of automatically opening them in Chrome” option.
Chrome will now display the standard save prompt for PDFs.
|
|
|
Mozilla Firefox also has a built-in option to let you download PDFs instead of previewing them in this browser.
Here’s how to do it:
|
|
|
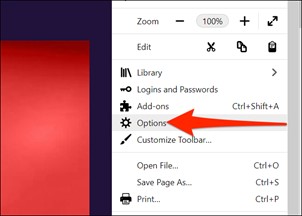
Open Firefox then click the hamburger menu (three horizontal lines) in the top-right corner of the window and select “Options.” |
|
|
|
|
|
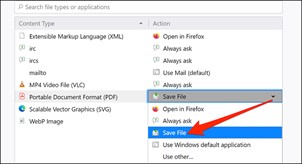
In Options, click “General” on the left. Scroll down the right pane until you see the “Applications” section.
In the Applications section, click the option next to “Portable Document Format (PDF)” and choose “Save File.”
That’s it! |
|
|
|
|
|
Microsoft Edge uses the built-in PDF viewer to let you preview files. Turn this option off, and the browser will save your PDFs instead of previewing them.
Here’s how:
|
|
|
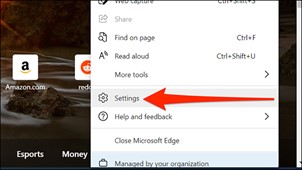
Open Edge, click the menu (three dots) in the top-right corner of the window and select “Settings.” |
|
|
|
|
|
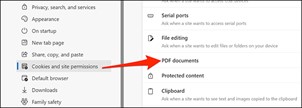
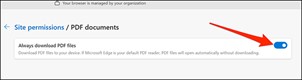
In Settings, click “Cookies and site permissions” on the left, and then select “PDF documents” on the right. |
|
|
|
|
|
Turn on the “Always download PDF files” option here. |
|
|
|
|
|
According to a statistic, 1 out of 4 men is happy! |
|
|
|
|
|
Save a web page as a PDF.
Did you know that you can save a Chrome, Firefox, Edge, or Safari web page as a PDF ? This allows you to read your favourite web pages offline whenever you want. You can also share these web-page PDFs with others.
Here's how:
|
|
|
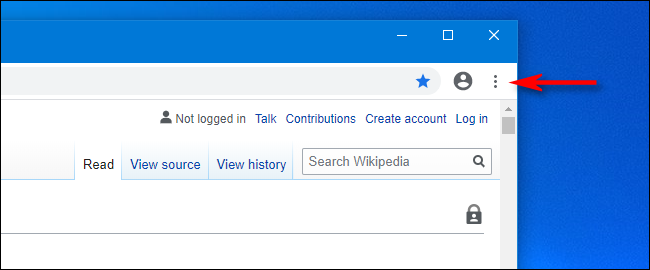
How to save a web page as a PDF in Google Chrome.
Sometimes, you’d like to grab a “hard copy” of a website in Google Chrome, but you don’t necessarily want to print it out on paper. In that case, it’s easy to save a website to a PDF file on Windows 10, Mac, Chrome OS, and Linux.
|
|
| First, open Chrome and navigate to the web page you’d like to save to a PDF. Once you’re on the right page, locate the menu button (three dots aligned vertically) in the upper-right corner of the window and click on it. |
 |
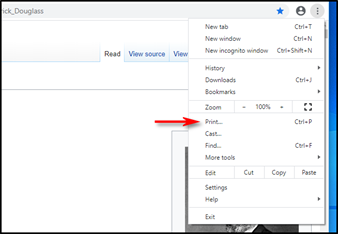
| In the menu that pops up, select “Print.” |
 |
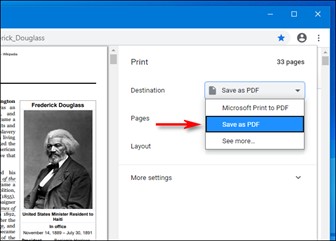
| A print window will open. In the drop-down menu labelled “Destination,” select “Save as PDF.” |
 |
|
If you’d like to only save certain pages (for example, only the first page, or a range such as pages 2-3) into the PDF file, you can do that here using the “Pages” option. And, if you’d like to change the orientation of the PDF file from portrait (vertical) to landscape (horizontal), click on the “Layout” option.
When you’re all set, click “Save” at the bottom of the Print window. |
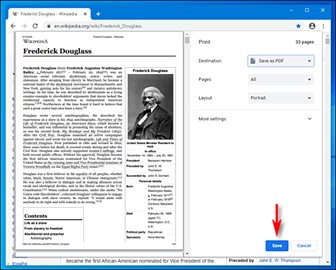 |
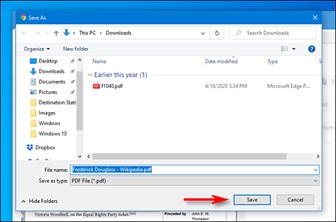
| A “Save As” dialog will pop up. Choose the path you’d like to save the PDF file to (and rename the file if necessary), then click “Save.” |
 |
|
|
|
|
After that, the website will be saved as a PDF file in the location you chose. If you’d like to double-check, navigate to your save location, open the PDF, and see if it looks correct. If not, you can tweak the settings in the Print dialog and try again.
It’s also possible to print documents to PDF files in Windows and on the Mac in apps other than Chrome. On both systems, the process involves built-in system-wide print-to-PDF functionality, which comes in very handy if you want to capture the formatting of a document for posterity.
|
|
|
|
|


Why is Windows called Windows?
You’ve probably heard the name a million times: “Microsoft Windows.” But how did the operating system get that way and why isn’t it named after something else—like doors or ceilings?

Microsoft Interface Manager
In 1981, Microsoft began developing the rudiments of what would later become Windows. Originally called Interface Manager, it would add a graphical overlay to MS-DOS, allowing visual program control using a mouse (instead of typing keyboard commands). It would also allow multitasking by showing different applications within boxes placed in different areas of the screen simultaneously—a concept pioneered at Xerox PARC with its Alto and Star computers and later refined at Apple.
In the computer industry at the time, these simultaneous on-screen program boxes were called “windows,” and software that managed them were usually called “windowing systems.” In the early 1980s, many vendors developed their own windowing systems for PCs, including IBM with TopView, Digital Research with GEM, and VisiCorp with Visi On. Microsoft’s “Interface Manager” would be one of many when it finally launched several years later, and Microsoft knew it.
Enter “Windows”
In 1982, Microsoft hired a new marketing VP named Rowland Hanson, who was a veteran of the cosmetics industry. Hanson brought a new angle for defining Microsoft’s brand that involved placing the “Microsoft” name in front of its products with a generic or simple word after it, such as Microsoft Word and Microsoft Excel. While researching a new name for its Interface Manager, Hanson reviewed trade articles about this wave of PC multitasking systems and pointed out what they had in common. He noticed the term “window” used a lot in the context of terms like “windowing system” and “windowing manager,” so he latched onto “Windows” as a generic term that would help Microsoft own the entire product category. Every time someone referred to windowing systems from then on, they would tangentially be promoting the “Windows” brand.
According to the book Barbarians led by Bill Gates, Interface Manager’s developers were reticent to switch the name to Windows, and the decision to finally do so came down to Bill Gates. Once Gates was behind the name, the developers fell in line — and Microsoft Windows was born.
The Windows Legacy.
Microsoft announced Microsoft Windows publicly on November 10, 1983 — far before the product was ready to ship — in an attempt to get hardware and software vendors on board with the “operating environment,” as Microsoft called it. It had its intended effect, since several competitors were working on PC windowing systems in the early 1980s.
When Windows 1.01 launched in 1985, it wasn’t a breakthrough product, but it evolved over time from a MS-DOS shell to a standalone operating system, then into the mammoth brand we all know today. Today Windows is a multi-billion dollar business and as long as there’s billions of dollars attached to the “Windows” name, Microsoft will probably keep using it for years to come.
No one ever says "It's only a game" when their team is winning.
Folders get lost in the Forest!
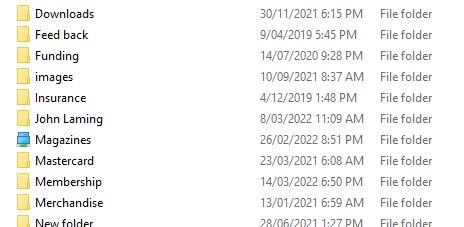
Over the years we end up with heaps of folders in our Documents Folder and as they all look the same, and although they are set out in alphabetical order, sometimes it’s hard trying to find the one you want. If you’ve got one that you use regularly, it can be a hassle scrolling down the list of folders looking for it – there has to be a better way.
Well of course there is!
Windows puts a small “manilla folder” icon to the left of each folder but you can change that icon to something different which makes it stand out from the others and makes it much easier to find and select.
Here’s how.
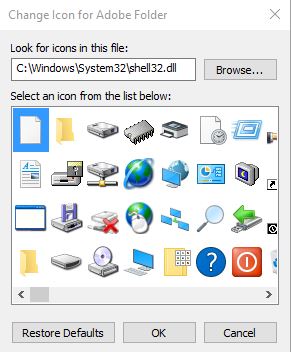
Open your document folder with File Explorer then click and highlight the folder which contains the files you access often. Right click it then click “Properties” which you’ll find at the bottom. When another window opens, click the “Customise” tab at the top then click “Change Icon”. Another window will open, sometimes it will only contain 4 or 5 icons, if it does, click the “Browse” button then navigate to PC then C:\, then Windows, then System32 then search for and click SHELL32.dll, this will open up heaps of icons. Search for the one you want (you can select any) and click it then click OK.
This will replace the “Manila Folder” icon with the one you’ve chosen and your folder will now stand out from the crowd.
You’re not restricted to Document Folders, this works on any Folder in your computer and you can change as many as you like.
There are no new sins; the old ones just get more publicity.
That Alt Key.
If you’re a Windows person you’ve probably wondered why anyone bothered to put the Alt key on your keyboard because you can’t think of a time when you’ve ever had to use it. Well, believe it or not, it is a very useful key, if you use it in conjunction with other keys it can do all sorts of things.
One use that we find useful is when you want to insert a symbol into a bunch of text. Let’s say, for example, you wanted to add a coloured block like this █ into your text. You could click Insert, then Symbol then scroll down until you found it or you could use the Alt key and a number from the key pad to the right of your keyboard. (You have to use the key pad, the number keys at the top of your keyboard will not work). To make that symbol above, just hold down the Alt key and type 219.
Or you might want to add a heart symbol (♥) to a note you’re sending to someone, with the Alt key it’s easy, just hold down the Alt key and press the number 3.
You’ll find all the keyboard shortcuts HERE. Have fun!
Gmail.
Gmail is one of the most popular email providers on the planet with an estimated 1.5 billion users. There is only one larger provider, Apple, which accounts for 28% of all email traffic world-wide. Gmail, which was released only 18 years ago, on the 1st April 2004, looks after 26%. Yahoo, which once was one of the favourites, has dropped to 7%.
The reason for Gmail’s popularity is it’s easy to get started, is lightning fast, offers plenty of storage and integrates seamlessly with all of your devices. You can get set up and running with a brand new Gmail account in less than 5 minutes, thanks to the effort behind the scenes at Google to make this process as easy as can be. All you need is an active internet connection and a computer, phone, or tablet. Simply pop over to the Gmail website, follow the on-screen prompts, and in 3-5 minutes you’ll have your new account.
Your Gmail integrates with the rest of your Google Account, essentially your digital passport.
Not only is your Gmail account going to give you access to some of the most powerful but easy to use email tools out there today, but it’s also going to become your “digital passport”.
To avoid you having to remember a million and one different passwords and usernames, more and more websites, apps, and online services allow for direct integration with your Gmail account. All you have to do is connect these sites to your account and you’ll be able to log in to them with the same credentials you use for Gmail.
How to quickly add rows and columns to a table in Microsoft Word.
Microsoft Word allows you to create neat tables within documents. Once a table is created, there are several easy ways to add more rows or columns. Here’s how!
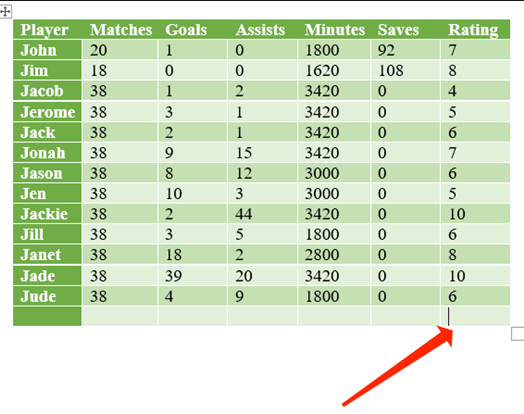
The simplest way to add rows to your table is by placing the cursor in the cell at the bottom-right corner of your table and then pressing Tab on your keyboard.
|
Each time you want to add a row, you can select the cell at the bottom right and press Tab again. If you select any other cell and hit Tab, then the cursor will move to the next cell. It’s only in the last cell that a new row gets added automatically. |
|
|
Press Delete to remove rows and columns. |
|
|
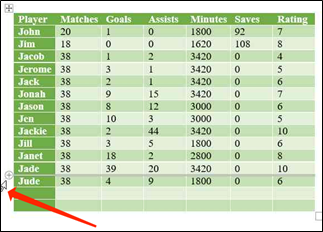
You can also delete rows and columns quickly by pressing the Delete key on your keyboard. First, you need to select a row or column. The quickest way to select a row is to click the area right outside the first cell on the left. You’ll notice that your mouse pointer has been flipped.
When you see the flipped pointer, you can click to select the entire row. Now, press Delete on your keyboard to get rid of the entire row.
|
|
|
|
|
|
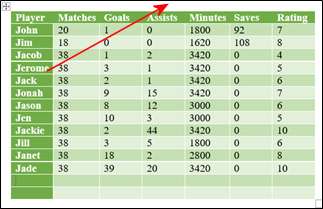
To select a column, move your mouse pointer above the first cell of any column. The pointer will change to a down arrow symbol. Now, click to select the entire column then hie Delete. |
|
|
Use the Ribbon Menu to add rows or columns |
|
|
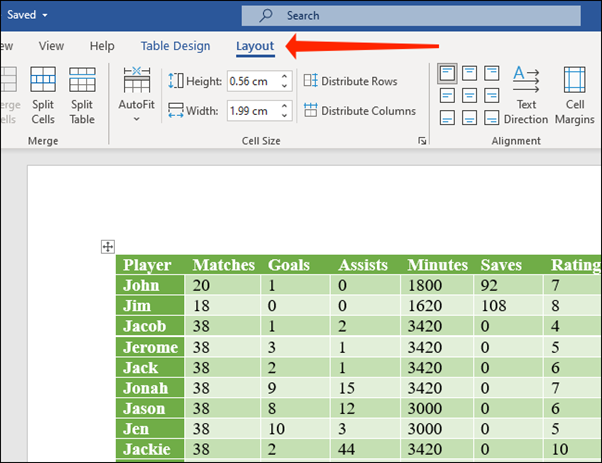
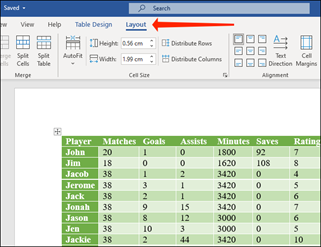
If you have a table in your Word document, the ribbon menu allows you to see some additional options to add rows and columns. You can access these options using the Layout tab in the ribbon menu up top. The only confusing part is that there are two tabs named Layout in the menu bar for some reason. You need to select the “Layout” tab on the right—the one next to Table Design.
Once you’ve selected this, you will find several table-related options there. |
|
|
|
|
|
If you want to insert a row above the cell that you’ve selected in your Microsoft Word table, click “Insert Above.” To add a row below the cell that you’ve selected, click “Insert Below.” You can also add columns quickly using the buttons given here.
“Insert Right” will add a column to the right of the cell. Similarly, “Insert Left” will add a column to the left of the selected cell. |
|
|
|
|
|
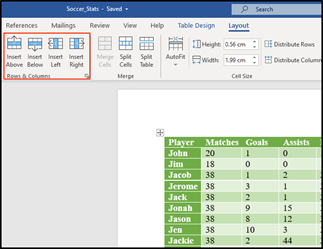
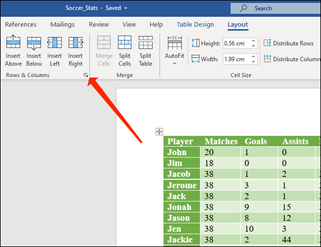
You can also click the arrow icon that’s to the right of the “Rows & Columns” sub-head to reveal a few more options. |
|
|
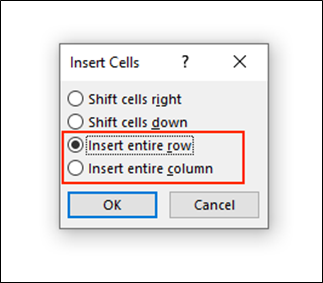
Here, you can click “Insert entire row” or “Insert entire column” to add rows or columns. |
|
|
|
|
|
Delete Rows and Columns Using the Ribbon Menu. |
|
|
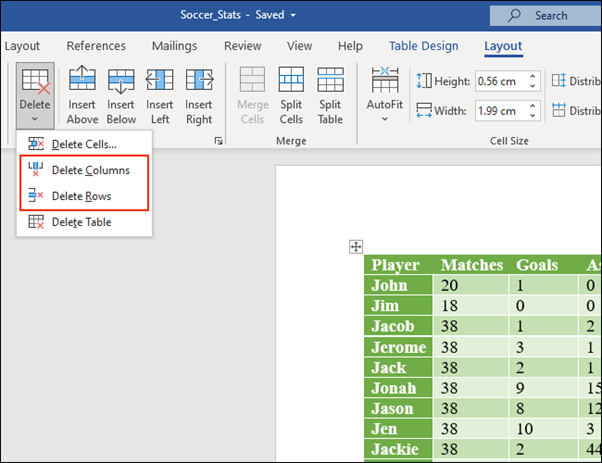
Microsoft Word also allows you to delete rows and columns using the same ribbon menu. Click the “Layout” tab next to Table Design. |
|
|
Now, go to the “Rows & Columns” sub-head. Click “Delete” to reveal the options to remove rows and columns.
Select “Delete Columns” to remove the columns that you’ve selected in your Word table. Alternatively, you can click “Delete Rows” to remove the selected rows from your table. |
|
|
Add rows and columns using the Context Menu |
|
|
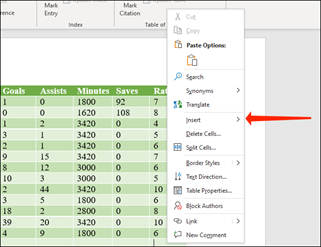
Another quick way to add rows and columns involves revealing the context menu in Microsoft Word tables.
To do this, select any cell, column, or row, and press the right-click button on your mouse and select “Insert.” |
|
|
You can select “Insert Columns to the Left” or “Insert Columns to the Right” to add columns to the left or right side of the cell that you’ve selected.
Alternatively, you can click “Insert Rows Above” or “Insert Rows Below” to add rows above or below the selected cell in your table. |
|
| Experiment with these tips, you’ll find them very easy to use.
|
|
|
|
|

Cats have a very precise method of walking, called “direct registering”, wherein their hind paws fall almost exactly into the place their fore paws did a moment before—this method of walking minimizes noise and visible tracks while ensuring more stable footing as the place has already been felt out by the fore paws.
![]()
How to copy text from pictures using Microsoft OneNote.
Microsoft OneNote, which comes with Microsoft Office, supports optical character recognition (OCR). This technology allows OneNote to recognize text within images letting you copy them and edit the content. Depending on your computer configuration, you could have two versions of OneNote on your computer, one titled “OneNote for Windows 10” and the other “OneNote”. The OCR facility works with the version that comes with Office only – ie: the “OneNote” version.
It's a little messy but easy to do, here’s how it’s done.
First, click and copy the image then open OneNote.
|
Right click anywhere in the body of OneNote and paste (Ctrl V) the image. |
 |
|
|
|
|
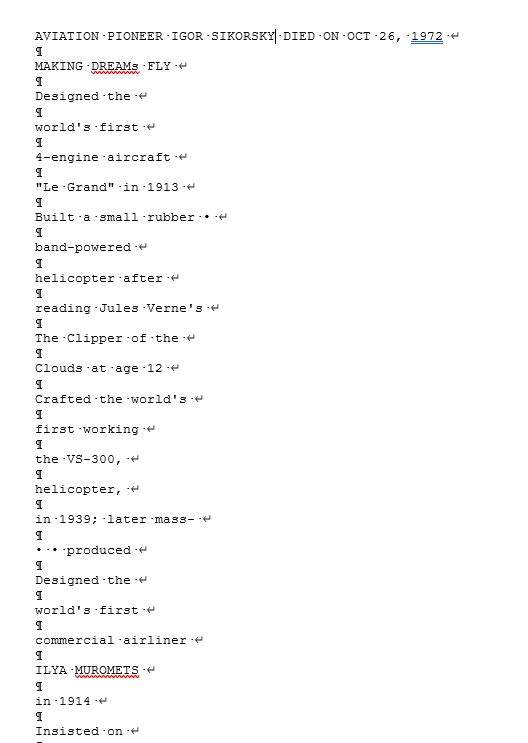
Left click the image, this will put a dotted edge around the image, then right click the image, a window will appear, click the “Copy Text from Picture” entry. The text will be copied but will not be formatted.
|
 |
|
|
|
|
Open a new page in Word, then paste the copied Text (Ctrl V) onto the page. It will be in plain text format and look something like this (Click it). |
 |
|
|
|
|
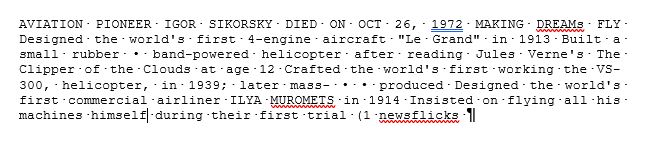
You’ll notice there will be a lot of “Soft Return” characters (┘) at the end of each line, first thing to do is getting rid of these. Click anywhere in the text that you’ve copied over then hold the CTRL key and press the A key. This will highlight everything, then hold the Ctrl key and press the H key – this opens the “Find and Replace” window, In the “Find what” window type ^L. (You’ll usually find the ^ symbol on the 6 key). In the “Replace with” window use the space bar and place one space.
Click “Replace All”
Now you have to get rid of the Return characters (¶) Same as before, Ctrl A, then Ctrl H, in the “Find what” window type ^p. In the “Replace with” window use the space bar and place one space. Click “Replace All.”
You’ll end up with a lot of “two space” instances, once again, Ctrl A, then Ctrl H, in the “Find what” window place two spaces with the space bar and in the “Replace with” window use the space bar and place one space. Click “Replace All.” You might need to do this twice.
This will leave you with one block of text (Click it). You can now format it anyway you like.
This might seem a complicated way of doing things, but when compared with re-typing a thousand or so words it’s a breeze.
|
|
|
|
|
|
There are worse things than getting a call for a wrong number at 4.00 am, for example, it could be the right number
|
|
Back Go to page: 1 2 3 4 5 6 7 8 9 10 11 12 13 14 15 16 17 18 19 20 Forward