|
|
||
|
||
|
Privacy Policy | Editorial Policy | Profit Policy | Join the Association | List of Members | Contact us | Index | Links |
||
|
Back Go to page: 1 2 3 4 5 6 7 8 9 10 11 12 13 14 15 16 17 18 19 20 Forward
|
||
|
Computers and Stuff.
Sam Houliston.
|
||
|
Report scams to the ACCC via www.scamwatch.gov.au or by calling 1300 795 995.
|
||
|
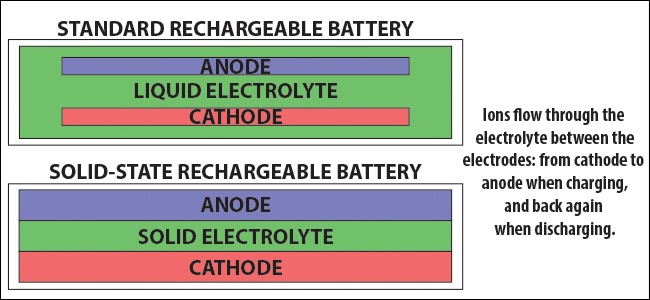
What is a Solid-State Battery and will they solve our Battery Life problems?
|
||
|
Mobile technology is increasing in power exponentially, but battery tech isn’t keeping up. We’re reaching the physical limits of what conventional lithium-ion and lithium-polymer designs can do. The solution might be something called a solid-state battery.
So? - what’s a Solid-State Battery?
|
||
|
|
||
|
In a conventional battery design, most commonly lithium-ion, two solid metal electrodes are used with a liquid lithium salt acting as an electrolyte. Ionic particles move from one electrode (the cathode) to the other (the anode) as the battery charges, and in reverse as it discharges. The liquid lithium salt electrolyte is the medium that allows that movement.
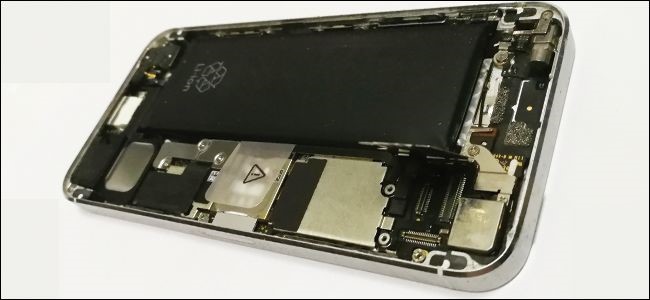
If you’ve ever seen a battery corrode or get punctured, the “battery acid” that oozes out (or sometimes explodes) is the liquid electrolyte.
In a solid-state battery, both the positive and negative electrodes and the electrolyte between them are solid pieces of metal, alloy, or some other synthetic material. The term “solid-state” might remind you of SSD data drives, and that’s not a coincidence. Solid-state storage drives use flash memory, which doesn’t move, as opposed to a standard hard drive, which stores data on a spinning magnetic disc powered by a tiny motor.
Though the idea of solid-state batteries has been around for decades, advances in their development are just beginning, currently spurred on by investment from electronics companies, car makers, and general industrial providers.
|
||
|
|
||
|
What’s better about Solid-State Batteries?
Solid-state batteries promise a few distinct advantages over their liquid-filled cousins: better battery life, faster charging times, and a safer experience. Solid-state batteries compress the anode, cathode, and electrolyte into three flat layers instead of suspending the electrodes in a liquid electrolyte. That means you can make them smaller, or at least, flatter while holding as much energy as a larger liquid-based battery. So, if you replaced the lithium-ion or lithium-polymer battery in your phone or laptop with a solid-state battery the same size, it would get a much longer charge. Alternatively, you can make a device that holds the same charge much smaller or thinner.
Solid-state batteries are also safer, since there’s no toxic, flammable liquid to spill and they don’t output as much heat as conventional rechargeable batteries. When applied to batteries that power current electronics or even electric cars, they might recharge much faster too, ions could move much more quickly from the cathode to the anode. According to the latest research, a solid-state battery could outperform conventional rechargeable batteries by 500% or more in terms of capacity, and charge up in a tenth of the time.
What Are the Disadvantages?
Because solid-state batteries are an emerging technology, they’re incredibly expensive to manufacture. So expensive, in fact, right now they aren’t installed in any major consumer-grade electronics. In 2012, analysts writing for the University of Florida Software Analysis and Advanced Materials Processing department estimated that a typical cell phone-sized solid-state battery would cost about $15,000 to manufacture. One big enough to power an electric car would cost $100,000.
Making a solid-state battery big enough to power your phone would cost thousands of dollars today. Part of this is because the economies of scale aren’t in place—hundreds of millions of rechargeable batteries are made each year right now, so the manufacturing cost of the materials and equipment are spread out across huge supply lines. There are only a few companies and universities researching solid-state batteries, so the cost to produce each one is astronomical.
|
||
|
|
||
|
Another issue is the materials. While the properties of various metals, alloys, and metallic salts used for conventional rechargeable batteries is well-known, we don’t currently know the best chemical and atomic composition for a solid electrolyte between metallic anodes and cathodes. Current research is narrowing this down, but we need to gather more reliable data before we can gather or synthesize the materials and invest in manufacturing processes.
When will I get to use a Solid-State Battery?
As with all emerging technology, trying to figure out when you’ll get your hands on it is guesswork at best. It’s encouraging that many enormous corporations are investing in the research needed to bring solid-state batteries into the consumer market, but shy of a major breakthrough in the immediate future, it’s hard to say whether there will be a great leap forward. At least one car company says it will be ready to put one in a vehicle by 2023 but doesn’t guess how much that car might cost. Five years seems overly optimistic; ten years seems more likely. It might be twenty years or more before the materials are settled upon and the manufacturing processes are developed.
But, conventional battery tech is starting to hit a wall and there’s nothing like potential sales to spur on research and development. It’s at least slightly (very, very slightly) possible that you might be able to use a gadget or drive a car powered by a solid-state battery soon.
|
||
|
I've spent most of my life golfing. The rest I've just wasted.
|
||
|
How to Run a Mail Merge from Microsoft Outlook.
Kicking off your mail merge in Outlook offers some advantages. You may have run mail merges directly in Microsoft Word, but did you know you can also start them from Microsoft Outlook?
Sure. Microsoft Word still runs the actual mail merge, but you can trigger the mail merge in Outlook, then go to Word to complete it. Here’s how!
Okay, so why start a mail merge in Outlook instead of Word? In Outlook, you can directly view and access your contact list, and if you need to send a form email, Outlook can handle that task easily. Maybe you have a form email that you want to send to friends and family. Perhaps you need to distribute a certain email to a larger number of colleagues, or possibly you’ve created a promotional email that you want to send to potential customers or clients. Whatever the reason, Outlook can help.
The following relate to Outlook 2016 and Word 2016 but you should be able to replicate the process in the prior version or two of both programs.
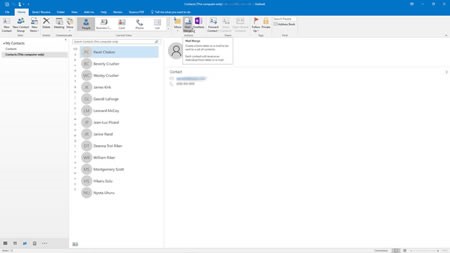
Open Outlook. Click on the Contacts icon at the bottom of the left pane. Under the heading Current View Windows offers to display your contacts 5 different ways:
I like to display mine under the Business Cards view as you can add a pic to each Contact - making it easier to ID them. When running a mail Merge I find it better to switch that view to People (right). If you want to perform the mail merge with only certain contacts, select those contacts by holding down the Ctrl key and clicking your mouse to choose the ones you want. If you want to send it out to a heap of contiguous names (one after the other) hold down the Shift key and click the first name then click the last name of the group you want, that will hilite them all.. If you want to perform the merge on all your contacts, then don’t select any of them - Windows will do that for you. Click on the Mail Merge icon on the Home Ribbon (in the Actions sub-menu).
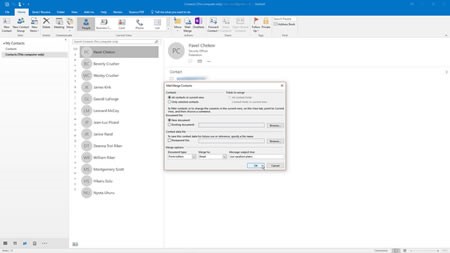
The Mail Merge Contacts window pops up for you to choose the options for the merge.
First, click on the option for “All contacts in current view” to perform the merge for all contacts, otherwise, if you selected only specific contacts, click on the option for “Only selected contacts.” If you’ve already set up a form document in Microsoft Word that you want to use, click on the Browse button next to the field for Existing document and select the file. If not, then stick with the option for “New document.” Since the contact data is already stored in Outlook, there’s no need to save it as a separate file, so leave the option for Permanent file unchecked.
Under Merge options, leave the Document type set to Form Letters but click on the field for “Merge to” and change the value to Email. Finally, type a subject line for your email in the “Message subject line” field. Click OK.
You’re whisked away to Microsoft Word where you can start building your form email.
Your task now is to populate the blank Word document with the necessary form fields for your email message. The fields you insert vary depending on what information you want to customize and display in your message.
Try this as an example:
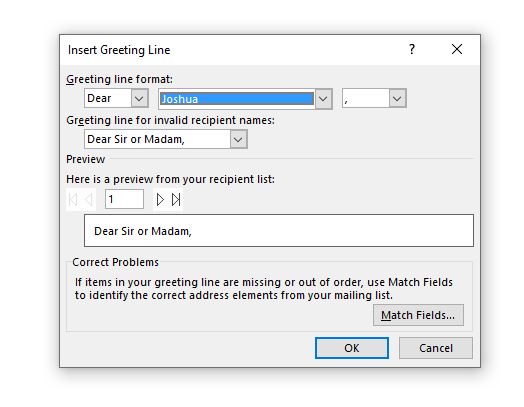
Let’s start with a greeting. Click on the Greeting Line icon on the Mailings Ribbon. Since you’re sending this round of emails to friends and people you know, we’ll address them by first name. At the Insert Greeting Line window, click on the field showing the last name and change it to the first name. The preview field shows the first name of the first contact in the list. Click OK.
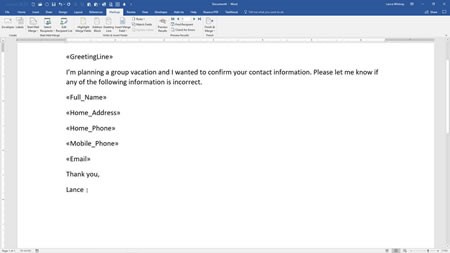
Press Enter once or twice to start a new paragraph. Type the following paragraph and then press Enter.
“I’m planning a group holiday and I wanted to confirm your contact information. Please let me know if any of the following information is incorrect:”
Now we’ll insert some merge fields.
If the document incorporates a lot of fields and would be tricky to recreate, save it before you run the mail merge. That way you can easily recover it if something goes wrong. Plus, you can reuse and more easily modify the document for future mail merges.
Next, we’re going to preview the merge before running it. Click on the Preview Results icon on the Ribbon. Word previews the email for the first contact in your list. If all looks well, click on the Finish & Merge icon on the Ribbon and select the option to Send Mail Messages.
At the Merge to E-mail window, the To field should say Email and the Subject line should display what you typed earlier. Click on the field for Mail format. You can choose one of three formats: Attachment, Plain text, or HTML. We like to send all our emails in HTML format, this way you can add graphics, hyperlinks, or add some special formatting – but it’s your choice. You can keep the option to send it to all records, meaning all contacts. Click OK.
If you receive a Microsoft Outlook message asking you to allow or deny the process, set the duration for anywhere from 1 to 10 minutes -- 1 minute if this is the only mail merge you're going to run; 10 minutes if you want to try more mail merges. Then click on the Allow button.
Finally, go back to Outlook and peek in your Sent Items folder. You should see all the mail merged messages sent from your account to each contact.
|
||
|
Daylight saving!
|
||
|
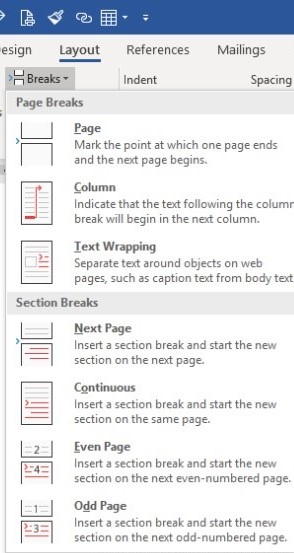
Adding a Break to your Document
As you are typing in Word, you will notice the program automatically keeps track of where you are. When your document no longer fits on a single page, Word automatically inserts a page break (indicated by a thin dashed line when viewing your document in Normal view) and wraps your text to the next page.
There may be times, however, when you want to insert a break in your text manually. Word supports the following types of breaks:
To insert a break in your document, follow these steps:
|
||
|
|
||
|
|
||
|
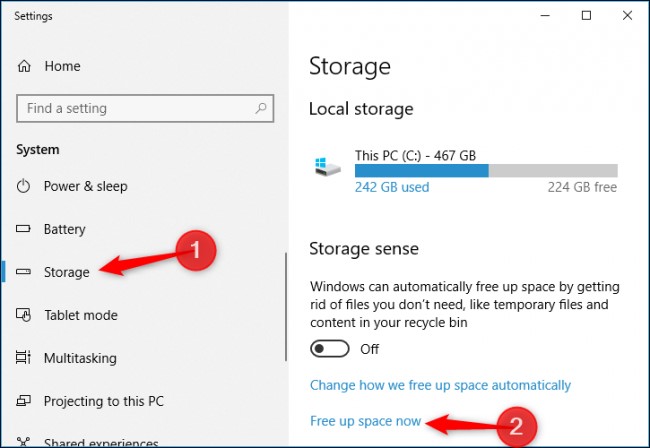
Use Windows 10’s new “Free Up Space” Tool to clean up your Hard Drive.
In one of the early updates to Windows 10, Microsoft added a feature named Storage Sense that’s aimed at helping you free up space on your drive. It is a new, very handy and easy-to-use tool. It removes temporary files, system logs, previous Windows installations, and other files you probably don’t need.
This tool was included in the April 2018 Update. It works similarly to the old Disk Cleanup utility, but it’s part of the modern Settings app and is a bit faster to use. To find this new tool, head to Settings > System > Storage (1). Click the “Free Up Space Now” (2) link under Storage Sense. If you don’t see that option here, the April 2018 Update hasn’t been installed on your PC yet.
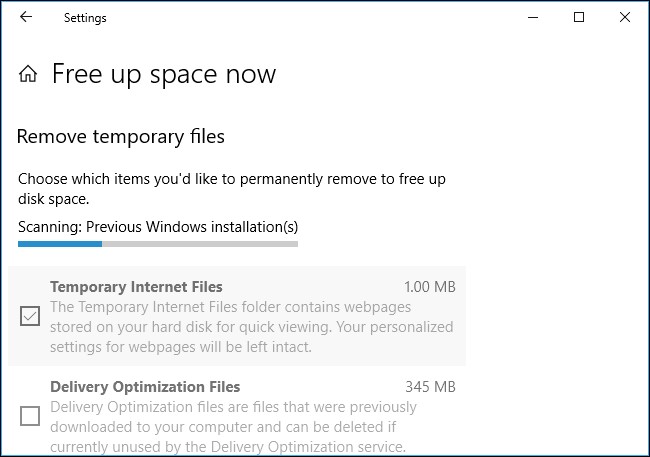
Windows automatically scans your PC for unnecessary data that it can remove to free up space. Unlike the old Disk Cleanup tool, this screen only shows data you can actually remove, and it scans both user files like your Recycle Bin and system data like old Windows installations at the same time.
Scroll through the list and check the different types of data you want to remove. Windows shows exactly how much space you’ll free up by removing each type of data. You can delete everything here as long as your computer is functioning properly. For example, “Windows upgrade log files” and “System created Windows Error Reporting Files” are both only helpful if your PC is experiencing problems. If everything is working fine, feel free to delete them.
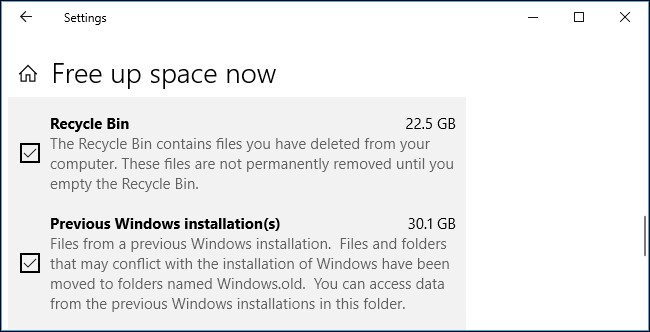
Be careful when checking the “Recycle Bin” option here. This will erase any deleted files in your Recycle Bin. Be sure you don’t want to recover any files from the Recycle Bin before checking this option.
After a big update like the April 2018 Update itself, you’ll also see a “Previous Windows installation(s)” entry here. Feel free to remove these files if your computer is working properly.
You won’t be able to downgrade to the previous Windows 10 update after removing these files, but Windows automatically removes these files after a short while anyway. If your computer isn’t working properly, you’ll need these files to roll back to your previous build of Windows.
Windows shows how much total space will be freed up at the top of the screen. Click “Remove Files” to remove the data you’ve selected.
Depending on how much data there is to remove, Windows may take a few minutes to finish the process.
If you wish, you can set your computer to free up disk space by periodically and automatically deleting unwanted files.
To do this, once again, head for Settings > System > Storage, click the “Change how we free up space automatically” to open this option. Turn ON the Storage Sense option then click the Run storage sense drop-down window and select it to run either Every day, Every week, Every month or During low free disk space.
Under the Temporary Files section, tick the box next to Delete temporary files that my apps aren’t using then select when you want Windows to run this option in the two drop-down boxes below.
This feature won’t remove as many types of data as the “Free Up Space Now” tool as they are two different tools but it is a good idea to set it to run periodically.
|
||
|
Did you know that on the Canary Islands there is not one canary. And on the Virgin Islands - same thing, not one canary there either.
|
||
|
How to Recover a Deleted File: The Ultimate Guide.
It’s happened to most of us. You delete a file, and then realize you need it back. Well, all is not lost as there are a number of ways you can get that file back – Here’s how!
|
||
|
|
||
|
If you’re not sure whether you permanently deleted a file, be sure to look around for it first. Try performing a search in File Explorer. Hopefully, you just misplaced the file and you can find it again.
|
||
|
|
||
|
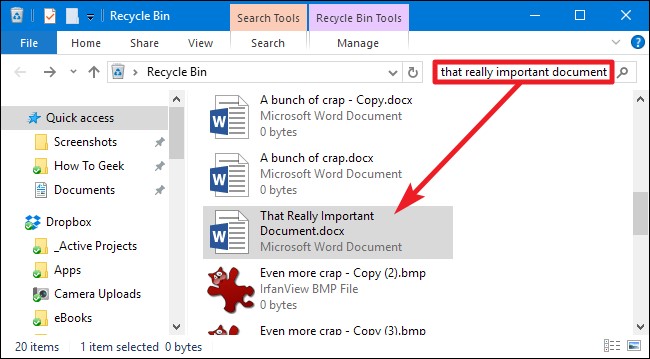
In Windows, take a peek in the Recycle Bin. You can search the Recycle Bin using the search box at the top-right corner of the window, which may help if you have a lot of files in there.
|
||
|
|
||
|
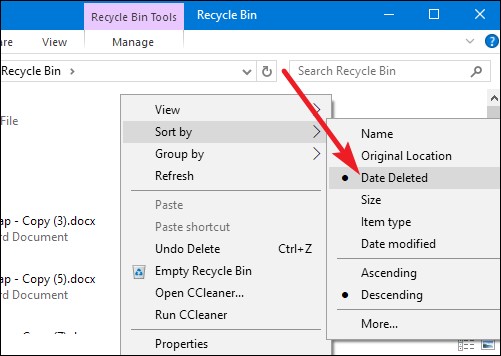
You can also right-click anywhere in the Recycle Bin window, and then choose Sort By > Date Deleted to more easily view recently deleted files.
|
||
|
|
||
|
By default, programs like CCleaner empty your Recycle Bin when you run them, so having CCleaner or a similar program automatically run in the background can prevent you from recovering files from the Recycle Bin. CCleaner, and similar apps, do let you disable cleaning the Recycle Bin, so that may be an option worth exploring if you like to hang on to deleted files until you’re ready for them to go.
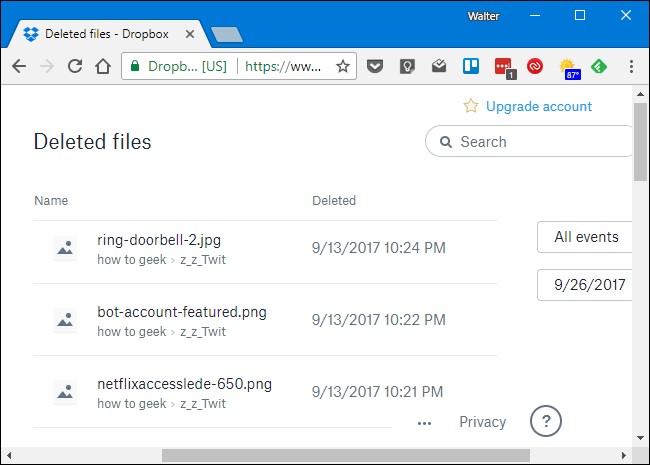
If your file was stored in a cloud storage service like Dropbox, Google Drive, or OneDrive, be sure to log into your account on the service’s website and check your deleted files there, you may find the file is still recoverable. This is the cloud storage version of the Recycle Bin.
|
||
|
|
||
|
Check Your Backups
You should be making regular backups of your most important files so you won’t lose too much critical data if your files ever vanish on you. If you do have a backup, now’s the time to check it for a copy of the file you deleted. And if you don’t have a backup, you really should. Windows has some good backup tools built in.In particular, Windows’ File History tool is useful for easily recovering deleted files and older versions of files, but it’s not enabled by default.
If you’ve made it this far and haven’t managed to restore your file yet, the only way you’re getting that file back is with file-recovery software. However, there’s some bad news: This may be impossible on some computers.
|
||
|
|
||
|
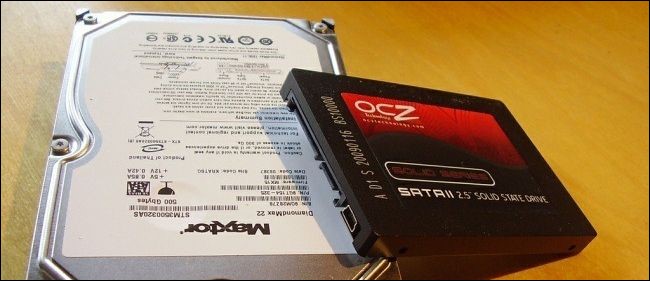
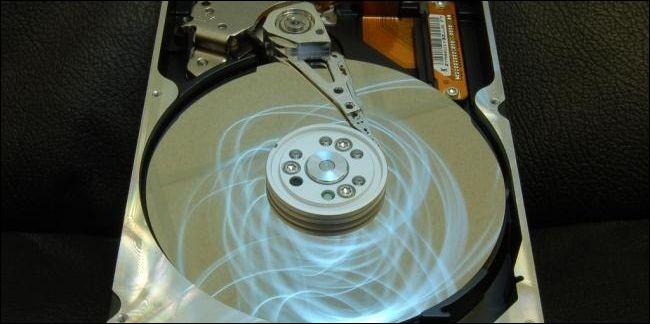
Traditional magnetic hard drives and solid-state drives work differently. When you delete a file on a magnetic hard drive, its data isn’t immediately erased from the disk. Instead, the pointer to that data is removed, so that the data can be overwritten. It may be possible to scan the hard drive for leftover data and restore deleted files that haven’t yet been overwritten.
When a file is deleted from a solid-state drive, that file is immediately erased with the TRIM command to free up the space and ensure the SSD can be quickly written to in the future. That means that you can’t recover data deleted from solid-state drives, once it’s gone, it’s gone. Very old solid-state drives and old operating systems like Windows Vista don’t support TRIM, but modern solid-state drives and Windows 7 through 10 all support TRIM.
So – another reason why it is super important to have a good backup.
If you deleted a file on a magnetic hard drive and you’re still using that computer and you don’t have a backup, the safest thing to do is shut down the computer immediately. If you continue using the computer, even if you’re just installing file-recovery software, it’s possible that a program on your computer could write data that overwrites the deleted file’s data on your hard drive.
Another hint, download a file recovery program now, have it ready just in case! One good one that is free is RECUVA, you can get it HERE.
If you don’t have a file recovery program already installed on your computer shut down your computer and reboot from a file-recovery live CD or USB drive, or remove the hard drive from the computer entirely and place it in another computer as a secondary drive. The key is to avoid writing to the drive entirely. Use file-recovery software to scan the drive, and hopefully you’ll find the deleted file. If you deleted the file recently and haven’t written to the drive much, you have a fairly good chance of recovering it. If you deleted the file two weeks ago, and have written to the drive quite a bit, it’s very unlikely that you’ll recover the file.
Professional Data Recovery.
If the data is particularly critical, you don’t have any backups, and you failed to recover the data using other methods, you might want to consider a professional data recovery service. First things first, though: power off the computer immediately if it’s not already off. The longer the computer runs, the more data will be written to its hard drive and the less chance you’ll have of recovering your data.
|
||
|
|
||
|
Professional data recovery services deal with everything from deleted and overwritten files to dying hard drives that need to be disassembled and repaired. These services can be extremely pricey, costing hundreds or even thousands of dollars, so they’re not the ideal solution. However, if you have extremely important data that you can’t recover or replace and you’re willing to pay up, this is an option available to you. Of course, these services can’t guarantee anything—they may be unable to recover your data. They’ll also probably charge you for their work even if they ultimately can’t recover your data.
Avoiding Deleted File Scares.
The best way to ensure you’ll never have to recover a deleted file is to perform regular backups. Even just enabling the File History or Windows Backup functionality in your version of Windows will give you some peace of mind. It’s still possible for a file to be deleted, but if you’re performing regular backups, you won’t lose much data. You’ll have much more luck restoring backups than recovering deleted files. Backup services are cheaper than professional data recovery services, too.
Deleted files aren’t necessarily gone forever, but they’re not always easy to recover. As solid-state drives are used in more and more new computers, proper backup procedures are becoming even more important.
|
||
|
Laughing at your own mistakes lengthens your life. Laughing at your wife’s mistakes shortens it.
|
||
|
How to change the Recycle Bin settings in Windows 10.
Any time you delete something in Windows, it goes to the Recycle Bin. It sits there until the Recycle Bin reaches its preconfigured maximum size (or until you empty the bin), at which point Windows deletes the oldest files in the bin to make room for new ones. This gives you a chance to restore deleted files before they’re permanently gone.
Most people just leave the Recycle Bin alone, never adjusting its default settings and letting it do its job, though there are settings you can adjust.
Change the maximum size of the Recycle Bin.
The Recycle Bin has a maximum amount of storage it can reach before Windows deletes old files to make room for new ones. The default storage size is a little tough to nail down. On a personal computer used by one person that’s not part of a managed network, the Recycle Bin takes up just over 5% of the total size of a disk. So, for example, on a normal 1 TB drive (which has about 930 GB of usable space), you can expect the Recycle Bin’s default size to be around 46 GB.
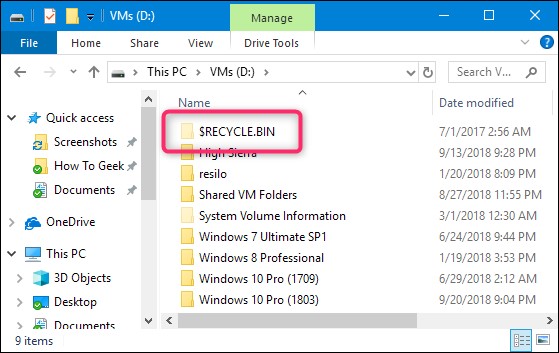
If you have more than one hard drive in your computer, each hard drive has its own Recycle Bin. Each one is stored as a hidden system folder named “$RECYCLE.BIN” at the root of each drive. You can see it in the image below.
Here’s where it gets a bit tricky. Even though each drive has its own Recycle Bin folder, the total contents of all those folders are combined in the normal Recycle Bin view so that you see all your deleted files, no matter where they come from.
Most of the time, that 5% default storage will be fine but there are times when you might want to adjust it. If you have a 2 TB hard drive that holds files you rarely delete, there’s not much point in the Recycle Bin taking up 100 GB of space.
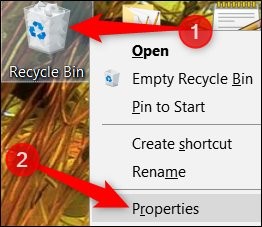
Open up the Recycle Bin properties window by (1) right-clicking the Recycle Bin icon on your desktop and then (2) clicking the “Properties” command.
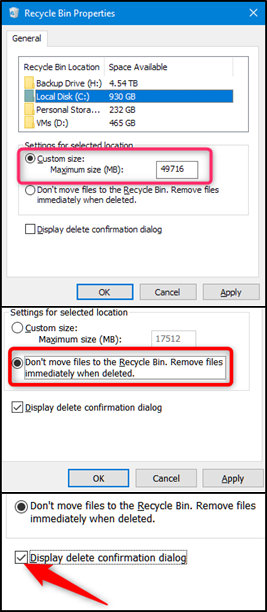
In the properties window, you’ll see each volume listed. If you have only one volume (your system or C: drive), that’s all you’ll see. Select the volume for which you want to change the size and then type a specific size in MB in the “Custom Size” field.
Stop using the Recycle Bin and have Items Deleted Immediately.
If you prefer to have things deleted immediately rather than sitting in the Recycle Bin, (though I can’t think or a good reason why you would) you can make that happen. I definitely don’t recommend it for general use, but I suppose it could be handy in some situations. Maybe you need to delete a bunch of things at once that you know you won’t need ever again and you don’t want to affect what’s already in the Bin.
To make this happen, in the Recycle Bin Properties window, select the “Don’t move files to the Recycle Bin. Remove files immediately when deleted.” option.
When you have this option enabled, it might be wise to also enable the confirmation box by ticking the “Display Delete Confirmation Dialog.” This option forces Windows to prompt you any time you delete something, to make sure you really want to delete it.
I suggest you have this clicked at all times anyway.
The Recycle Bin is something most of us never give a second thought, but with a little tweaking, you can make it work the way you want.
|
||
|
|
||
|
Your Smartphone has a Special Security Chip. Here’s how it works.
Google’s new Pixel 3 phones have a “Titan M” security chip. Apple has something similar with its “Secure Enclave” on its iPhones. Samsung’s Galaxy phones and other Android phones often use ARM’s TrustZone technology.
Here’s how they help protect your phone.
These chips are basically separate little computers inside your phone. They have different processors and memory, and they run their own tiny operating systems. Your phone’s regular operating system and the applications running on it can’t see inside the secure area. This protects the secure area from tampering and lets the secure area do a variety of useful things.
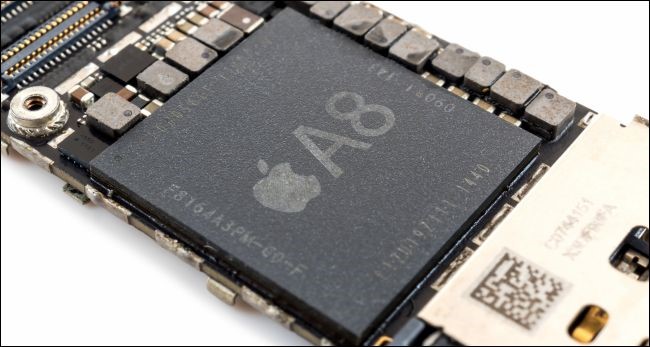
The Secure Enclave is part of Apple’s A-series system-on-a-chip hardware. All these chips work in slightly different ways. In Google’s new Pixel phones, Titan M is an actual physical chip that’s separate from the phone’s normal CPU.
With Apple’s Secure Enclave and ARM’s TrustZone, the Secure Enclave or TrustZone is not technically a different “chip.” Instead, it’s a separate, isolated processor built into the device’s main system-on-a-chip. While its built-in, it still has a separate processor and area of memory. Think of it as a chip inside the main chip.
Either way, whether it’s Titan M, Secure Enclave, or TrustZone, the chip is a separate “coprocessor.” It has its own special area of memory and runs its own operating system. It’s completely isolated from everything else. In other words, even if your entire Android or iOS operating system was compromised by malware and that malware had access to everything, it wouldn’t be able to access the contents of the secure area.
How it protects your phone.
Apple’s Secure Enclave holds the keys to your Face ID biometric data. The data on your phone is stored encrypted on disk but the key that unlocks the data is stored in the secure area. When you unlock your phone with your PIN, password, Face ID, or Touch ID, the processor inside the secure area authenticates you and uses your key to decrypt your data in memory.
This encryption key never leaves the security chip’s secure area. If an attacker is attempting to sign in by guessing multiple PINs or passwords, the secure chip can slow them down and enforce a delay between attempts. Even if that person had compromised your device’s main operating system, the secure chip would limit their attempts to access your security keys.
On an iPhone or iPad, the Secure Enclave stores encryption keys that protect your face (for Face ID) or fingerprint (for Touch ID) information. Even someone who stole your phone and somehow compromised the main iOS operating system wouldn’t be able to view information about your fingerprint.
Google’s Titan M chip can also protect sensitive transactions in Android apps. Apps can use Android 9’s new “StrongBox KeyStore API” to generate and store their own private keys in Titan M. Google Pay will be testing this out soon. It could also be used for other types of sensitive transactions, from voting to sending money.
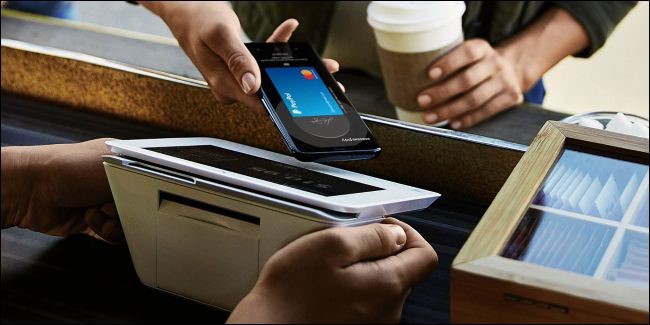
iPhones work similarly. Apple Pay uses the Secure Enclave, so the details of your Mastercard/Visa etc are stored and transmitted securely. Apple also lets apps on your phone store their keys in the Secure Enclave for additional security. The Secure Enclave ensures its own software is signed by Apple before booting, so it can’t be replaced with modified software.
ARM’s TrustZone works very similarly to the Secure Enclave. It uses a secure area of the main processor to run critical software. Security keys can be stored here. Samsung’s KNOX security software runs in the ARM TrustZone area, so it’s isolated from the rest of the system. Samsung Pay also uses ARM TrustZone to handle payment card information securely.
On a new Pixel phone, the Titan M chip also secures the bootloader. When you start your phone, Titan M ensures you’re running the “last known safe Android version.” Anyone with access to your phone can’t downgrade you to an older version of Android with known security holes. And the firmware on Titan M can’t be updated unless you enter your passcode, so an attacker couldn’t even create a malicious replacement for Titan M’s firmware.
Why Your Phone Needs a Secure Processor.
Samsung Pay uses ARM TrustZone and Samsung KNOX. Without a secure processor and isolated memory area, your device is much more open to attack. The secure chip isolates critical data like encryption keys and payment information. Even if your device is compromised, malware couldn’t access this information. The secure area also throttles access to your device. Even if someone has your device and replaces its operating system with a compromised one, the secure chip won’t let them guess a million PINs or passcodes a second. It will slow them down and lock them out of your device.
When you’re using a mobile wallet like Apple Pay, Samsung Pay, or Google Pay, your payment details can be stored securely to ensure that no malicious software running on your device can access them. Google is also doing some interesting new things with the Titan M chip, such as authenticating your bootloader and ensuring no attacker can downgrade your operating system or replace your Titan M firmware.
Even a Spectre-style attack that lets an application read memory that doesn’t belong to it wouldn’t be able to crack these chips, as the chips use memory that’s completely separate from the main system memory.
No smartphone user really needs to know about this hardware, although it should make you feel more secure when keeping sensitive data like credit cards and online-banking details on your phone. This is just cool technology that works silently to protect your phone and data, keeping you more secure. A lot of smart people are putting a lot of work into securing modern smartphones and protecting them against all kinds of possible attacks. And lots of work goes into making that security so effortless that you’ll never even have to think about it, too.
|
||
|
|
||
|
|
||
|
Check Windows 10 Camera Options.
On Windows 10, the Settings app has a few switches that disable your webcam in all applications. If you disable your webcam here, even desktop applications won’t be able to use it.
This is a little confusing. In general, the app permissions options under Settings > Privacy mostly affect new Windows 10 apps from the Store, also known as UWP apps. But the webcam options also affect desktop apps.
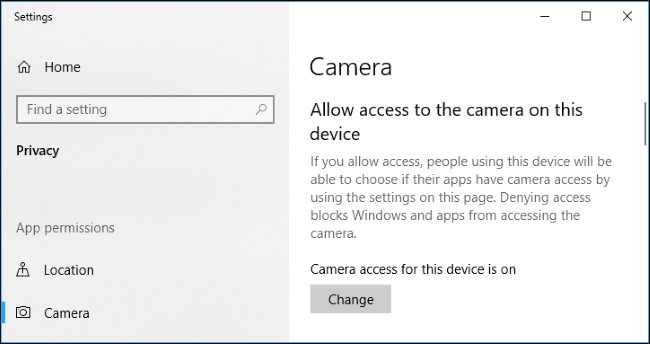
If your webcam isn’t working, head to Settings > Privacy > Camera.
At the top of the window, ensure it says “Camera access for this device is on.” If it says camera access is off, click the “Change” button and set it to “On.” If camera access is off, Windows and applications on your system won’t be able to use the webcam.
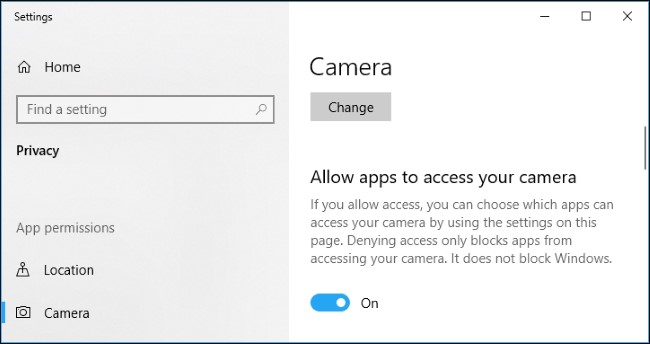
Just under that, ensure “Allow apps to access your camera” is also set to “On.” If it’s set to Off, no applications on your system, including desktop applications, can see or use your camera. However, the Windows operating system can still use your camera for features like Windows Hello. This option was changed with the release of Windows 10’s April 2018 Update. Previously, it only affected Universal Windows Platform (UWP) apps and didn’t affect traditional desktop applications.
Under “Choose which apps can access your camera,” ensure the app that wants to access your camera isn’t listed and set to “Off.” If it appears in this list, set it to “On.”
Note that traditional desktop applications don’t appear on this list. Only Store applications appear here. Traditional desktop applications can always access your webcam as long as you’ve enabled the system-wide “Allow access to the camera on this device” and “Allow apps to access your camera” options.
As long as the above options are set correctly, Windows 10 shouldn’t be getting in the way. That just leaves the traditional webcam troubleshooting steps.
|
||
|
|
||
|
Golf is played by hundreds of thousands of Australian men whose wives think they are out having fun.
|
||
|
|
||
|
|
||
|
|
||
|
|
||
|
|