
|
Vol 76 |
Page 4 |
Privacy Policy | Editorial Policy | Profit Policy | Join the Association | List of Members | Contact us | Index | Links
Back Go to page: 1 2 3 4 5 6 7 8 9 10 11 12 13 14 15 16 17 18 19 20 Forward

Computers and Stuff
Sam Houliston.
Contents.
How to clear Cookies on an Android device:
How to make a PowerPoint presentation into a video.
How to make videos always full screen in Film & TV.
How to transfer files from Windows to Android.
How to undelete files from OneDrive.
How to watch YouTube using an Android or iPhone device.
How to wrap text in Microsoft Excel.
![]()
Undelete files from Onedrive.
If you deleted a file or folder from your OneDrive account, you can restore them from the Recycle Bin within 30 days but you have to be quick as after 30 days the deleted file or folder is automatically and permanently deleted from the Recycle Bin. You can do this from either your desktop or mobile device.
Here’s how to restore a deleted OneDrive file or folder using your desktop device.
.JPG)
First, from your desktop, log into your OneDrive account then click the “hamburger” icon (arrowed) at the top left. This opens the window below, .
.JPG)
Click on Recycle Bin. This will open the OneDrive Recycle Bin, look for the file or folder you wish to restore, right click it then click “Restore”. This will restore that file or folder to your OneDrive account.
If you want to restore all the items in the Recycle Bin, just click “Restore All Items” at the top of the screen.
.jpg)
Here’s how to restore a deleted OneDrive file or folder using your Android device.
To restore using your Android device you must first download the OneDrive App. (You can of course use an iPhone device too but not having one we’re unsure how to do it – but it will be similar to this.)
On your Android device, open the OneDrive App, a window will open and depending on your device, will most likely open in HOME. Click on "Me" down the bottom right of the screen and another window will open. Click on Recycle bin and restore the item(s) similar to the method outlined earlier.
REMEMBER: You are not restoring a file or folder to your desktop or mobile device, you are restoring the item to your cloud storage site. You are only using your desktop or mobile device to accomplish the restoration.
If you don't have a sense of humour, you probably don't have any sense at all.
How to watch YouTube using an Android or iPhone device.
Smartphones are great for watching YouTube videos, but the smaller controls can be a little annoying to use. Thankfully, the YouTube app is full of handy gestures. If you don’t know about them, you’re really missing out. The gestures here are available in the YouTube app for iPhone, iPad, and Android devices.
Double-Tap to skip forward and back.
YouTube puts buttons for Play, Next Video, and Previous Video on the screen, but what about skipping a little bit forward or backward? That’s where this handy gesture comes in. Simply double-tap the left or right side of the video with one finger to skip forward or backward 10-seconds. You’ll see arrows to indicate the skipping.
Two-Finger Double-Tap to skip chapters.
Some long videos on YouTube have “chapters” to divide the video into sections. These chapters are indicated on the scroll bar, but you can also easily skip through them with a gesture. This time, double-tap the left or right side of the video with two fingers to skip to the next or previous chapter. You’ll see arrows and the chapter title on the screen when it works.
Slide finger to scrub through video.
Google removed the ability to tap anywhere on the seek bar to skip to that spot in the video after complaints of accidental taps. The replacement is a lesser-known gesture. First, with a video playing, tap and hold your finger on the video. Keeping your finger pressed on the screen, slide your finger left-to-right to scrub through the video. A little box will show you a preview of the video. Lift your finger off the screen to start playing the video from the position you land on.
Pinch-to-zoom to fill the entire screen.
.jpg)
A lot of smartphones these days don’t have the same aspect ratio as YouTube videos. You may notice black bars on the sides of the video when you watch in full-screen. A simple gesture can fix this. All you have to do is pinch two fingers out to zoom in on the video. It will now fill the entire screen, but keep in mind that this does cut off some of the top and bottom of the video.
Swipe video down to minimize.
Say you’re watching a video and you want to keep browsing on YouTube while it plays. There’s a handy gesture for that, too. Simply swipe—or “pull”—the video down from the top of the screen. The video will continue playing in a minimized bar at the bottom of the screen. You can tap or swipe it up to go back to the full video.
These gestures are all very simple, but YouTube doesn’t make them super obvious.
Important Information
This is how HACKERS get your information.
With websites, there is a big difference between http:// and https:// I don’t know how many of you are aware of the difference, but it is worth knowing.
The main difference between http:// and https:// is it’s all about keeping you secure. HTTP bit stands for Hyper Text Transfer Protocol. The “S” stands for “secure”.
If you visit a website or web page and look at the address in the web browser, it will likely begin with the following: http:// This means that the website is talking to your browser using the regular “unsecured” language. In other words, it is possible for someone to “eavesdrop” on your computer’s conversation with the website. If you fill out a form on the website, someone might see the information you send to that site.
This is why you never enter your credit card number in an http:// website!
But if the web address begins with https://, that means your computer is talking to the website in a secure code that no one can eavesdrop. If a website ever asks you to enter your credit card information, you should automatically look to see if the web address begins with https://. You will note that the Radschool site is https://radschool.org.au/ ensuring that it is secure and any information you provide to Radschool is totally secure.
If it doesn’t, you should NEVER enter sensitive information such as a credit card number to a http site.
Stroke a cat and you will have a permanent job.
How to wrap text in Microsoft Excel.
.jpg)
Wrapping your text in Microsoft Excel keeps your file easy to read. It also makes the width of your columns more consistent which will help your spreadsheets look more professional.
Here are different ways to do it.
Wrap using a keyboard shortcut.
Perhaps the quickest way to wrap text to the inside of a cell (so that the text automatically fits and doesn’t get cut off) is by using a keyboard shortcut. First, open your Excel document and select the cell you want to wrap. Press Alt+H, (This opens the Home tab in the ribbon with all shortcuts highlighted) press the “W” key. The text in the cell will wrap to fit automatically, which is useful for quickly wrapping text one cell at a time.
Wrap using the “Wrap Text” option
Another easy way to wrap text in Excel is to use the “Wrap Text” option on the ribbon. First, start by opening a new or existing document in Microsoft Excel. Then navigate to the ribbon (the toolbar at the top of the screen) and select the “Home” tab. In the body of the spreadsheet, select and highlight any cell or a range of cells where you want your text to automatically wrap as you type.
.jpg)
.jpg)
In the “Home” ribbon, click “Wrap Text.” The button now appears slightly shaded, showing that any text you write in the selected cells will wrap to fit inside each cell completely.
Type anything you want into the cells you selected. The text will wrap automatically so you can read it easily and avoid text overflow into other cells. Wrapping text using this method is extremely useful if you’re formatting cells in a hurry, and it’s ideal if you want to select a large number of cells to automatically format as you fill in the data.
The only drawback to wrapping text this way is that you have to manually resize the width of the cell if you have a significant amount of text in it. For example, writing a lot of text in a single cell makes it look overly compact and difficult to read.
To fix this manually, widen the column by navigating to the edge of the column in the toolbar and click and hold it. You’ll see the width value for that column pop up in a little box. When you unclick that little box disappears. Drag the cursor to the right until it reaches your desired size. You can do the same thing to adjust the row height and make it look a little tidier. Adjust the height and width until you’re happy with the result.
Wrap using the “Format” option.
.jpg)
You can also wrap text in Excel using the “Format” option. First, select any single cell or range of cells in the body of your spreadsheet that you want to wrap. In the “Home” tab of the ribbon, select “Format.” A drop-down menu will appear. Click “Format Cells.”
(You can access the same menu by right-clicking in any cell or range of cells and selecting “Format Cells,” which might be a little faster depending on your preference.)
.jpg)
After selecting “Format Cells,” A formatting menu will appear. In the format menu, click the “Alignment” tab.
Under “Alignment,” place a check mark beside “Wrap Text” in the “Text Control” section. Then click “OK” to save your settings. This will wrap any existing text in the cells you just selected and formatted.
The cell(s) does not need to contain text for you to format it to wrap text in the future. Using this method makes it easier to pick and choose which cells you want to format this way. It also allows you to format cells individually with different parameters (merging, numerical values, formulas, etc.) while also enabling a text wrap as you input data.
How come it takes so little time for a child who is afraid of the dark
to become a teenager who wants to stay out all night?
How to clear Cookies and Site Data on Android.
Websites store data, like your login state, preferences and even tracking information, this information is called Cookies, but you can clear this information whenever you want: Here’s how to do it on Android.
What are Browser Cookies and Site Data?
When you visit a website it will remember certain information, which it stores in your browser’s cookies and site data. Things like passwords and user settings can be saved so it’s easy to use the site the next time you visit it, however, this data can add up and you may feel the need to clear it.
Depending on which browser you use, there are different ways to clear cookies. Click the browser you use below to find out how to clear cookies from that browser.
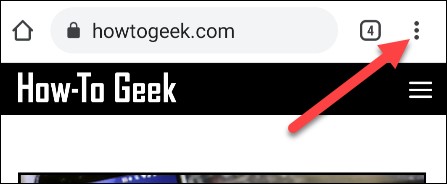
Google Chrome is the default browser on Android devices. First, open Google Chrome on your Android phone or tablet and tap the three-dot menu icon in the top right corner.
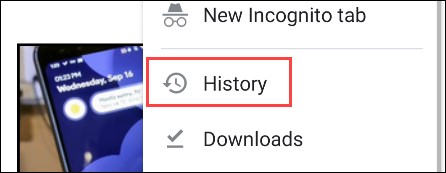
Next, select “History” from the menu.
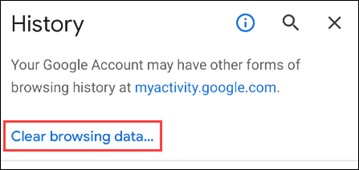
Now go to “Clear Browsing Data.”
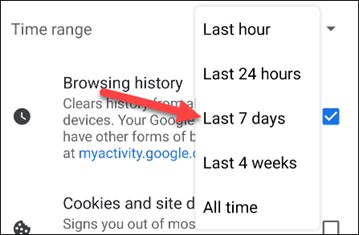
Here’s where you can select what browsing data you would like to clear. First, choose a time range for how far back you want to clear.
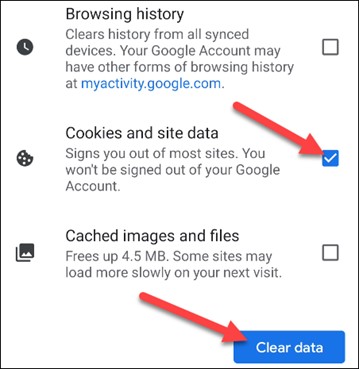
Make sure “Cookies and Site Data” is the only category selected and tap “Clear Data.”
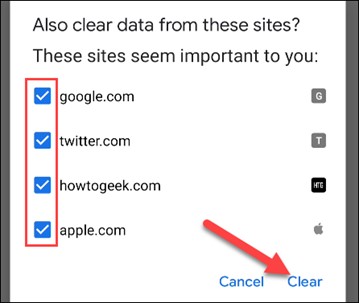
You may see a pop-up asking if you’re sure you want to clear data from sites that “seem important to you.” Check all that you want to include and tap “Clear” to continue.
All done! Cookies and site data for the chosen time length will be cleared.

First, open Microsoft Edge on your Android phone or tablet and tap the three-dot menu icon in the bottom bar.
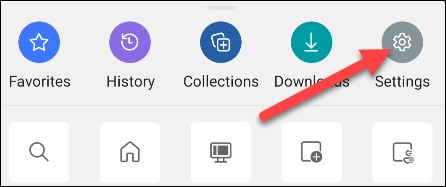
Select “Settings” from the menu.

Next, go to the “Privacy and Security” section.

Scroll all the way down to “Clear Browsing Data.”
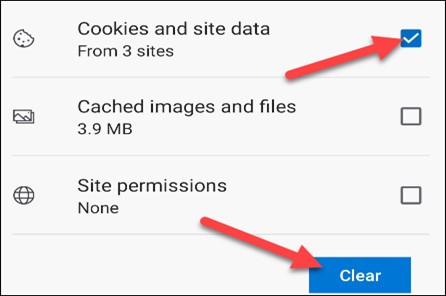
Make sure only “Cookies and Site Data” is selected, then tap “Clear.” Unlike Google Chrome, you can’t select how far back you want to clear.
A pop-up will ask if you’re sure you want to clear the data. Tap “Clear” to proceed.
That’s it! All of your cookies and site data will be removed. Edge doesn’t allow for as much fine-tuning as Chrome, but it still gets the job done. Just don’t overdo it.
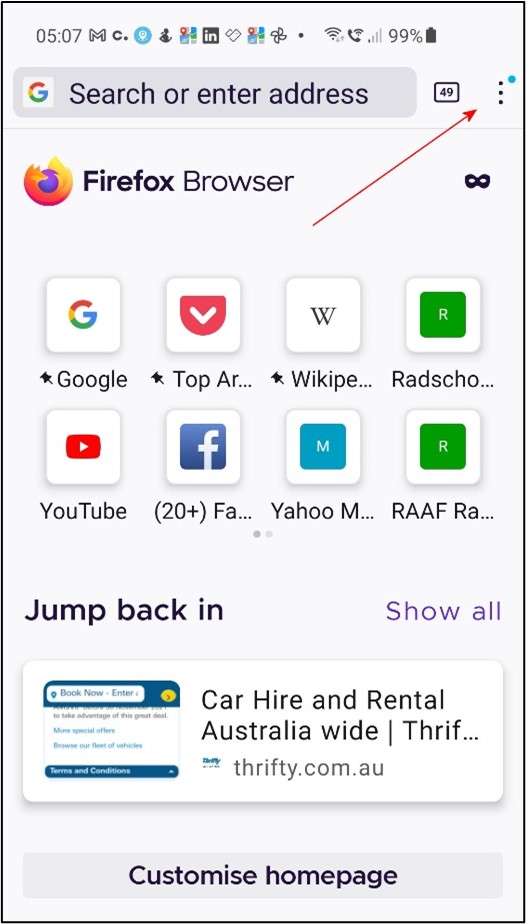
Open the Firefox browser and click on the 3 dots at the top right.
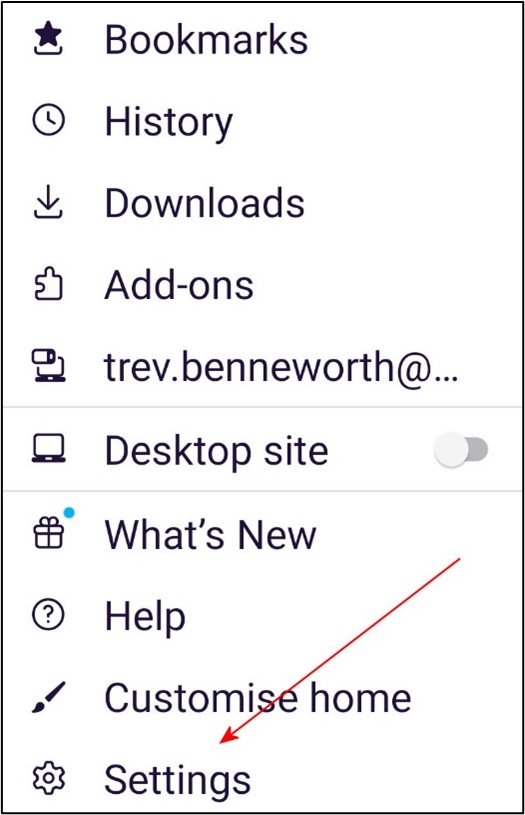
Click on Settings.
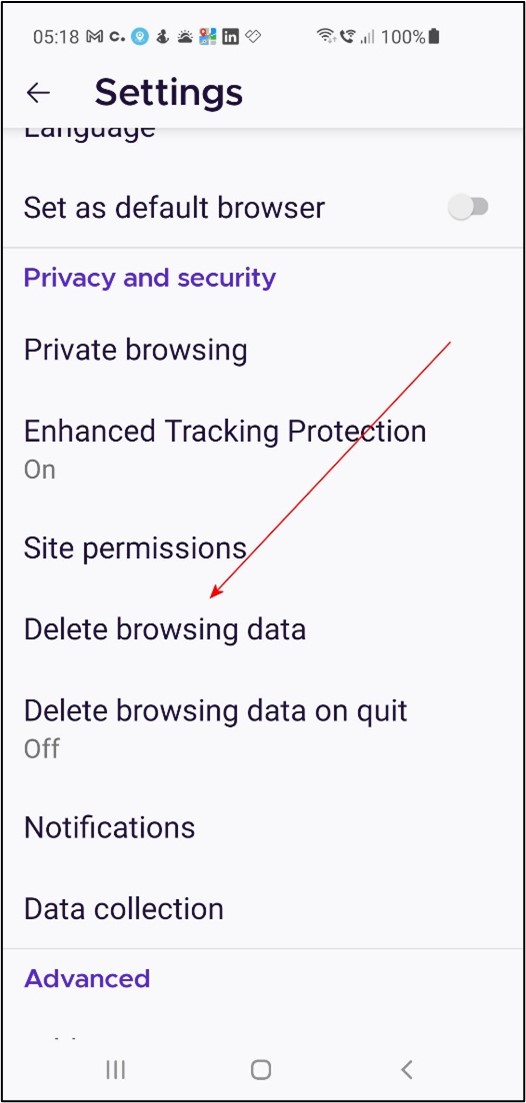
Scroll down and click “Delete browsing data.
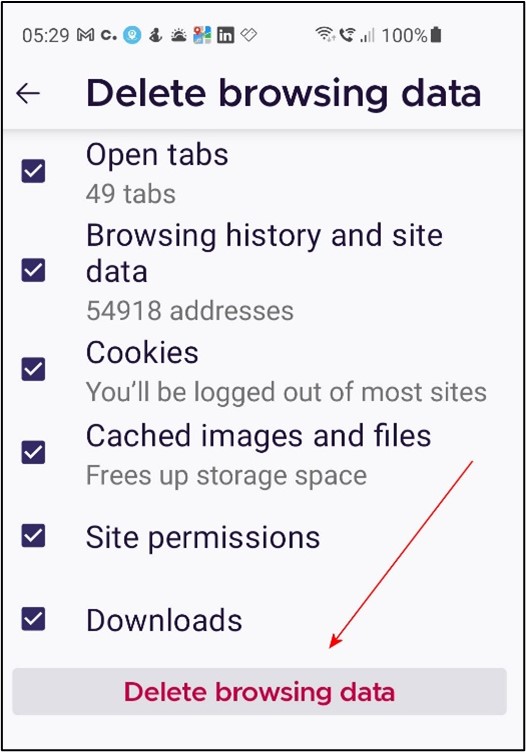
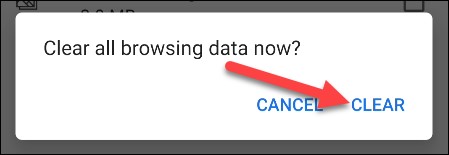
All items will be selected by default. Unselect what you do not want to delete, keep “Browsing history and site data” and “Cookies” then click “Delete browsing data”.
Life isn't tied with a bow, but it's still a gift.
.jpg)
How to make a Microsoft PowerPoint Presentation into a Video.
Microsoft PowerPoint presentations are great, but they are not as easily accessible as videos. Luckily, you can convert your presentations to videos with a built-in option. Here’s how.
Why convert a PowerPoint to Video?
There are many reasons to turn a presentation into a video. Maybe you want to send someone a presentation but they don’t have PowerPoint installed, or, maybe you want to upload your presentation to a site that only accepts videos. PowerPoint has a built-in option to convert presentations to videos. When you perform this conversion, all your original animations, transitions, and media items are preserved. Your resulting video also includes all recorded timings, narrations, ink strokes and laser pointer gestures (though you can choose not to include these if you want).
Convert a PowerPoint Presentation to a Video
To turn a PowerPoint presentation into a video, first, open your presentation with the PowerPoint app on your Windows or Mac computer.
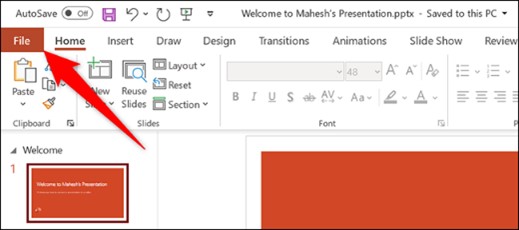
In the top-left corner of PowerPoint, click the “File” option.

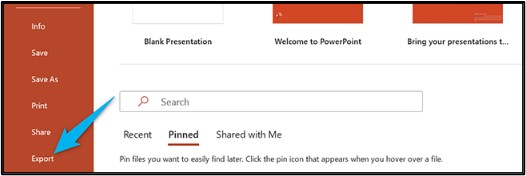
From the sidebar that opens after clicking the “File” option, select “Export.”
In the “Export” menu, click “Create a Video.”
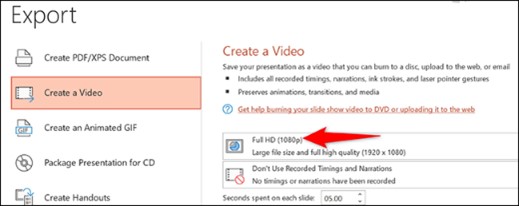
To the right of the “Export” menu, you will now see a “Create a Video” section. In this section, you will define the options for your video file. First, choose the quality for your video by clicking the “Full HD” option.
You will see multiple video quality options. Select the one that you think works the best for you. Know that the higher the quality you select, the larger the file size of your video will be.
There are worse things than getting a call from a wrong number at 4 am,
for example, it could be the right number.
How to wirelessly transfer files from Windows to Android
.jpg)
Moving files between devices is a pretty common thing to do. There are plenty of ways to do it, some being better than others. If you use a Windows PC and Android device, here are some easy to use methods.
Transfer files using Bluetooth.
The easiest method is always going to be the one that works with what you already have. If your Windows PC and Android device have Bluetooth, that’s all you need to wirelessly transfer files. First, you need to pair your Windows PC with your Android device. This will only need to be done once.
If you haven’t already paired your phone to your PC, open Settings on your PC, go to Devices > Bluetooth & Other Devices. Ensure that Bluetooth is on and that the PC is discoverable.
.jpg)
Next, grab your Android device and open the Settings app. Go to the “Connections”, “Connected Devices” or “Bluetooth” section and tap “Pair New Device.” Find your PC on the list of available devices and pair it.
Find your PC on the list and select it to pair the two devices.
With the devices paired, you can use Bluetooth file transfer. The process is a bit cumbersome, but it works without any additional software on either device. Back on your Windows PC, open the “Bluetooth & Other Devices” settings menu again. This time, click “Send or Receive Files via Bluetooth” in the Related Settings sidebar.

A new window will open. Select “Send Files.”
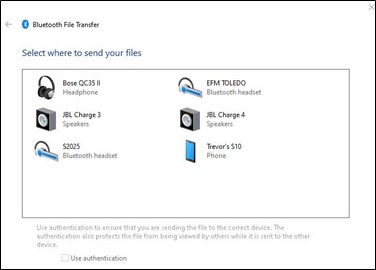
Next, you’ll see a list of Bluetooth devices that have been connected to your PC. Select your Android device from the list and click “Next.”
Choose “Browse” on the next screen to open the file manager and find the file that you would like to send. After you select a file, click “Next” to begin the transfer. An “Incoming File” notification will appear on your Android device. Tap it and select “Accept” from the pop-up. The transfer will process and the file will now be on your Android phone or tablet! You’ll find it in the “Downloads” section.
Transfer Files Using Cloud Storage.
If Bluetooth isn’t your style, or perhaps one of your devices doesn’t have it, there are other methods for sharing files between your Windows PC and Android handset. The popular alternative is a cloud storage service. This will allow you to upload a file on your Windows PC and download it from the companion app on your Android device.
Microsoft OneDrive, Google Drive and Dropbox are popular cloud storage services that will work for this task. All will work in a similar manner, but for this guide, we will demonstrate with OneDrive.
First, download the OneDrive app from the Play Store on your Android device. Make sure that you’re signed into the app using the same Microsoft account as your Windows computer.
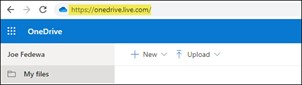
Next, open a web browser on your Windows PC (such as Firefox, Edge or Chrome) and navigate to the OneDrive website.
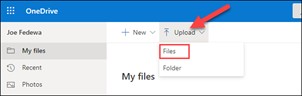
Select the “Upload” drop-down menu and choose “Files.” (or Folder). The file manager will open, and you can select the file(s) (or folder) that you wish to transfer.
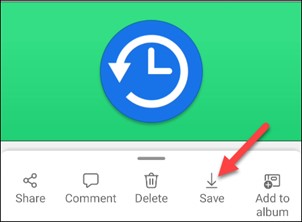
Now, go back to your Android device and open the OneDrive app. Select the file(s) or folder that you just uploaded. Tap “Save” to download it to your Android device.
If this is your first time using OneDrive, you will be asked to grant the app access to your photos and media. Tap “Allow” to proceed.
OneDrive will default to saving files to the “Download” folder on your phone or tablet. You can tap “Save” to insert it there or tap the back arrow to see more folders.
That’s it! The file will be saved to the folder that you selected.
Cats have a very precise method of walking, called “direct registering”, wherein their hind paws fall almost exactly into the place their fore paws did a moment before—this method of walking minimizes noise and visible tracks while ensuring more stable footing as the place has already been felt out by the fore paws.
How to make videos always full-screen in Films & TV on Windows 10.
.jpg)
Are you sick of always having to click an option to make your videos full-screen in the Films & TV app? If so, make full-screen the default playback mode so all your videos automatically take up the entire screen. Here’s how.
In some versions of Win 10, the Films & TV app is called Movies & TV, but it’s the same app and does the exact same tasks.
To start, open the Films & TV app on your Windows 10 PC. Do this by clicking the “Start” button, selecting “All Aps” then scroll down to “Films & TV”. Click it.
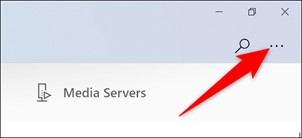
In the Films & TV app, at the top-right corner, click the three dots. From the three-dots menu, select “Settings.”

Scroll down to the “Playback” section, toggle on the “Always Start Videos in Full Screen” option.
And you’re all set. Any video that you open with the Films & TV app will now play full-screen by default. Very useful!
No one has more driving ambition than the teenage boy who wants to buy a car.
.jpg)
Back Go to page: 1 2 3 4 5 6 7 8 9 10 11 12 13 14 15 16 17 18 19 20 Forward