
|
Vol 76 |
Page 9 |
Privacy Policy | Editorial Policy | Profit Policy | Join the Association | List of Members | Contact us | Index | Links
Back Go to page: 1 2 3 4 5 6 7 8 9 10 11 12 13 14 15 16 17 18 19 20 Forward

Allan George's Gems.
Contents.
10 ways to increase the performance of your PC.
How frequent Flyer loyalty programs work.
How to save passwords in Google Chrome.
![]()
10 Quick Steps to increase PC performance.
We live in the future. Your living room speaker turns on the coffee pot, a robot vacuums the house, and the thermostat knows when you get home, but even in this amazing era of automation, your PC still needs some manual help when it slows down. Here are 10 tips on how to speed it up.
1. Check your Startup programs.
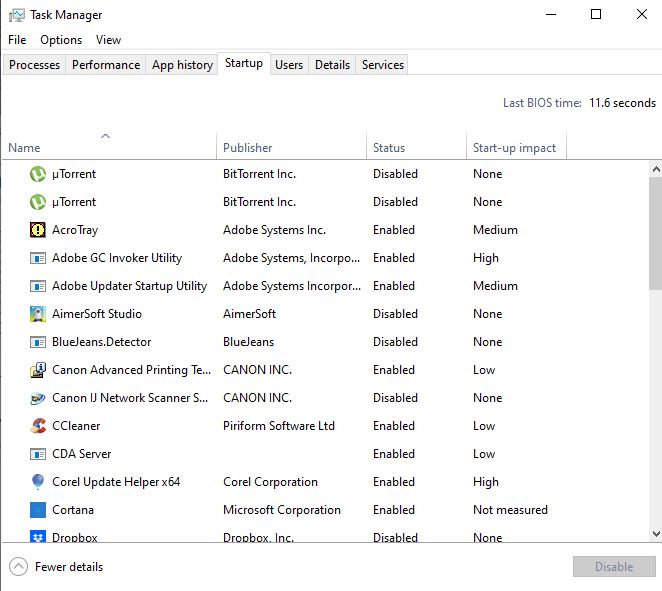
When a computer is slow to boot up, a common ailment is having too many start-up programs. To fix this in Windows 10, press the Windows key, and then type (and select) Task Manager. When the Task Manager opens, click the “Startup” tab. Here, you’ll see all the programs that are set to turn on when Windows boots up. Take a look at the column on the far right labelled Startup Impact. Examine anything rated as having a “high” or “medium” impact and decide whether it’s really important. You don’t want to turn off anything that’s mission-critical, even it does have a “high” impact, but take a good look at everything. Once you’ve decided what will be turned off, select them one at a time with your mouse and click Disable in the lower right corner.
2. Adjust your Restart settings.
When your computer restarts automatically because of a system or program update, by default Windows 10 tries to reopen everything that was open on the desktop before the shutdown. It’s a nice feature, but it can also impact performance, and turning it off is easy. Open the Settings app (click “Start” and then select the settings cog) in the lower left of the Start Menu. Inside the Settings app, select Accounts > Sign- In Options. Then under Privacy turn off the slider labelled “Use my sign-in info to automatically finish setting up my device and reopen my apps after an update or restart.”
3 Remove Bloatware and Superfluous Apps.
Startup apps are just half the problem. Some programs have little helper utilities that run in the background even when an app isn’t running. You don’t want to turn these off manually unless you’re familiar with what they’re doing, a better approach is to just unload the apps that you never or rarely use, including bloatware applications that came preinstalled on your PC. Right-click on any superfluous Windows 10 Store apps in the Start menu and select “Uninstall.” This works for regular desktop apps as well, but we still recommend the old school Control Panel method for removing those.
4 Check Your Storage Space.
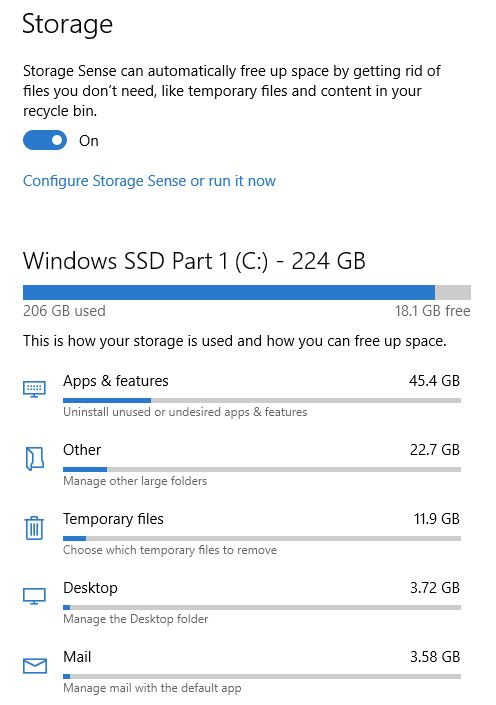
Windows 10 provides more built-in information for viewing and managing your PC’s storage. To find it, open the Settings app and select System > Storage. This section shows a summary of your usage of the system’s primary storage, including how much space apps and features are using, as well as your large files and folders, temporary files, and so on. Typically, the storage usage should have a blue bar indicating how close to full it is. When the bar turns red, you have a problem and need to start unloading files to other drives (or delete them). Using this feature can help you figure out what to delete (or unload), but there are a few things you don’t want to touch. First, even if you see a ton of them in the “Apps & features” section, do not uninstall any of the Microsoft Visual C++ redistributables. It looks redundant, but different programs depend on different versions. Also, if you see anything in the “Other” section any folders labelled AMD, Nvidia, or Intel should be left alone. You also don’t want to touch the System & Reserved section. In general, if you don’t know what something does, then don’t uninstall or delete it. In this section, you can also activate a feature called Storage Sense, which automatically deletes temporary files and other junk when it’s not needed.
5 Tweak the Power Plan.
By default, Windows 10 uses a “balanced” power usage plan that can sometimes hamper performance. The balanced plan keeps your CPU speed lower when it’s not in use and puts key components in their respective power-saving modes during times of low demand. You can ratchet things up by opening the Control Panel (click “Start” and type “Control Panel”) and select “Power Options.” On the next panel, click “Show Additional Plans” and then select the “High Performance” option.
6 Shut down OneDrive.
If for some reason you’re not using OneDrive, this is an easy way to cut down on superfluous system resource usage. The easiest thing to do is turn off OneDrive under the Startup tab in Task Manager—if it’s there. If it’s not, don’t worry, it’s not affecting your speed. Although we wouldn’t recommend it, you can also open the Start menu and under the “O” section, right-click “OneDrive” and select “Uninstall.” This will remove OneDrive from your PC, but all your files will still be on OneDrive.com.
7 Stop background Updates.
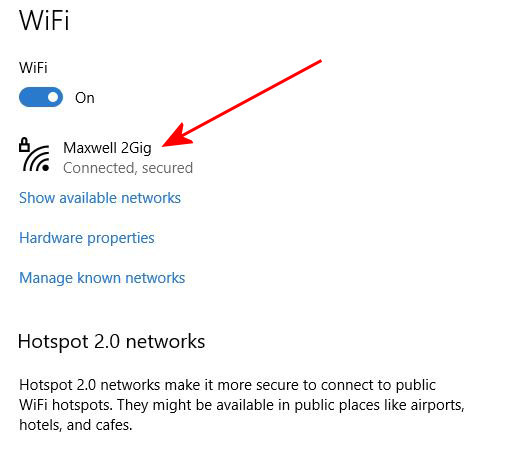
There is something you can do to stymie Windows Update and other background download features in Windows but we would suggest you only do this if your machine is terribly slow and you’re desperate to try and speed it up. Microsoft issues updates for a reason, you’re better to allow them to be installed on your machine when issued. These processes may, however, drag down your internet connection performance, as well as your computer’s. Set your home Wi-Fi or wired Ethernet connection as metered from Settings > Network & Internet > Wi-Fi, or Settings > then click the connected network (arrowed). This opens another window, scroll down to “Metered connection” and set the metred connection to ON. This tells Windows 10 not to download any large updates while on that Wi-Fi connection—at least for a little while anyway. Eventually, it will force an upgrade, but this setting helps most of the time. It also stops some apps from pinging servers, which can help reduce the performance of background processes. Give it a go but if it doesn’t make a huge difference, turn it back off again.
8 Speed up Menus and Animations.
Like other versions of the operating system, Windows 10 uses visual effects that can reduce performance. These are items such as animations, window translucency, shadow effects, and so on. To change this, open your File Explorer, in the left hand window, scroll down and right click ‘This PC’ then click ‘Properties.’ Over on the right hand side of the window that has opened, click ‘Advanced system settings’. This opens another window, click the ‘Advanced’ tab then under ‘Performance’ click ‘Settings’. This opens another window, click the ‘Visual Effects’ tab. By default, Windows 10 tries to pick the settings that are best for your PC, but you can also select the option that says “Adjust For Best Performance,” then click “Apply.” Another alternative is to go through the list manually and uncheck what you don’t want to use.
This change probably won’t do much on mid-range and high-end machines, but budget devices with limited ram and weaker CPUs can benefit.
9 Recovering from a sudden slow down.
If your PC is suddenly slowing down, there are two culprits to look at right away. First, open the Settings > Update & Security > View Update History window. Were any updates installed around the time your PC started slowing down? If so, search online by the update’s KB number (it’s in brackets at the end of each update title), and see if anyone else is complaining about it on PC news sites, forums, or Reddit posts. If a good amount of people are having trouble since that update, then you may need to uninstall it or wait for Microsoft to send a fix—that could take a while. Next, run a standard scan for malware, and then do an online scan with Windows Security (Windows Defender in previous versions of Windows) to make extra sure that everything is fine.
10 Hard Drive Tips.
This last tip doesn’t affect PCs with solid-state drives but it’s good advice for those with hard drives. Spinning drives can do with a little extra maintenance from time to time. These are good old fashioned moves that long-time PC users should be familiar with. First, use the Defragment and Optimize Drives utility. Search for it in the taskbar and it will pop up. Select the drives you want to deal with, and then select the “Optimize” button. You can also turn on automated optimization. Windows defragments and optimizes your drives automatically, but it’s a good idea to check and run it manually if your PC is slow. Next, is the disk cleanup utility—again, search for “Disk Cleanup” from the taskbar or Start menu’s search box. Choose the drive you want to clean up and run it.

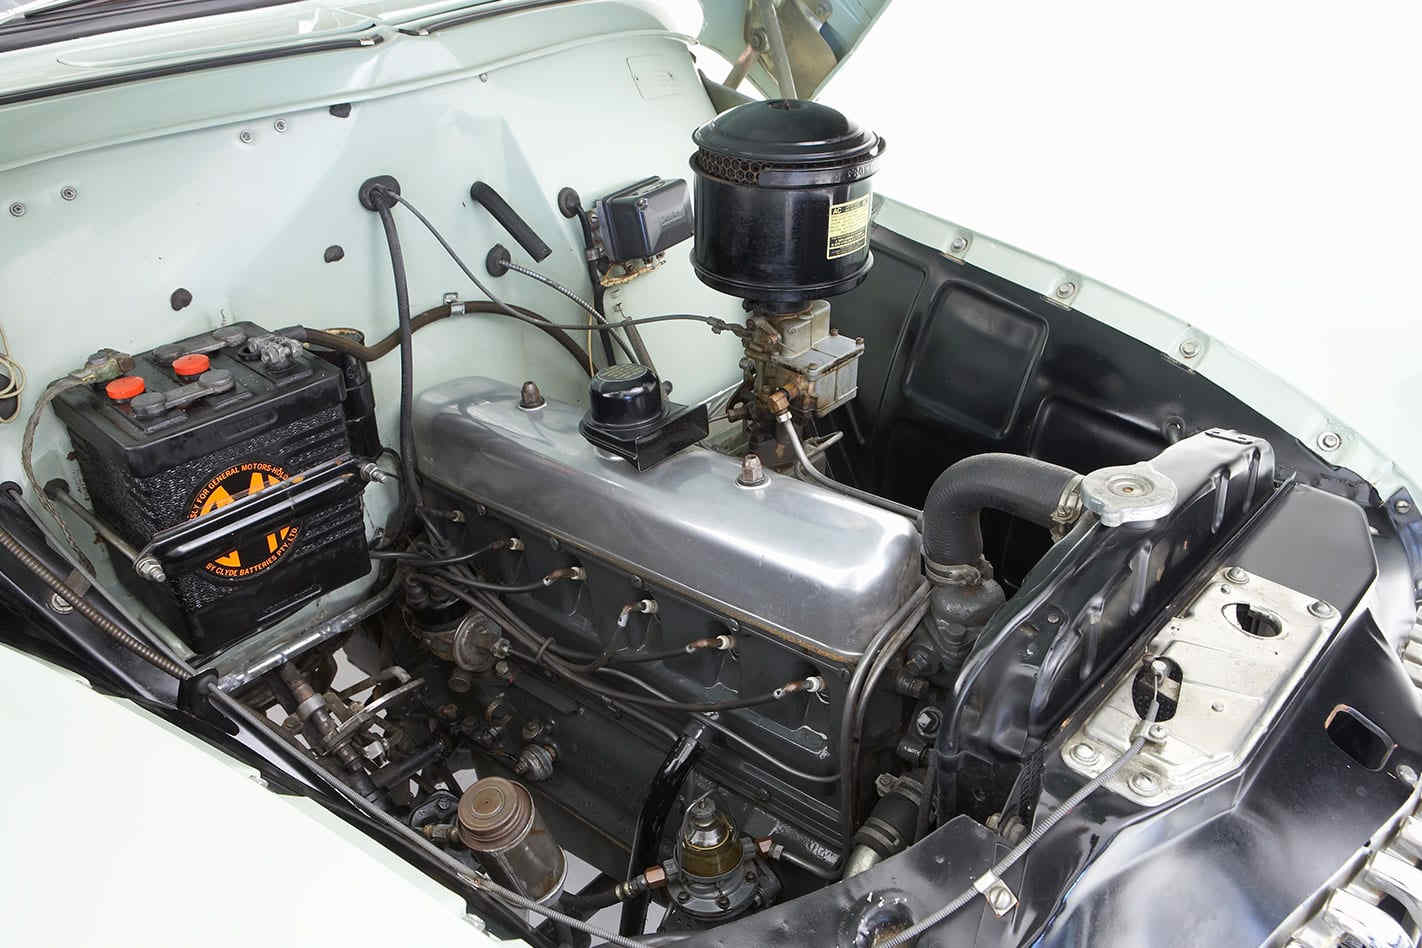
Engine sensors.
Once upon a time car engines were simple creatures. You lifted the bonnet, and it sat there, you could see it all, there was plenty of room to work on it, a dozen or so bolts and you could have it out, simple! 95% of the time you put super or standard petrol into a tube at the back end of the car which fed into a tank that was attached under the car behind the back axle, a mechanical fuel pump attached to the engine and driven by the camshaft would suck fuel from the tank and feed it into a float chamber on a carburettor. To start your car, (if you lived in Tassie), you pulled on a choke button which closed off a valve at the opening of the carburettor changing the fuel/air mixture to super rich, you actuated the starter motor and pressed down on the accelerator which opened another valve further down in the carburettor allowing air to be sucked into an inlet manifold which fed it into the cylinders, drawing some fuel from the float chamber by way of a venturi built into the carburettor. Also driven by the camshaft would be a distributor which would have a number of leads coming out the top with one going to each spark plug screwed into the side of the engine head.
As the engine turned by way of the starter motor, a rotor inside the distributor would also turn, as would a little cam which would open and close a set of electrical contacts. These contacts, called points, as they opened and closed as the little cam spun with the engine, would interrupt the current flow to a coil, which, due to the making and breaking of a magnetic field (built by the coil) would cause a large voltage to be induced into a second winding in the coil. That voltage would then be fed to each spark plug at the right time by way of the leads from the distributor. At the end of each spark plug there would have a small gap between an insulated inner core and its outer which was attached to the engine head. The voltage fed to the plug would be high enough to allow it to jump the gap to the engine head – causing a spark. This spark would ignite the fuel/air mix in each cylinder, the engine would ‘start’, you would let go of the starter button and as the engine warmed up, you’d push in the choke.
And that was it. To be efficient and deliver maximum power, all those events had to happen at a specific time. The spark had to happen when fuel had been sucked into the engine and the piston in the cylinder was nearly at the top of its cycle. The distributor took care of this, it had small weights built in which would spin with the engine and when the engine revs increased centrifugal force would pull them outwards which through a small lever system would cause the distributor to send the high voltage to each plug a little earlier (called engine advance) than when the piston reached the top of its cycle. But that system relied on RPM, it didn't take into account any load on the engine when more power was needed. To overcome this, a small hose was connected from the inlet manifold to the distributor which, using vacuum, also advanced the timing.
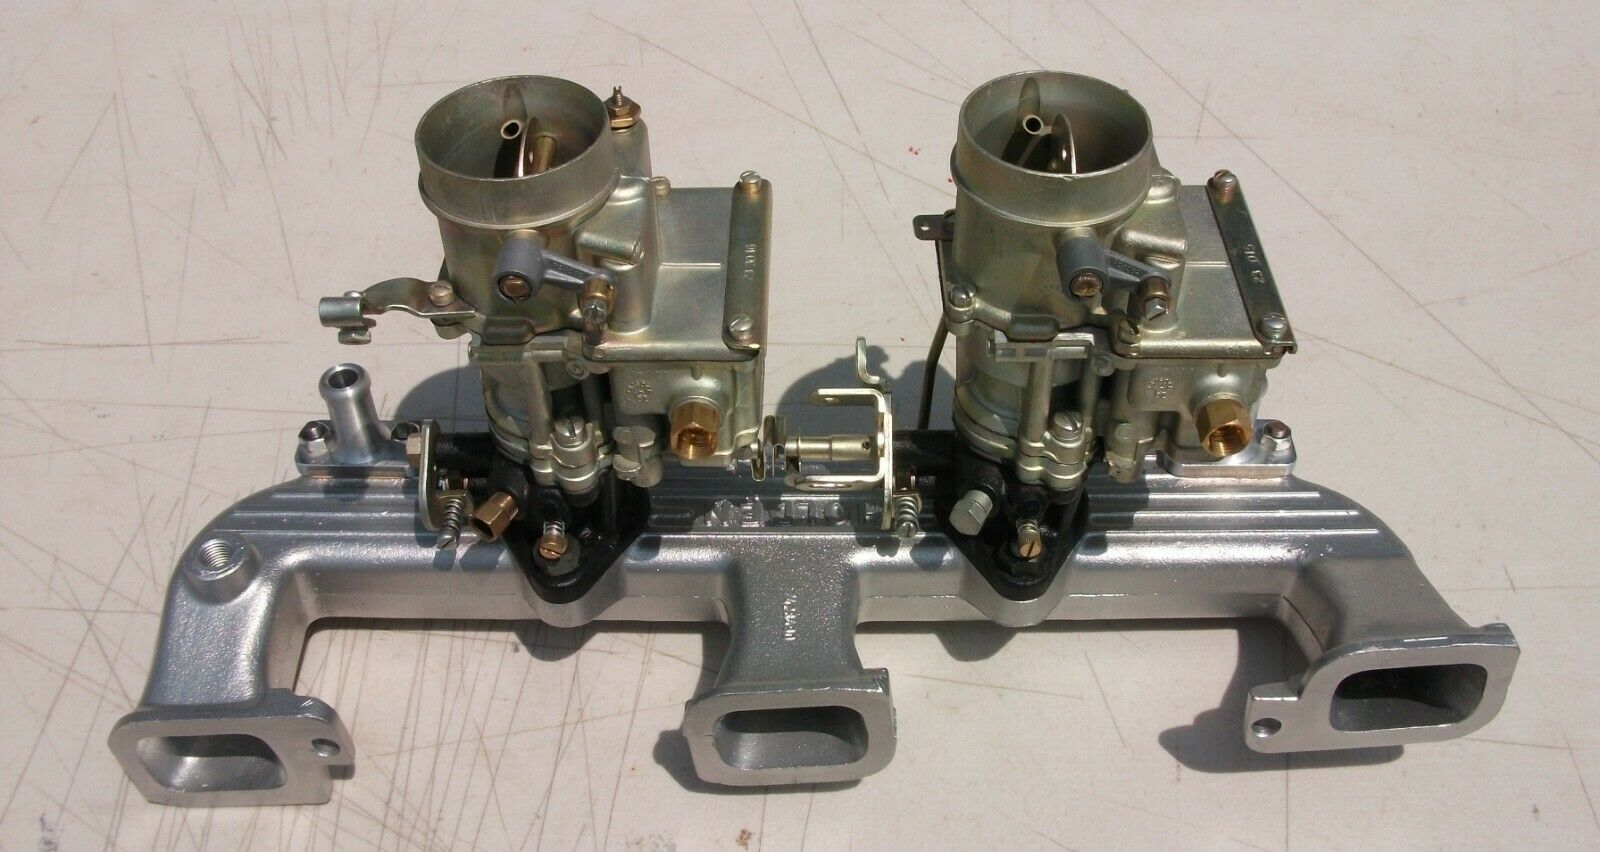
It was as simple as that. Engines worked but they really weren’t all that efficient and without today’s electronics, there wasn’t much that could be done to improve them apart from making them bigger, changing the exhaust and adding more carburettors to get more fuel in. (Actually, it didn't cost a lot to get a fai bit more oomph out of that old grey motor, I had one, they were very low in compression so you took 20 thou off the head, put Morris Minor side valve exhaust springs inside the standard valve springs - to stop valve bounce - twin carbs and a Lukey Myer exhaust and it went rather well - you couldn't stop it though - tb). A mechanic could work on any engine from any manufacturer as, apart from size and number of cylinders, they were all the same. The early Holden 6 cylinder engines (the grey motor) was a bit over 2 litres in size (2.173 litres) and produced 60HP whereas a Toyota Corolla 2 litre 4 cylinder engine develops 170HP, uses less fuel and doesn’t pump out bad stuff from its exhaust.
Today’s engines don’t have any of that stuff above, except for the spark plug. Everything else has gone, been replaced by electronic wizardry. Today’s engines are controlled by a computer which gets fed data from numerous sensors attached to all parts of the car. Mechanics need to have a thorough understanding of electronics to be able to work on a car and fault diagnostics is no longer done by ear but by a wizard box.
Have a look at the video below.
Government Loans - how they work.
There's a lot of myth out there about Gov't loans, nearly every country on the planet is in debt, where does the money comes from, that, as a consequence, every man, women and child is in debt up to their eye-balls, the debt is too big to ever be repaid, the Country is bankrupt etc etc.
Watch the video below - it puts it all in perspective.
How Frequent Flyer programs work
Most people have joined a frequent flyer loyalty program of one sort or another. Be it the Coles brand Flybuys, the Woolworths Everyday Rewards or the Virgin Velocity program. People just flash their membership card whenever they buy from a relative supplier and some stick with a supplier just to get points - but does anyone know how these programs work and does anyone know what an enormous cash cow they really are.
Watch the following video. Although it explains how the US programs work, the same principal applies to Australian based programs. It's a real eye-opener.

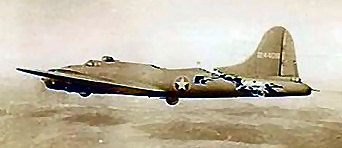
A rare miracle from World War 2
In 1943 a mid-air collision on February 1, 1943, between a B-17 and a German fighter over the Tunis dock area in North Africa, this became the subject of one of the most famous photographs of WW II.
An enemy fighter attacking a 97th Bomb Group formation went out of control, probably with a wounded pilot, then continued its crashing descent into the rear of the fuselage of a Flying Fortress named "All American", piloted by Lt. Kendrick R. Bragg, of the 414th Bomb Squadron. When it struck, the fighter broke apart but left some pieces in the B-17. The left horizontal stabilizer of the Fortress and left elevator were completely torn away. The two right engines were out and one on the left had a serious oil pump leak. The vertical fin and the rudder had been damaged. The fuselage had been cut almost completely through . . . connected only at two small parts of the frame and the radios, electrical and oxygen systems were damaged.
There was also a hole in the top that was over 16-feet long and 4 feet wide at its widest; the split in the fuselage went all the way to the top gunner's turret and the tail actually bounced and swayed in the wind, and twisted when the plane turned. And all the control cables were severed, except one single elevator cable still worked and the aircraft miraculously still flew! The tail gunner was trapped because there was no floor connecting the tail to the rest of the plane. The waist and tail gunners used parts of the German fighter and their own parachute harnesses in an attempt to keep the tail from ripping off and the two sides of the fuselage from splitting apart.
While the crew was trying to keep the bomber from coming apart, the pilot continued on his bomb run and released his bombs over the target
When the bomb bay doors were opened, the wind turbulence was so great that it blew one of the waist gunners into the broken tail section. It took several minutes and four crew members to pass him ropes from parachutes and haul him back into the forward part of the plane. When they tried to do the same for the tail gunner, the tail began flapping so hard that it began to break off. The weight of the gunner was adding some stability to the tail section, so he went back to his position.
The turn back toward England had to be very slow to keep the tail from twisting off. They actually covered almost 70 miles to make the turn home. The bomber was so badly damaged that it was losing altitude and speed and was soon alone in the sky. For a brief time, two more Me-109 German fighters attacked the "All American". Despite the extensive damage, all of the machine gunners were able to respond to these attacks and soon drove off the fighters.
The two waist gunners stood up with their heads sticking out through the hole in the top of the fuselage to aim and fire their machine guns. The tail gunner had to shoot in short bursts because the recoil was actually causing the plane to turn.
Allied P-51 fighters intercepted the "All American" as it crossed over the Channel and took one of the pictures shown. They also radioed to the base describing that the appendage was waving like a fishtail and that the plane would not make it and to send out boats to rescue the crew when they bailed out. The fighters stayed with the Fortress, taking hand signals from Lt. Bragg and relaying them to the base. Lt. Bragg signalled that 5 parachutes and the spare had been "used" so five of the crew could not bail out. He made the decision that if they could not bail out safely, then he would stay with the plane to land it. Two and a half hours after being hit, the aircraft made its final turn to line up with the runway while it was still over 40 miles away. It descended into an emergency landing and a normal roll-out on its landing gear.
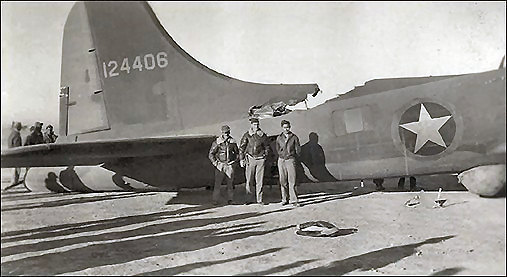
When the ambulance pulled alongside, it was waved off because not a single member of the crew had been injured. No one could believe that the aircraft could still fly in such a condition. The Fortress sat placidly until the crew all exited through the door in the fuselage and the tail gunner had climbed down a ladder, at which time the entire rear section of the aircraft collapsed.
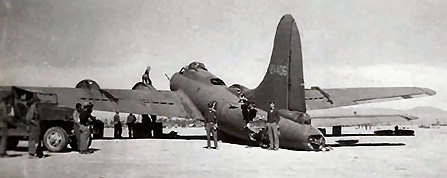
This old bird had done its job and brought the entire crew home uninjured.
B-17 "All American" (414th Squadron, 97BG) Crew:
|
Pilot - Ken Bragg Jr. Co-pilot - G. Boyd Jr. Navigator - Harry C. Nuessle Bombardier - Ralph Burbridge Engineer - Joe C. James
|
Radio Operator - Paul A. Galloway Ball Turret Gunner - Elton Conda Waist Gunner - Michael Zuk Tail Gunner - Sam T. Sarpolus Ground Crew Chief - Hank Hyland
|
Click HERE to see a note a pilot from another aircraft who saw All American, sent home to his wife.
I very quietly confided to my best friend that I was having an affair.
She turned to me and asked, "Are you having it catered?"
And that, my friend, is the sad definition of "OLD!"
How to save Passwords on Google Chrome.
Google Chrome can save your website passwords and help you automatically fill them the next time you visit your sites. If you haven’t already, here’s how to enable Chrome’s built-in password manager on both your desktop and mobile.
There are three ways to turn on the password saving feature in Chrome. Note that Chrome syncs your passwords with your Google account, which means if you enable Chrome to save passwords on one device, that change automatically applies to all your signed-in devices. For example, if you enable the option to save passwords in Chrome on desktop, the Chrome app on your smartphone will also automatically activate that feature. Thus, you can use the method that’s convenient for you.
Save Passwords on Chrome for Desktop
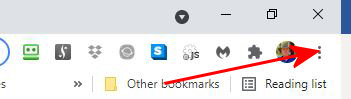
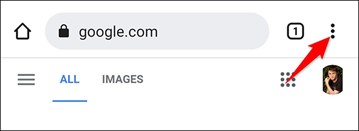
To enable Chrome’s password manager on your Windows, Mac, Linux, or Chromebook computer, first, open Chrome on your computer then in Chrome’s top right hand corner, click the three dots.
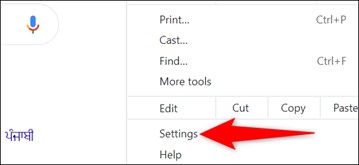
From the three-dots menu, select “Settings.”
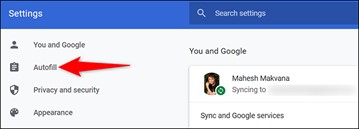
On the “Settings” page, in the left sidebar, click “Autofill.”
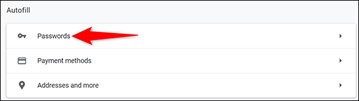
In the “Autofill” section click “Passwords.”
At the top of the “Passwords” page, enable the “Offer to Save Passwords” option.
And that’s it. From now on, when you log in to a site in Chrome on any of your devices, the browser will ask you to save your password for that site. You can then also manually view the saved passwords in Chrome by clicking HERE
Tip: In the future, if you decide you don’t want password prompts from Chrome, just turn off the “Offer to Save Passwords” option again.
Save Passwords on Chrome for Mobile
To get Chrome on your iPhone, iPad, or Android device to offer to save passwords, open Chrome on your phone.
Tap the three dots in Chrome on your phone. If you are on Android, these dots are in Chrome’s top-right corner. If you are on an iPhone or iPad, you will find these dots in the bottom-right corner.
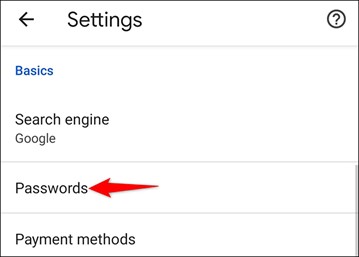
In the three-dots menu that opens, tap “Settings.”
On the “Settings” page, in the “Basics” section, tap “Passwords.”
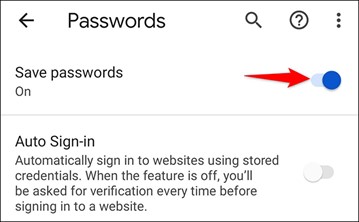
On the “Passwords” page, toggle-on the “Save Passwords” option.
And that’s all. If you ever want, you can delete the saved passwords in Chrome on your devices HERE.
A man suffered a serious heart attack while out shopping. The store manager called 000 when he saw him collapse to the floor. The paramedics rushed the man to the nearest hospital where he had emergency open heart bypass surgery. He awakened from surgery to find himself in the care of nuns at the Catholic Hospital. A nun was seated next to his bed holding a clipboard loaded with forms and a pen. She asked him how he was going to pay for his treatment. "Do you have health insurance?" she asked. He replied in a raspy voice, "No health insurance." The nun asked, "Do you have money in the bank?" He replied, "No money in the bank." Do you have a relative who could help you with the payments?" asked the nun. He said, "I only have a spinster sister, and she is a nun." The nun became agitated and announced loudly, "Nuns are not spinsters! Nuns are married to God." The patient replied, "Perfect. Send the bill to my brother-in-law."
Save Passwords on Chrome using the Password Manager site
The third way to enable Chrome to save your site passwords is to toggle on an option on Google’s Password Manager site. The advantage of this option is that it allows you to activate the feature even while you’re using a browser other than Chrome.
To use this method, open a web browser on your device and access the Google Password Manager site. Log in to the site with the same Google account that you use in Chrome.
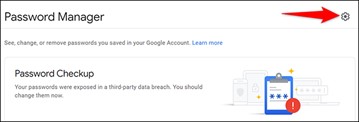
When the Password Manager site opens, in the top-right corner, click “Password Options” (a gear icon).
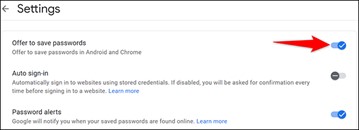
You will land on a “Settings” page. Here, at the top, turn on the “Offer to Save Passwords” option.
You’re all set. From now on, no matter what method you used above, Chrome will start prompting you to save passwords on all your signed-in devices. Very handy!
I never thought I’d be the kind of person who’d wake up early in the morning to exercise.
And I was right!
![]()
Windows XP is 20 years old.
Microsoft released Windows XP, one of the most popular and enduring versions of Windows ever, on October 25, 2001. It brought a graphical refresh and much-needed stability to consumer Windows. Let’s look back at what made it special. It brought Windows NT to consumers, finally.
In the early 1990s, Microsoft began working on a next-generation operating system called Windows NT that would leave Microsoft’s MS-DOS-based roots behind. It incorporated a brand new kernel and other technologies that made it very stable and reliable. At first, NT proved too hardware intensive to run well on the typical consumer PC, so Microsoft aimed it at the professional and server markets. With Windows 2000, Microsoft almost brought NT to the consumer market, but decided to hold off and released Windows Millennium Edition (Me) instead. But the company knew the shift to NT was inevitable.
Windows Me (like Windows 95 and 98 before it) ran on technology carried over from MS-DOS that made it prone to frequent, catastrophic crashes. After Windows Me garnered a poor critical and customer response in 2000, Microsoft knew its next consumer OS would need to finally take up the NT mantle.
After extensive prototyping, including abandoning earlier attempts at a consumer NT-based operating system, Microsoft settled on a prototype called “Whistler” that would eventually turn into Windows XP. According to Microsoft, the “XP” meant “experience,” with a promise to focus on user experience in the new release. Unlike the divide between operating systems like Windows 95 and NT 4.0 in the past (or Windows Me and Windows 2000), XP would unify Microsoft’s consumer and professional Windows products under one brand, albeit in two different editions.
Aimed at consumers, Windows XP Home Edition sold for $199 ($99 for an upgrade version) and Windows XP Professional cost $299 — or $199 if you upgraded from a previous professional version of Windows. The two main editions cost about $307 (for Home) and $461 (for Pro) in today’s dollars when adjusted for inflation.
Like any new version of Windows, XP upped the system requirements. Microsoft had to make sure people could enjoy the new graphical effects and more complex system processes handling things in the background. XP required a 233 MHz or higher CPU, 64 MB of RAM, 1.5 GB of free hard disk space, and a video card that supported 800×600 resolution or higher.

Windows XP brought eye candy to Windows in a big way, marking the first significant departure from the classic grey Windows theme introduced in Windows 95. Thanks to a visual style called Luna, Windows XP defaulted to a colourful design that featured a blue taskbar with a green Start button, blue window title bars, and bright red “X” buttons to close Windows.
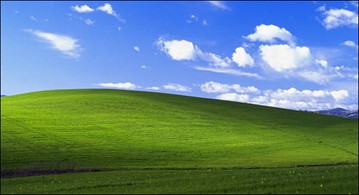
To tie in with the colour scheme, Microsoft chose a photograph (titled “Bliss”) of a gentle grassy hill with a blue sky dotted with clouds as the default XP desktop background image. Former National Geographic photographer Charles O’Rear took the photo near Napa Valley, California in 1996.
Although some criticized the new XP theme as looking like a Fisher-Price toy, thanks to a new visual style system, themes could easily be changed. There was even a “Classic” theme similar to Windows 2000. In another visual improvement, Windows XP brought anti-aliasing to system fonts in a significant way with ClearType rendering, which provided sub-pixel rendering for fonts. It aimed to make fonts look better on LCD monitors that were then starting to gain more widespread use at the time.
Windows XP also included a set of colourful new icons with rounded corners, smooth gradients, and more colour depth than usual. For the first time, Windows icons could support an alpha channel for transparency and drop shadow effects. Overall, Windows XP was a gorgeous step forward for Windows, although it didn’t keep some die-hard fans from grumbling.
Other New XP Features
Windows XP gained dozens of new features over previous versions of Windows. Here are just a handful of notable ones:
-
A two-column Start menu that allowed pinning apps.
-
A taskbar that can group application windows under a single button.
-
Content-aware Windows Explorer window formats for music and other types of media.
-
Fast User Switching for changing user accounts quickly without logging out.
-
Thumbnails in Windows Explorer that show previews of images and other documents.
-
Pop-up “word bubble” notification messages from the taskbar—new to consumer Windows but borrowed from Windows 2000.
-
Automated System Recovery that detected system problems and aided recovery from crashes or system file failure.
-
In Networking, Windows XP gained several significant new features, such as a firewall, Wi-Fi support, and Internet Connection Sharing.
-
Windows Product Activation (WPA), which discouraged casual piracy by phoning home to Microsoft about each installed copy of Windows XP via the Internet.
The Games of Windows XP
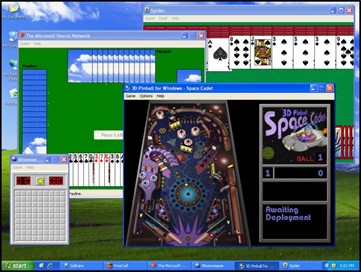
Windows XP carried over a large array of games from Windows Me and other previous versions of Windows. It included classic games like Solitaire, Minesweeper, and Freecell, and also more recent additions to the Windows gaming pantheon like Spider Solitaire, Hearts, and 3D Pinball: Space Cadet.
XP also shipped with four online multiplayer games that originally launched with Windows Me: Internet Backgammon, Internet Checkers, Internet Hearts, Internet Reversi, and Internet Spades. When playing the internet-enabled games, players would be matched up automatically with other Windows gamers through servers run by Zone.com.
Even though Windows XP ran on Windows NT architecture, it maintained backward compatibility with previous Win32 games for Windows 95 and 98 while paving the way for future gaming Windows experiences with robust DirectX support.
Windows XP’s Launch and Legacy
Microsoft launched Windows XP with a $1 billion marketing campaign on October 25, 2001, hosting an event in New York City that also paid tribute to those lost in the attacks on the 11th September, 2001. Many initial reviews were generally good, although some controversies surrounded the release. The press reported on driver issues and multiple security bugs that Microsoft quickly patched. Also, reviewers and customers were concerned about Windows XP’s new activation system, which potentially required re-activation when certain aspects of your hardware configuration changed. If someone didn’t have Internet access, they could call a toll-free number to activate with a live representative.
Ultimately, those were just hiccups on the way to Windows XP’s success. Within two months of release, XP sold over 17 million copies, with sales speed exceeding those of Windows 95 and Me.
That total grew to over 210 million by 2004, and while there are no hard numbers on total lifetime sales of XP, guesses range anywhere between 500 million and 1 billion copies depending on where you look.
The different way vodka is drunk in Australia compared to how it’s drunk in Russia.


Velly Intelesting - but stoopid!!
Back Go to page: 1 2 3 4 5 6 7 8 9 10 11 12 13 14 15 16 17 18 19 20 Forward