
|
Vol 73 |
Page 4 |
Privacy Policy | Editorial Policy | Profit Policy | Join the Association | List of Members | Contact us | Index | Links
Back Go to page: 1 2 3 4 5 6 7 8 9 10 11 12 13 14 15 16 17 18 19 20 Forward

Computers and Stuff
Sam Houliston.
Contents.
Add an expiration date to Gmail emails.
Add an expiration date to Outlook emails.
Capacitor start motors - how do they work?
Manage emails with an expiration date.
What does an expiration date in emails do?
AutoArchive in Outlook?
Windows 10 PowerToys.
The following article is for people who have a reasonably good knowledge of how computers work. If you’re not a power user, this probably isn’t for you.
No matter how many features Microsoft crams into its Windows 10 operating system, there will always be users looking for a faster, better, or at the very least, different way of doing things.
A set of slightly unusual free Windows tools has been a part of the Windows operating system landscape since Windows 95, but their availability has been noticeably absent for Windows 10 at least until September 2019. In 2019, Microsoft, in partnership with development company Janea Systems, released the first two PowerToys for Windows 10, accompanied by a promise of more releases in the near future.
.jpg)
The first set of Windows PowerToys were made available for Windows 95. That first set of 15 free utilities were published and endorsed by Microsoft and made available in a free download. From the beginning, PowerToys were designed to be used by "power users" seeking ways to tweak the way the operating system functions. In some cases, a careless change made using a PowerToys utility by an inexperienced user could cause havoc with the Windows operating system, so novice users were encouraged to use caution.
For the most part, though, PowerToys would allow users, whether they considered themselves "power" or not, to more easily make tweaks to the look and feel of Windows without a deep dive into configuration screens or the dreaded and dangerous edit of the Windows Registry file.
Windows 95 PowerToys included:
-
TweakUI was used for tweaking obscure Windows settings.
-
CD Autoplay allowed all CDs to autoplay, not just audio CDs.
-
Command Prompt Here opened a command prompt in the current directory.
-
Explore from Here opened File Explorer in the current directory.
-
FlexiCD allowed a user to control an audio CD from the Taskbar.
-
Xmouse 1.2 allowed a user to change window focus by moving the mouse cursor, no click needed.
.png)
Through the years and the various Windows versions, individual PowerToys have come and gone. Each new Windows version inspired a new set of tools based on what developers perceived was needed to improve and enhance that version. Windows 10 has inspired a completely new set of PowerToys.
Traditionally, each power toy has been offered as a separate executable file, available as a free download from a specific Microsoft website. For Windows 10, Microsoft is taking a slightly different approach: All Windows 10 PowerToys are now included as part of a free downloadable system that users can configure. You can download it HERE.
When it’s downloaded, you’ll find a small rainbow coloured icon (arrowed) in the “Show hidden icons” on the task bar.
To access PowerToys, click the icon. The figure at left shows you what the Windows 10 PowerToys system looks like when opened.
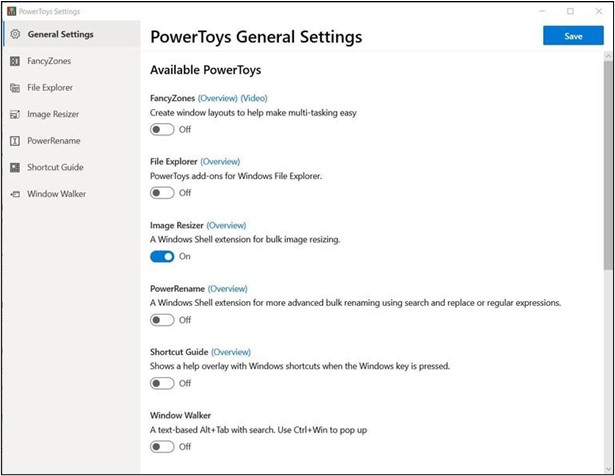
When you open Power Toys for the first time. In the GENERAL Tab you might see a prompt asking you to Run as Administrator. Click YES and move the toggle to always run as Administrator.
The list of “Toys” appears on the left hand side of the window.
Click each heading below to see what each does and how to do it.
· Preview Pane addons for File Explorer
Windows 10 PowerToys provide tools and features that can make users of the Windows operating system more productive and, by extension, happier. Over the years, many users have come to depend on one or more of these PowerToys for their daily computer productivity. For many power users, PowerToys improve their quality of life.
Beyond making users more productive, PowerToys have also provided a glimpse of what features and tools could become an integral part of the Windows operating system in the future. Many of these once separate tools have become just another part of the operating system during its next iteration.
I’m at that age where my mind still thinks I’m 29,
my humour suggests I’m 12,
while my body mostly keeps asking if I’m sure I’m not dead yet.
Capacitor start motors – how do they work?
Capacitors are electric devices that get an electric motor running at start-up by providing a "jolt" of stored electrical energy, or that help keep a motor spinning once it has started.
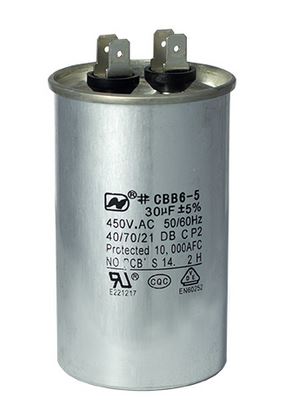
The starting capacitor, used on motors such as air conditioning compressors that require a high starting torque, helps a motor start spinning by creating a high-torque, rotating, electrical field in the motor.
To deliver this starting kick or torque boost, a start capacitor will always have a high microfarad (MFD or µF) rating compared to the run capacitor used for the same motor. Electrolytic type starting capacitors are designed only for intermittent use (each time the motor starts). Starting capacitors extend electric motor or compressor motor life, and surprising to non-engineers, a hard start compressor actually reduces the operating cost of the equipment it is serving by reducing the in-rush of current during the start-up phase of motor operation.
But starting capacitors themselves can fail for any of several reasons including exposure to harsh conditions, weather, corrosion, loose connections, or improper control, selection, or use. If the start capacitor has failed the symptom is that the motor won't start. If either or both start and run capacitors are defective the motor may try to start but will hum and won't keep running.
The starting capacitor works by "accumulating" a large electrical charge inside the capacitor. During compressor or other motor startup, the start capacitor releases its charge to give a voltage "boost" to get the electric motor spinning.
During an electric motor start-up (such as an air conditioner compressor motor and some fan motors) where a starting capacitor is included in the circuit, with the added charge stored in the capacitor, run-start and start-common voltages increase to a maximum value to start the motor spinning. The total supply current subsequently drops back to normal run conditions when the start device is dropped from the circuit and the motor continues to run. This "electrical starting booster charge" can be particularly needed if an air conditioner is suddenly switched off and back on when it has been operating. Suddenly switching off an air conditioning compressor leaves a high "head pressure" inside the compressor which can provide extra mechanical resistance when the motor is attempting to re-start.
Traditionally electrical capacitors were also called "accumulators" for this reason. The capacitor's electrical charge is released at motor start-up time, gives the compressor motor or other electrical motor a boost for starting.
Once a starting capacitor has provided the necessary boost to get the electric motor spinning, to avoid possible motor damage the capacitor has to drop from the electrical circuit, leaving the motor to run on normal operating current. Typically, a centrifugal switch or possibly a PTC (thermistor) or PRD (surge protection device) drops the start capacitor from the motor's electrical circuit once the motor has spun up to operating speed.
To avoid burning out the motor windings or the capacitor itself, the huge current delivered by the start capacitor has to be turned off once the electric motor is running. There are two reasons the start capacitor can’t stay in the circuit full time.
-
The start winding of the compressor can’t carry such a heavy current continuously without overheating and burning out.
-
The start capacitors are made very compact and would overheat in a short while because they aren’t big enough to dissipate heat as rapidly as it’s generated.
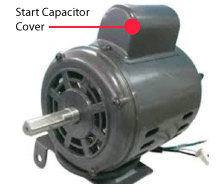
The plastic casing on the start capacitor also plays a role in its tendency to overheat. When a start capacitor does overheat, the little putty filled hole in the top of the capacitor blows and all the fluid inside runs out, causing the capacitor to fail.
Some starting capacitors include a bleed-through resistor wired between the capacitor's two terminals. Typically a 15K-18Kohm two-watt resistor is used for this purpose. The use of capacitors without these resistors will result in sticking relay contacts and/or erratic relay operation especially where short cycling is likely to occur. This is due to the start capacitor discharging through the relay contacts as they close, following a very short running cycle. The resistor permits the capacitor charge to bleed down at a much faster rate, preventing arcing and over-heating of the relay contacts.
I see people around my age mountain climbing, how do they do it?
I feel good getting my leg through my underwear without losing my balance.
![]()
How to add an Expiration Date to Gmail emails.

You’ve probably heard of sending disappearing messages in popular messaging apps, but did you know you can also set an expiration date for emails sent through Gmail, making the content within the message inaccessible after the set time?
Here’s how it’s done.
|
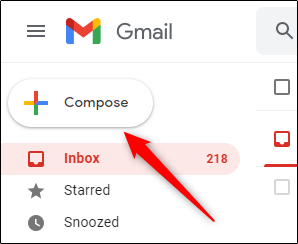
Using Windows 10 or Mac, to add an expiration date to an email, log in to your Gmail account using your browser, then click “Compose” in the top-left corner of the window. |
 |
|
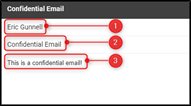
In the email composition window, enter (1) the recipient’s email address, (2) the subject of the email, and (3) the content of the email. |
 |
|
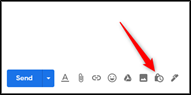
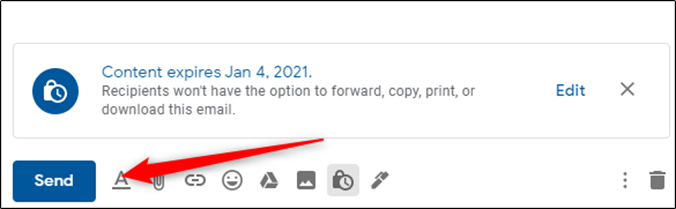
Next, at the bottom of the composition window, click the lock button that has a clock in front of it. This is the Confidential Mode icon. |
 |
|
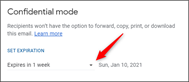
Once that’s been clicked, the “Confidential Mode” window will appear. In the “Set Expiration” section, click the down arrow to display a list of different expiration times. |
 |
|
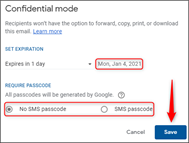
The expiration times range from one day to five years. Select the desired expiration time by clicking it. The expiration date will now appear to the right of the selected time. In addition, you can also require a passcode. Choosing “No SMS Passcode” will let the recipients immediately open the email, while choosing “SMS Passcode” will require the recipient to first enter a password that they’ll receive via SMS text.
You’ll need to enter their phone number if you choose the latter option. When ready, click “Save.” |
|
|
|
|
|
The email will now have a set expiration date. A message will appear at the bottom of your email confirming this. Click “Send” to send the email. |
|
|
|
|
|
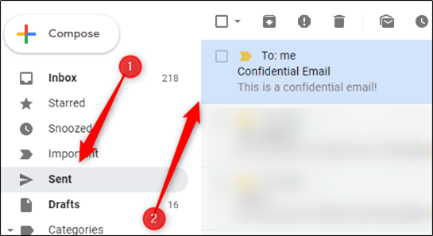
If you want to remove access to the email before the set expiration date, click “Sent” in the left-hand pane, then select the message with the expiration date from the list of emails. |
|
|
|
|
|
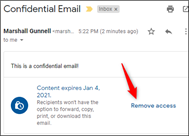
At the bottom of the email, click “Remove Access.” Now, the recipient can no longer access the email. |
|
|
|
|
I find that these days most of my conversations start out with:
Did I tell you this already? Or, What was I going to say?
How to add an Expiration Date to Emails in Outlook.

If you have a Gmail account but pipe your emails through Outlook instead of through the Gmail client server, you can add an expiration date to these emails too.
Here’s how!
Outlook lets you add an expiration date to emails you send or receive. Once the expiration date has passed the email will be displayed with different formatting and you can use Outlook’s built-in tools to manage expired email automatically.
Expiration dates only apply to emails, not calendar events or tasks because those items have their own dates you can use for managing them
How to Set an Expiration Date on an Email
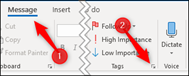
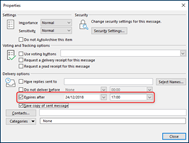
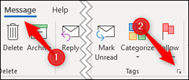
| To add an expiration date to an email you’re sending, you need to open the Properties window for the email. Open the email and then click (1) Message > (2) Tags. |
 |
| This will open the Properties window for the email. Switch on the “Expires after” checkbox and then choose a date and time. Click Close to return to your email. There won’t be any visible signs that an expiration date has been added and you can send the email as normal. |
 |
| To add an expiration date to an email you’ve received, open the email and click (1) Message > (2) Tags. |
 |
| This opens the Properties window for the email. There aren’t as many options for a received email as there are for a message you’re sending, but you can still set an expiration date and time. |
 |
|
What Does an Expiration Date Do?
So you’ve added an expiration date to an email. That’s great and all, but what’s the benefit of doing it? Expiration dates are used in a variety of ways by Outlook to help you focus on what’s important. Emails that have expired are generally not as important as emails that haven’t expired, so Outlook automatically formats expired emails differently.
|
|
|
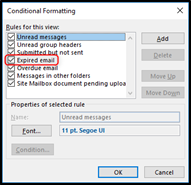
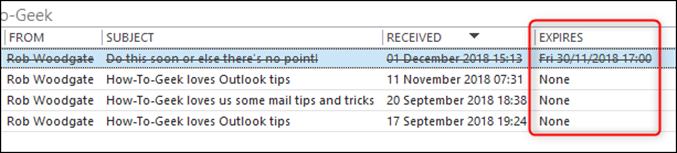
When you open the setting conditional formatting in Outlook, you would have noticed the “Expired items” formatting rule. This rule formats any email that has passed its expiry date with a grey font and the text struck through.
This lets you know that the email has expired so you can focus on more important emails first. If you’ve sent an email with an expiration date, this formatting will be applied in the recipient’s Outlook as well, but other email clients like Thunderbird, or web apps like Gmail or Yahoo! Mail, will ignore the date and do nothing with it. |
|
|
|
|
|
|
|
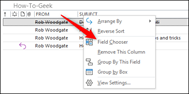
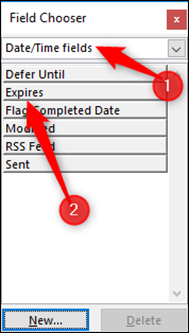
| You can also add a column to a folder that shows the expiration date of any email. Right-click a column header in the folder to which you want to add the column and then click “Field Chooser.” |
 |
|
|
|
|
Select “Date Time fields” from the drop-down and then select the “Expires” option.
Drag and drop the “Expires” item into your folder to add it to the columns. |
|
|
|
|
|
|
|
|
|
|
|
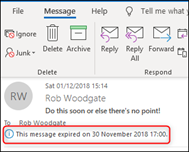
When you open an expired email, Outlook notifies you with a message in the header. |
|
|
|
|
|
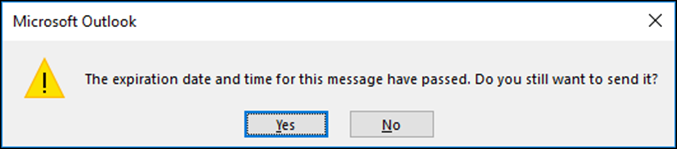
You can still reply to or forward an expired email, but if you try to forward it, Outlook shows you a warning first.
|
|
|
|
|
|
Click “Yes” to send the email, or “No” to cancel.
Using the Expiration Date to Manage Your Email
|
|
|
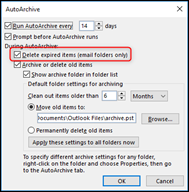
Some of Outlook’s built-in tools also make use of expiration dates. If you’ve set up AutoArchiving in Outlook, then you might have noticed an option to “Delete expired items (email folder only).”
If this is switched on, then AutoArchive will delete or move (depending on the other settings) any emails where the date has passed. This is a great way to remove expired emails automatically and stop them cluttering up your mailbox. If you don’t want your expired emails to be deleted or moved, but you don’t want to see them in Outlook either, then you can set Outlook’s synchronization rules to prevent them being downloaded from the Exchange email server. |
|
|
|
|
|
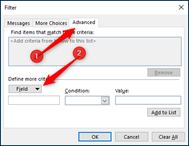
When you’re building your synchronization filter, click the “Advanced” tab and then the “Field” button. |
|
|
|
|
|
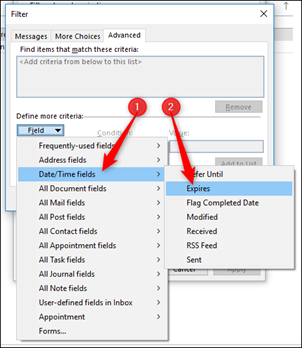
Select Date/Time fields > Expires from the menu. The field is available in the “All Mail fields” and “All Post fields” options as well. |
|
|
|
|
|
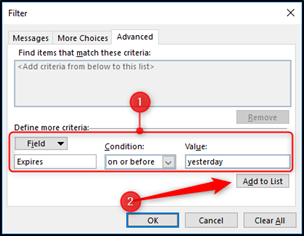
Set “Condition” to “on or before” and the “Value” to “yesterday,” and then click “Add to List.”
This will filter all expired tasks so that if they expired yesterday or earlier, then they won’t be synchronized with Outlook and won’t appear in your mailbox. They’ll still be available in the Outlook web app if you want to see them there. |
|
|
|
|
|
You can’t set up rules to add expiration dates to incoming email automatically or create a quick step that applies an expiration date at the press of a button, but you can automatically add an expiration date to all outgoing emails.
|
|
|
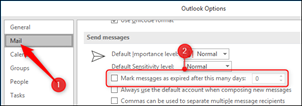
Click File > Options > Mail, scroll down to Send Messages and switch on “Mark emails as expired after this many days.” |
|
|
|
|
|
Enter the number of days after which you want messages to expire and then click “OK.” This will automatically add an expiration date to all of the emails you send.
Expiration dates are a useful way of managing your priorities and your mailbox by low-lighting messages that are no longer relevant and allowing you to use Outlook tools to delete or hide messages you don’t need anymore. It’s one more tool in the fight to prevent your mailbox from getting out of control and a very useful tool at that.
What is AutoArchive in Outlook and how does it work?
|
|
|
If you’ve used the mailbox cleanup tool, (File > Info > Tools) then you’ll have seen the AutoArchive button, but you may be wary of how it works and what it’ll do. Here’s what it does and how you can put it to use.
Clicking the AutoArchive button causes a process to swing through all of the folders in Outlook and apply any AutoArchive rules you’ve set up (don’t worry, the default AutoArchive rule is to do nothing, so you can’t do any harm by clicking the button). But if you want to move your older items to an archive where they’re out of the way, AutoArchive is how you automate the process.
Here’s how it's done!
|
|
|
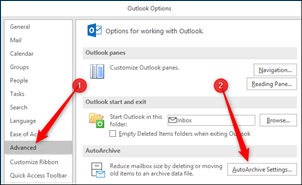
First, you need to turn on AutoArchive and choose its settings. Go to File > Info > Options > Advanced and then click the “AutoArchive Settings” button. |
|
|
|
|
|
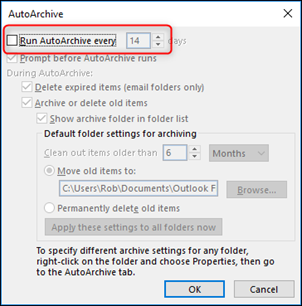
As long as the “Run AutoArchive every” option is switched off (which is the default), AutoArchive will never run. |
|
|
|
|
|
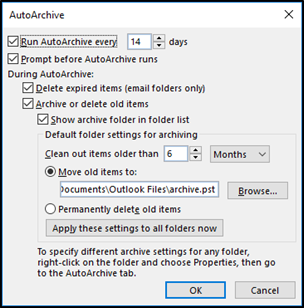
Once you turn the “Run AutoArchive every” option on, all of the options are now available.
|
|
|
Unlike Folder Cleanup, which has one window of settings in File Options and then allows you to run those settings against any folder you like as a manual task, the AutoArchive settings shown here are the default settings. Each folder that has AutoArchive switched on can use these default settings, or you can use different settings for different folders if you want. We’ll go through how to do that later on, but for now, let’s look at the default settings. |
|
|
How To Set Up AutoArchive |
|
|
|
|
|
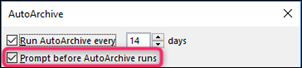
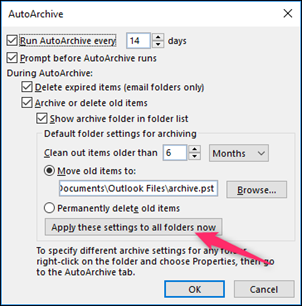
The first thing to notice is that once AutoArchive is turned on, it will run every 14 days. You can change that using the Up and Down arrows or by typing a number in, and you can select any value from 1 to 60 days. You can type in any two-digit number, but if it’s more than 60, Outlook will display an error message when you click “OK,” and you’ll have to change the value before you can save.
The next option—“Prompt before AutoArchive runs”—gives you the choice of having Outlook show you a prompt before the AutoArchive happens. |
|
|
|
|
|
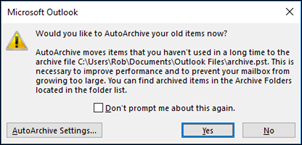
This prompt lets you review the settings or cancel this run of the AutoArchive if you want. |
|
|
|
|
|
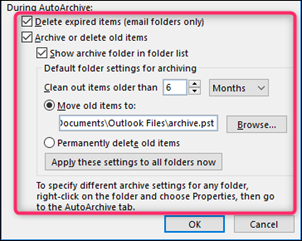
The other settings relate to what items will be archived, and what happens during the archive process. The first option here—“Delete expired items (email folder only)”—relates to emails which have had an expiry date added to them. This won’t affect tasks or events, even if you turn AutoArchive on for those folders.
The rest of the settings apply to all items, not just email. This means calendar events, tasks, notes, and journal entries.
Assuming you leave “Archive or delete old items” switched on, the default settings are for Outlook to move items older than 6 months to a new, separate .pst file named Archive (by default) and make this visible in the navigation pane in Outlook so you can access the archived items whenever you want. You can change the “Clean out items older than” value to anything from 1 day to 60 months, pick a different .pst file to archive the items in, or choose to “Permanently delete old items.”
Be warned that this deletion bypasses the Deleted Items folder, and your items will be deleted from Outlook entirely. You may still be able to access it on your mail server, depending on your settings, but you shouldn’t rely on this. Only choose this option if you want to delete the items forever.
When you click “OK,” AutoArchive will be turned on. It will run in line with the “Run AutoArchive every” value you’ve chosen (every 14 days by default), starting today. So once you turn it on you should expect it to run quite quickly, usually within 15 mins. AutoArchive only runs by default on a few folders, so if you want it to run on specific folders, or you want to customize how it runs on different folders, se below.
How to Turn On and Customize AutoArchive for Different Folders.
When you turn AutoArchive on, it only runs by default against the following folders:
|
|
|
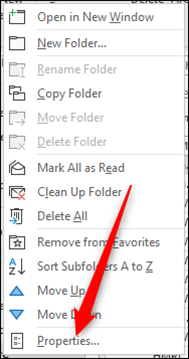
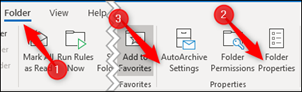
If you want it to run on any other folder, you’ll need to turn it on for each folder (or turn it off on any of those four folders against which you don’t want it to run). Do this by right-clicking the folder in the Navigation pane and clicking “Properties.” |
|
|
|
|
|
You can also access folder properties by selecting Folder > Folder Properties in the ribbon. (For folders like Calendar and Tasks that don’t show up in the Navigation pane, this is the only way to access the folder properties.)
There’s also the option to go straight to the AutoArchive Settings, which saves you a step once you’re inside the Folder Properties. |
|
|
|
|
|
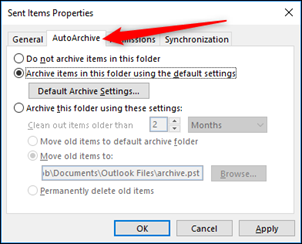
In the Folder Properties window, click the AutoArchive tab to access the settings for that folder. |
|
|
For most folders, the “Do not archive items in this folder” setting will be on by default. This means that when the AutoArchive process runs, the folder will be ignored and no items in it will be archived. If you want the folder to be included, switch on the “Archive items in this folder using the default settings” option. Alternatively, if you want the AutoArchive settings for this folder to be different from the defaults, switch on “Archive this folder using these settings” and amend the settings to your preference.
|
|
|
|
|
|
If at any point you want to return all folders to use the default settings, you can go back to File > Options > Advanced > AutoArchive Settings and click the “Apply these settings to all folders now” button. That will change all folders that have the “Archive this folder using these settings” switched on to have “Archive items in this folder using the default settings” switched on instead. |
|
|
|
|
|
Once yu’ve got the AutoArchive default settings, and the settings per folder, set up the way you want, you can leave the process to quietly work in the background, freeing up space for you and keeping your folders from getting too bloated. |
|


Back Go to page: 1 2 3 4 5 6 7 8 9 10 11 12 13 14 15 16 17 18 19 20 Forward