
|
Vol 73 |
Page 9 |
Privacy Policy | Editorial Policy | Profit Policy | Join the Association | List of Members | Contact us | Index | Links
Back Go to page: 1 2 3 4 5 6 7 8 9 10 11 12 13 14 15 16 17 18 19 20 Forward

Allan George's Gems.
Contents
The ACT's additional Territory.
The English Electric Lightning.
The missing Vulcan and the Falklands war.
USB connections - the history.
Why aren't disc brakes fitted to caravans?
Why do radial engines have an odd number of cylinders?
![]()
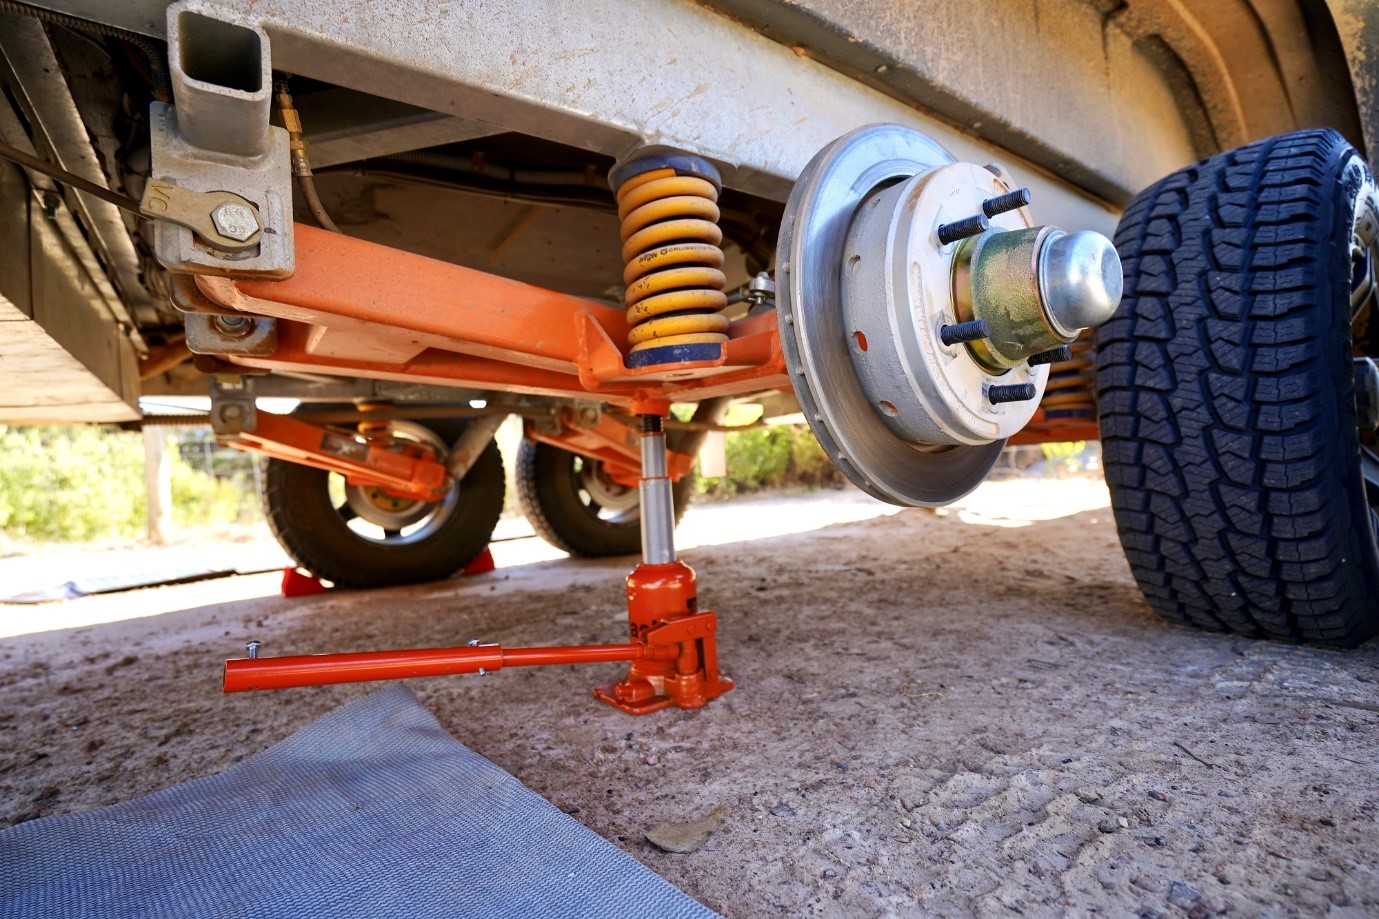
Why are disc brakes not usually fitted to caravans?
They’ve been around for years, but you might ask, ‘Why are disc brakes not usually fitted to caravans?’
Given the widespread use of disc brakes in our towing vehicles you might wonder why the technology isn’t used widely in caravan hardware. It’s rare to find a van straight from the factory with disc brakes and as drum brakes have been working fine for most people since the 1970s, why change?
Certainly, disc brakes offer better braking performance, but that comes at a cost, one that’s not readily accepted by the industry that needs to keep manufacturing costs down and, in general, consumers want cheaper vans.
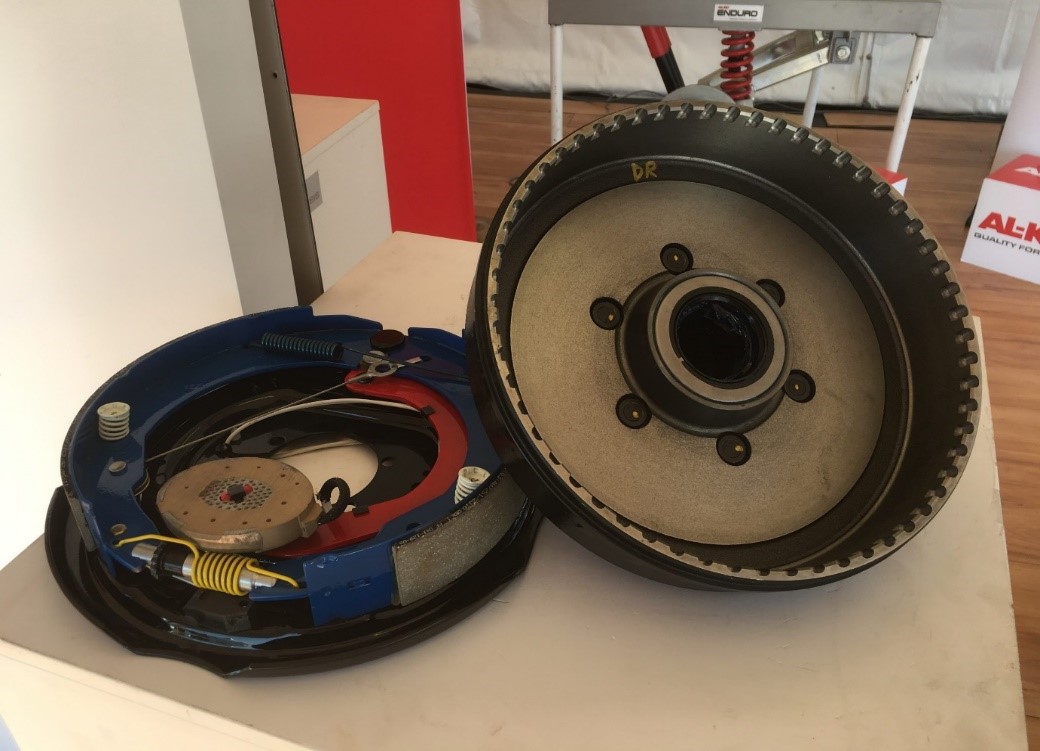
The drum brakes found in most caravans are electrically operated. Any van over 750kg needs brakes, over-ride or electric, and anything over 2000kg needs brakes on each wheel, which is usually electrically operated drums but occasionally more complex hydraulic/air disc brake systems.
The electric drum brakes are simple in design and operation, but they’re also basic in the either fully on or fully off status they deliver. That’s why the operation can be clunky or jerky, and of course, there’s adjustment and maintenance that we’d wager isn’t as thorough as it should be in many cases. Drum brakes may be adjustable, but do many owners set them up correctly with their electric brake controllers, or do they dial up the controller for simply more stopping power?
Essentially, what it comes down to is force and the force required to operate the hydraulically-operated brake callipers used in disc braking. When cars first appeared on the road and had foot-operated drum brakes, you could push your brake lever and you’d stop. When discs arrived, with a calliper, the force required was beyond that of your average human leg, so the brake booster was born.
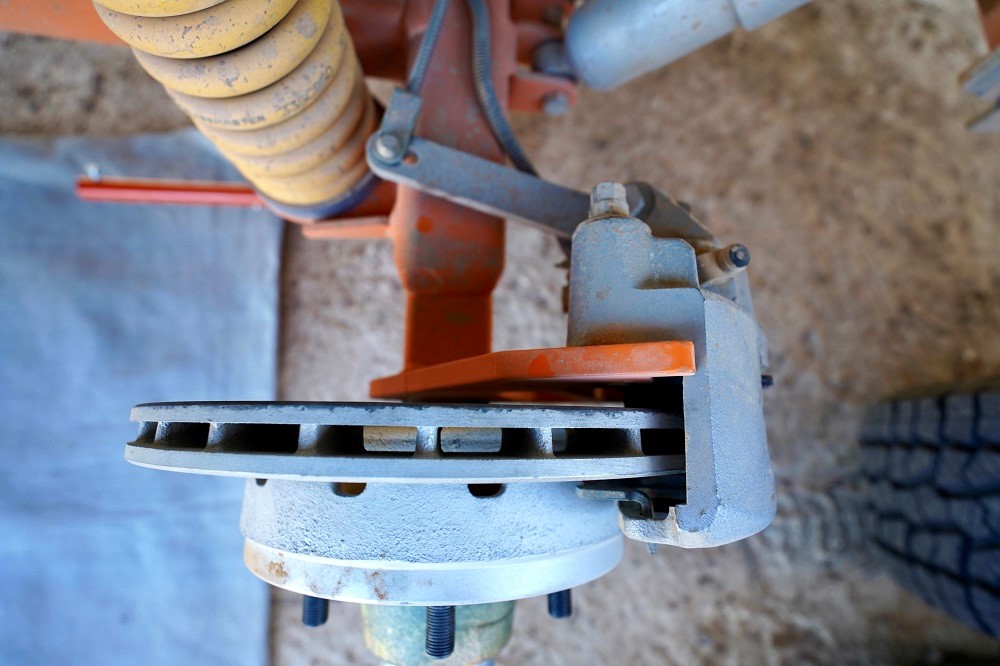
A brake pad has a much smaller surface area in contact with the brake disc than a brake shoe within a drum and so when it receives its electrical signal to activate it brake duties it does so well. So does the calliper but it requires a much greater amount of force that is provided by the booster/actuator set-up and that’s the expensive and more complex tech that stops most manufacturers from opting for hydraulic discs on their vans right from the drawing board. Not to mention that the vacuum pressure required to activate a brake booster, runs directly from your vehicle’s engine.
It’s also worth remembering that braking systems are installed in line with prevailing manufacturing design standards, VSB1, so it’s not like you’re relying on technology that’s not up to the job. In any event, if you’re not invested in your braking performance due to lack of knowledge, then it’s worth finding a skilled brake technician.
The drum brake also doesn’t enjoy water crossings and if you’re a full-time off-roader then the maintenance for these terrain-supplied contaminants such as dust, water and mud may direct you to the disc brake option (or a better maintenance program).
You need to work out whether the cost impost is worth the benefits.
What are the benefits of a disc brake system on your van?
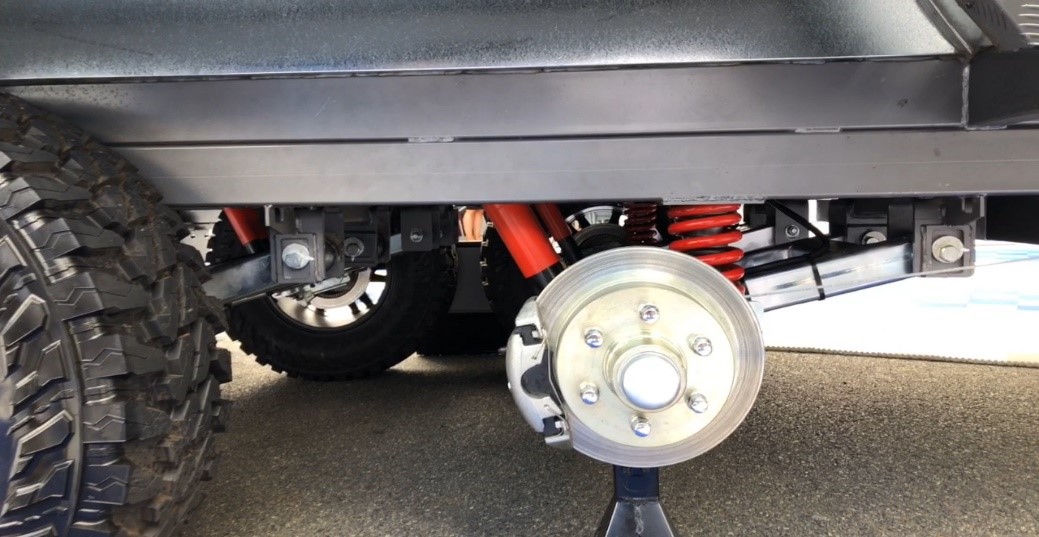
Well, improved brake feel and operation, over what can be a bit harsh drum-brake bite. The disc set-up copes better with off-road use and is definitely a better brake in pure stopping power. Importantly, discs are less prone to brake fade in the way that a drum might on long downhill sections or arduous conditions.
And fade is caused by heat, so heat dissipation, especially on very heavy trailers, is vital and ventilated disc brakes do this very well. If you own a light van or trailer, then the financial considerations mean the heat dissipation from your wallet might outweigh the need for discs on your 1500kg camper-trailer.
And the downsides?
Unless you can buy a second-hand van with disc brakes already installed you’re going to be up for a price penalty. Indicative hardware pricing alone is about $2000 for a single axle and $3500 for a twin-axle hydraulic disc brake set-up. The system is much more complex and requires hydraulics and different electrics, and there are, as with drums, maintenance items and consumable brake pads to consider (don’t forget drums and shoes are consumables too). And of course, there’s the brake fluid that must be flushed every two years.
Discs at some point will require machining plus you still need a mechanical handbrake, but some disc-brake kits supply this part. A disc-brake system will lock on as soon as the Anderson plug is disconnected.
Conclusion.
Essentially, the bottom line is don’t under-brake your trailer. For the most part (and budgets), the tried and true electric drum brakes will do the job just fine. Make sure your brakes are maintained and adjusted to suit the loads you’re carrying and cleaned after off-road use. If you’re on the very heavy end of caravan models, carry a lot of gear and do all this off-road a lot then you may want to specify disc brakes from the outset.
The Bacon Tree.
Two Mexicans are stuck in the desert after crossing into the United States, wandering aimlessly and starving. They are about to just lie down and wait for death, when all of a sudden Luis says........."Hey Pepe, do you smell what I smell. Ees bacon, I theenk." "Is, Luis, eet sure smell like bacon. " With renewed hope they struggle up the next sand dune, and there, in the distance, is a tree loaded with bacon. There's raw bacon, there's fried bacon, back bacon, double smoked bacon ... Every imaginable kind of cured pork. "Pepe, Pepe, we ees saved! Ees a bacon tree!" "Luis, maybe ees a meerage? We ees in the desert don't forget." "Pepe, since when deed you ever hear of a meerage that smell like bacon...ees no meerage, ees a bacon tree!" And with that, Luis staggers towards the tree. He gets to within 5 metres, Pepe crawling close behind, when suddenly a machine gun opens up, and Luis drops like a wet sock. Mortally wounded, he warns Pepe with his dying breath.... "Pepe... Go back man, you was right, ees not a bacon tree!" "Luis, Luis mi amigo... what ees it? " "Pepe.. ees not a bacon tree. Ees.... Ees..... Ees.... Ees..... a ham bush...."
![]()
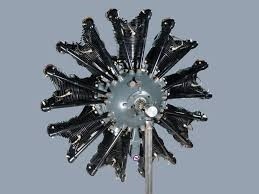
Radial Engines.
Why do most radial engines use an odd number of cylinders?
Actually it’s not true that radial engines have odd numbers of cylinders. For example, the Pratt and Whitney R-2000, as used on the Caribou, has 14 cylinders and the Pratt & Whitney R-4360 which powered the post-war B-36 Convair Peacemaker, had 28 cylinders. What is true is that each bank or row of cylinders has an odd number.
It’s important to make sure that any internal combustion engine is well balanced both from the standpoint of minimizing internal stresses in the engine and to minimize discomfort to any passengers. One primary factor in achieving this is to arrange the engine so that the intervals between power strokes of the various cylinders are equal. Any engine operating on a 4-stroke cycle, two revolutions of the crankshaft are required for each power stroke.
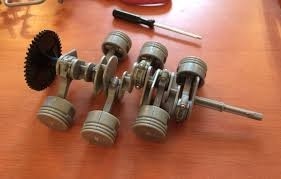
The following applies in general to most engine configurations, inline engines, opposed engines, V engines and so on, but not to radial engines. As an example, look at a six cylinder engine, such as the air-cooled Porsche 911 flat six.
The pic at right shows the 911’s engine crankshaft with rods and pistons attached. You can see that each piston has its own crankshaft throw, so by varying the relative angles between the crankshaft throws, it’s possible to get equal firing intervals distributed over the two revolutions in the crankshaft. In this case, power strokes occur at 120 degree intervals of crankshaft rotation. The firing order is 1-6-2-4-3-5. In some instances pairs of pistons on opposite sides of a v or flat engine may share a crank throw, but in the most general case each has its own.
|
Here is a top view of the cylinders of this engine. You can see that the left bank is offset from the right, to accommodate the spacing between the various crank throws. |
|
|
|
However, in a radial engine, each bank of cylinders lies in a single plane and so all the pistons in that bank share the same crank throw. |
|
|
|
|
|
|
|
Let’s look at how a 9 cylinder radial engine would work: |
||
|
Here’s top dead centre for cylinder 1 (above).
As the crankcase revolves, 40 degrees later, cylinder 2 hits TDC, and so on. So one way to arrange this would be to have the cylinders fire in order: 1-2-3-4-5-6-7-8-9 but now you’d need a second revolution of the crankshaft with no power strokes to complete the cycle, not exactly even spacing of the power strokes. |
|
|

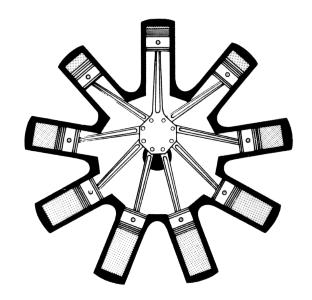
Instead, they arrange the ignition and valve timing so that only cylinders 1, 3, 5, 7, and 9 fire on the first revolution, with 2, 4, 6 and 8 in the second:
So a cylinder fires every 80 degrees of crankshaft revolution and at the end of two revolutions the cycle begins again.
If you go through a similar analysis with an even number of cylinders, you will find that it’s impossible to evenly distribute the cylinder firings throughout the two revolutions when constrained to a single throw on the crankshaft – which is why radials always have an odd number of cylinders per bank.

The RAAF Apprentice Scheme.
The RAAF Apprenticeship Scheme was based on a similar scheme run by the Royal Air Force in Britain. In the RAF instance the scheme had been running well before WWII. It was first considered by the Air Board in 1943 but was shelved during the war.
In 1945 Air Commodore Hewitt the Air Member for personnel noted in a submission the difficulties that the RAAF had experienced in recruiting men of sufficient educational standard to deal with the rapid technological advances being made in aviation at the time. The then general education system throughout Australia was believed to be inadequate or inappropriate to the needs of the RAAF. It was believed that the service had to bridge the gap with additional classroom training for new recruits. There were two separate schools set up, one at Frognall in Victoria and the other in Wagga Wagga New South Wales.
The Radio Apprentice School was formed at RAAF Frognall in December 1947. No 1 Course (comprising 16 trainees) began training in the first week of February 1948. Formal radio training was undertaken by the Royal Melbourne Institute of Technology (RMIT) and this arrangement continued for the next 26 years. From 1948 until 1960 each new intake of Radio Apprentices undertook a common course; this was the first six months of RMIT's Associate Diploma in Communication Engineering.
Those who passed this common course continued with the Diploma course for a further 2½ years followed by one year at the RAAF School of Radio (RADS) which was then located at Ballarat in Victoria. On successfully completing this four-year training period, apprentices were awarded their Associate Diplomas. Some were selected for a further years study at RMIT to qualify for a Fellowship Diploma, after which they were commissioned. Those apprentices who failed the six month common course were streamed into RMIT’s Radio and Electronics Technician Certificate course. This was an 18 month course, and those who passed did a further eight months training in applied electronics at RADS before finally graduating.
n 1961 RADS moved from Ballarat to Laverton. So did the Radio Apprentice School which, on 1 May 1961, was reformed within RADS as Radio Apprentice Squadron. 1961 also saw the abolition of the six month common course at RMIT. Entrants selected for RAAF apprenticeships did RMIT’s Radio and Electronics Technician Certificate course plus eight months in applied electronics at RADS. Entrants selected for the Diploma course went to Frognall as Officer Cadets.
In 1969 RMIT replaced its Technician Certificate course with a two year Trade Technician course. All RAAF Radio Apprentices undertook this course followed by a further eight months training at RADS. The RAAF’s long association with RMIT ended in 1975, since than all Radio Trade Apprentice training has been conducted at RADS.
The Technologist Apprentice Scheme.
1982 saw the introduction of the Technologist Apprentice Scheme to supplement the existing Radio Trade Apprentice scheme. This new scheme arose from a perceived need to train tradesmen capable of adopting a systems approach to the maintenance of modem, complex high-technology aircraft now in RAAF service. Unlike their trade Apprentice counterparts whose two year course is conducted entirely at RADS, Technologist Apprentices undertake a three year Certificate of Technology course at Footscray College of TAFE as well as specialist training at RADS. 1988 saw the Certificate of Technology course upgraded to an Associate Diploma in Engineering (Electronics).
Way back the RAAF produced a video on the scheme - you can see it below.
The English Electric Lightning
The English Electric Lightning is a British fighter aircraft that served as an interceptor during the 1960s, the 1970s and into the late 1980s. It remains the only UK-designed-and-built fighter capable of Mach 2. The Lightning was designed, developed, and manufactured by English Electric, which was later absorbed by the newly-formed British Aircraft Corporation. Later the type was marketed as the BAC Lightning. It was operated by the Royal Air Force (RAF), the Kuwait Air Force (KAF) and the Royal Saudi Air Force (RSAF).
A unique feature of the Lightning's design is the vertical, staggered configuration of its two Rolls-Royce Avon turbojet engines within the fuselage. The Lightning was initially designed and developed as an interceptor to defend the V bomber airfields from attack by anticipated future nuclear-armed supersonic Soviet bombers such as what emerged as the Tupolev Tu-22, but it was subsequently also required to intercept other bomber aircraft such as the Tupolev Tu-16 and the Tupolev Tu-95.
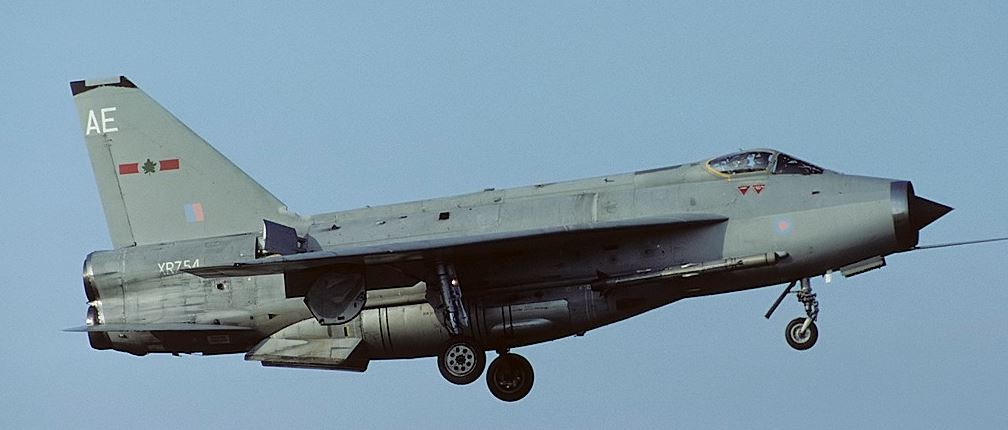
The Lightning has exceptional rate of climb, ceiling, and speed; pilots have described flying it as "being saddled to a skyrocket". This performance and the initially limited fuel supply meant that its missions are dictated to a high degree by its limited range. Later developments provided greater range and speed along with aerial reconnaissance and ground-attack capability.
Following retirement by the RAF in the late 1980s, many of the remaining aircraft became museum exhibits. Until 2009, three Lightnings were kept flying at "Thunder City" in Cape Town, South Africa. In September 2008, the Institution of Mechanical Engineers conferred on the Lightning its "Engineering Heritage Award" at a ceremony at BAE Systems' site at Warton Aerodrome.
Years ago, the RAF put the lightning up again the American’s U2 and also the Concord aircraft. The result was outstanding. You can see a video of the event HERE.
Timing has a lot to do with the outcome of a rain dance.
ACT Territory.
What a lot of people don’t know, is that the ACT not only comprises the area around Canberra but also includes a small area centred on Jervis Bay.
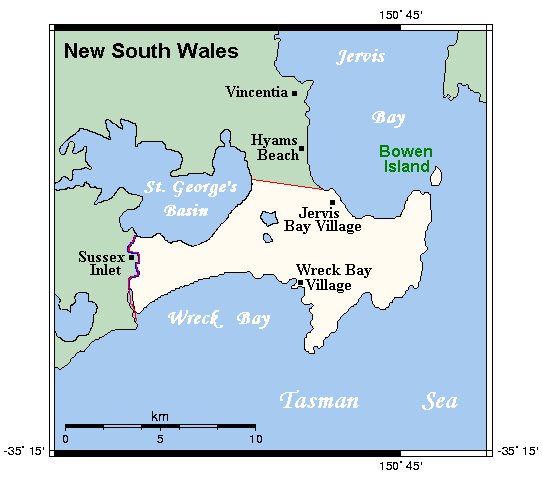
The Jervis Bay Territory is an internal territory of the Commonwealth of Australia. It was surrendered by the state of New South Wales to the Commonwealth Government in 1915 so that the Australian Capital Territory would have access to the sea.
It was administered by the Department of the Interior (and later by the Department of the Capital Territory) as if it were part of the Australian Capital Territory, although it has always been a separate Commonwealth territory. The perception that it is part of the ACT stems from the fact that under the terms of the Jervis Bay Territory Acceptance Act, the laws of the ACT apply to the Jervis Bay Territory. In 1989, when the ACT achieved self-government, the Department of The Arts, Sport, The Environment, Tourism and Territories took over responsibility for the JBT's administration and it has since been administered by various Commonwealth departments responsible to the Minister for Territories.
The bay was sighted by Lieutenant James Cook aboard HMS Endeavour on 25 April 1770 (two days after Saint George's Day) and he named the southern headland Cape St George. In August 1791 the bay was entered and named by Lieutenant Richard Bowen aboard the convict transport ship Atlantic of the Third Fleet in honour of Admiral John Jervis, under whom he had served. In November
During the negotiations that led to Federation, three major agreements were reached regarding proposed federal territories, including (in particular) the capital city of the proposed federation.
-
Firstly, it was decided that a new, purpose-built city, located within the borders of New South Wales (NSW), should become the federal capital.
-
Secondly, to allay fears that such a location would give NSW too much influence on federal politics, it was also agreed that an area including the new city would be exclaved from NSW – to become a small, separate federal territory.
-
Thirdly, it was also considered desirable, at the time, that the responsibilities and powers of the federal government should include direct control of, and jurisdiction over, at least one port and, therefore, an area of coastline.
Although the site of the capital city was not decided until 1908, most of the proposed sites were relatively long distances from the sea; hence it was also acknowledged (if only implicitly) that the capital and the port would be in separate, non-contiguous areas. In other words, it would have been onerous and unreasonable for NSW to have surrendered a single, contiguous area large enough to accommodate both port and capital. It was decided subsequently that Jervis Bay was the most practical location for a federally-controlled port. Ownership of Crown land in the area was transferred from the New South Wales government to the federal government in 1909 (at the same time that ownership of the site of Canberra and the surrounding area was also relinquished by NSW).
In 1915, jurisdiction over the Jervis Bay Territory was also transferred from NSW to the Commonwealth. To reduce the practical difficulties presented by the physical separation of the two territories, the government of NSW also agreed, in principle, that the federal government could build and take full control of a proposed rail corridor between Canberra and Jervis Bay, although this was never implemented.
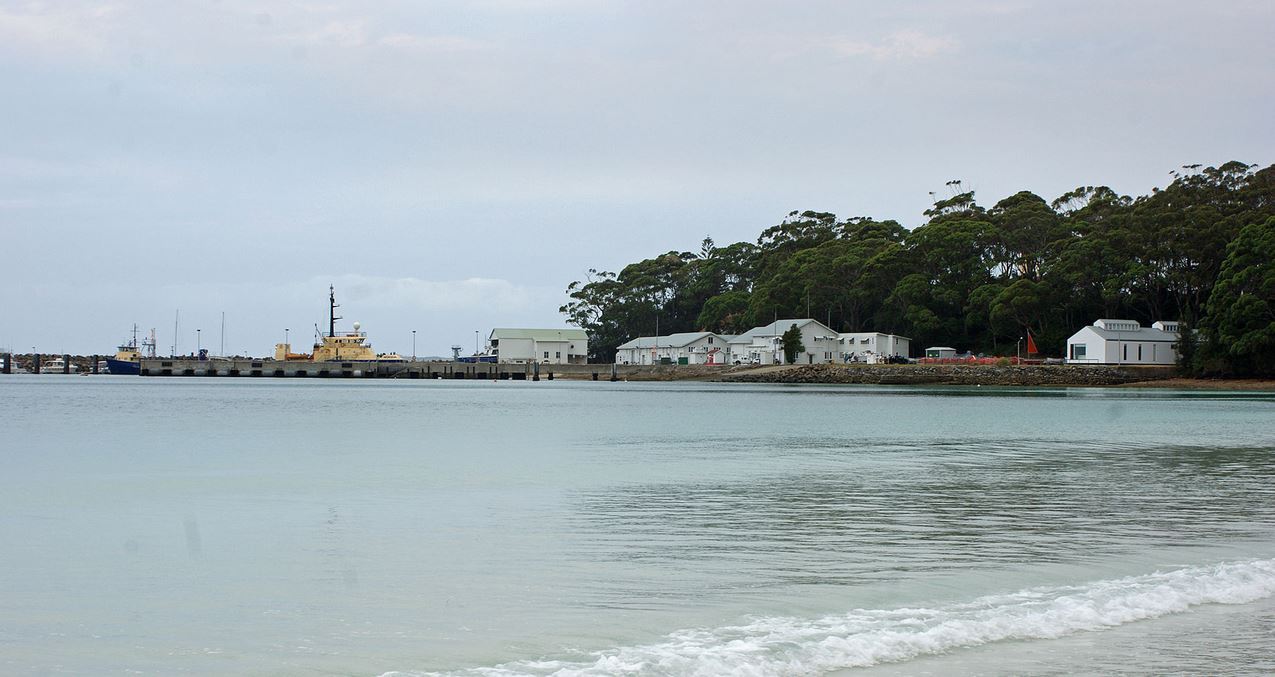
At the 2016 census, 391 people lived in the territory, the majority working and living at the Royal Australian Navy, HMAS Creswell.
There are two villages in the Jervis Bay Territory both of which are covered by postcode 2540. Listed from north to south, they are:
-
Jervis Bay Village (pop. 189)
-
Wreck Bay Village (pop. 152)
There are four private leasehold properties in Jervis Bay Territory, within but not part of Booderee National Park. Among these leasehold properties is the historic, heritage-listed Christian's Minde settlement, which was founded in 1880 by the Ellmoos family from Denmark. Christian's Minde was the first guesthouse on the NSW south coast between Port Hacking and Twofold Bay. The properties Christian's Minde, Kullindi and Ellmoos have been consistently inhabited and looked after by descendants and relatives of the first settlers. Many members of the family are buried in a cemetery on a hill, surrounded by dense bush near the settlement.
Good judgement comes from experience and a lot of that comes from bad judgement.
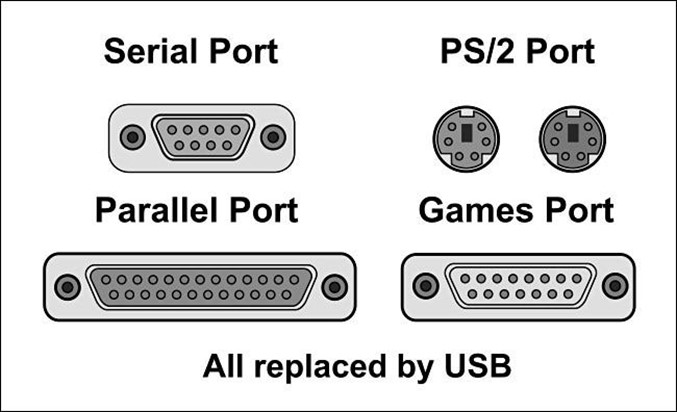
USB connections – the History.
In the early 1990s, connecting peripherals to PCs was a mess. You had to utilize a handful of different types of incompatible ports and connectors of which included a keyboard port, a 9 or 25-pin RS-232 serial port, and a 25-pin parallel port. In addition, PC game controllers used their own 15-pin standard, and mice often plugged into serial ports or proprietary cards.
At the same time, peripheral manufacturers began bumping into data rate limits in existing ports used for peripherals on PCs. Demand for telephony, video and audio applications was growing. Traditionally, vendors had sidestepped these limitations by introducing their own proprietary ports that could be installed as add-in cards, but that added cost and increased compatibility issues between machines.
And finally, adding a new peripheral on a PC was a headache. It often meant configuring technical details like IRQ settings, DMA channels, and I/O addresses so that they did not conflict with other devices installed on the system. There had to be an easier way.
The Solution: USB.
Relief would soon come in the form of a single port that could unify the industry: The Universal Serial Bus. The USB originated as a 1994 joint project between eight high-profile firms: Intel, Microsoft, IBM, Compaq, Digital Equipment Corporation, NEC, and Northern Telecom. After development for the next year and a half, the group published the USB 1.0 specification on January 15, 1996.

What they came up with was a serial computer peripheral bus that used simple 4-pin connectors that were rugged and inexpensive. USB allowed up to 12 megabit-per-second connections (enough for network applications at the time) and could serve up to 127 devices on a single bus if chained together using hubs.
Best of all, USB was completely plug-and-play, which meant devices automatically configured themselves (or sought appropriate drivers) when you plugged them in. No more wrestling with IRQs and unlike earlier standards, USB supported hot-swapping, which meant you could plug and unplug your peripherals while the computer was still running: no need for reboots when switching something as simple as your mouse.
At the time, the industry was also eyeing competing standards such as Firewire (IEEE 1394), Apple GeoPort, ACCESS.bus, and SCSI. But the simplicity and flexibility of USB won out—especially when vendors demonstrated they could create relatively low-cost USB chipsets for hubs and peripherals.
USB Appears in the Wild
The PC industry adopted USB slowly at first, with incremental improvements in the standard taking place over several years before widespread adoption took hold. Microsoft first supported USB in Windows 95 OSR 2.1 in August 1997 (and Win NT around that time as well). According to ComputerWorld, the Unisys Aquanta DX desktop, announced in May 13, 1996, was the first PC announced with built-in USB ports, though other vendors like IBM may have beaten them to market. Reports in Byte Magazine say USB chipsets weren’t available at scale until mid-late 1996. Still, by the end of 1996, almost a dozen PC vendors had announced PCs that included USB ports—usually two ports per machine.
Even with some early support for USB from PC manufacturers, USB peripherals that could actually use the ports were few and far between until around 1998. Until that time, almost every PC still shipped with legacy ports, so manufacturers continued to develop and sell devices that used them.
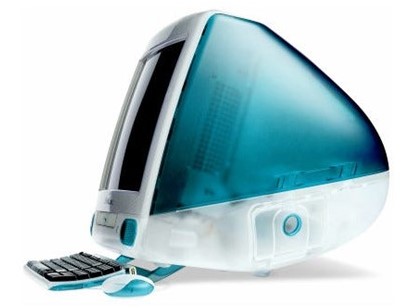
Apple
One event changed the availability of USB peripherals dramatically. In August 1998, Apple released the iMac, a sleek all-in-one machine that ditched all of its legacy ports for USB. For the first time in over a decade, Apple had created a machine without SCSI, ADB, or serial ports, and Mac peripheral manufacturers were forced to jump into USB in a significant way.
While Apple can’t claim sole credit in popularizing USB, the heavy press focus on the iMac’s reliance on USB brought the port into the popular consciousness in a big way for the first time. Soon, those Mac USB peripherals were also available for PCs with USB and with healthy support for USB in Windows 98, lower-cost chipsets and revisions to the USB standard, the PC market began to adopt USB with gusto around the turn of the 2000s. Eventually, cell phones began supporting USB connections as well, and the popularity of USB hasn’t slowed down since.
USB through the years
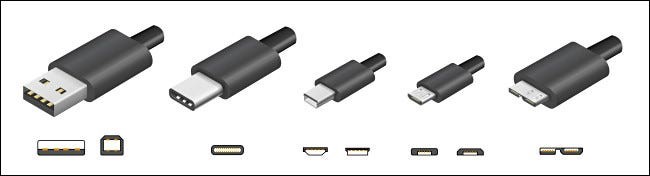
Examples of the major USB connector types over the years.
Since 1996, USB has expanded dramatically in capability, including support for newer, smaller connector types and much faster speeds. Throughout, the standard has been maintained by the USB Implementers Forum (USB-IF). Here are some highlights.
-
USB 1.0 (1996): The formal introduction of the USB standard with Type A and Type B connectors. High-speed is 12 megabits/second, low-speed is 1.5 megabits/second.
-
USB 1.1 (1998): This release fixed bugs in the 1.0 standard, including issues with USB hubs, and became the first widely-adopted USB standard. It also introduced USB Mini Type A and B connectors.
-
USB 2.0 (2001): This introduced a new, higher-speed 480 megabit/second mode while retaining backward compatibility with USB 1.1 devices. A 2007 revision introduced USB Micro connectors for the first time.
-
USB 3.0 (2011): The 3.0 standard introduced a new 5 gigabit/second data rate called SuperSpeed. It also introduced new Type A, Type B, and Micro connectors with more pins to support the higher data rate.
-
USB 3.1 (2014): This increased the USB data rate to 10 gigabits/second. Around this time, the USB-IF also introduced the symmetrical USB-C connector, which can be plugged in either way and still work. (No more flipping your USB device around three times to find the correct alignment!)
-
USB 3.2 (2017): With this revision, USB climbed to 20 gigabits/second and deprecated the Type B and Micro connectors in favor of Type C.
-
USB 4.0 (2019): This standard is compatible with Thunderbolt 3 and supports up to 40 gigabit/second connections. All connectors other than USB-C have been deprecated.
The Future is USB
As of 2021, USB is still going strong, supported so widely that USB connectors have become de facto power sockets for charging smartphones, tablets, video game controllers, battery-powered children’s toys, and for novelty items such as coffee mug warmers and tiny desktop vacuum cleaners.
USB hasn’t stopped improving USB4 shows the industry is serious about keeping the standard competitive as computers get faster and the data we shuffle between devices grows ever-larger. It’s even making inroads—Apple’s iPad Pro tablets dumped their proprietary Lightning ports for USB-C, although Lightning still endures on the iPhone and many other Apple devices.
My neighbour just banged on the door at 4.20am. Lucky I was still up playing music.
He banged and shouted, “Can we have a little respect please?”
So I shouted back, “I’m not a big Aretha Franklin fan, but ok, this one’s for you.”
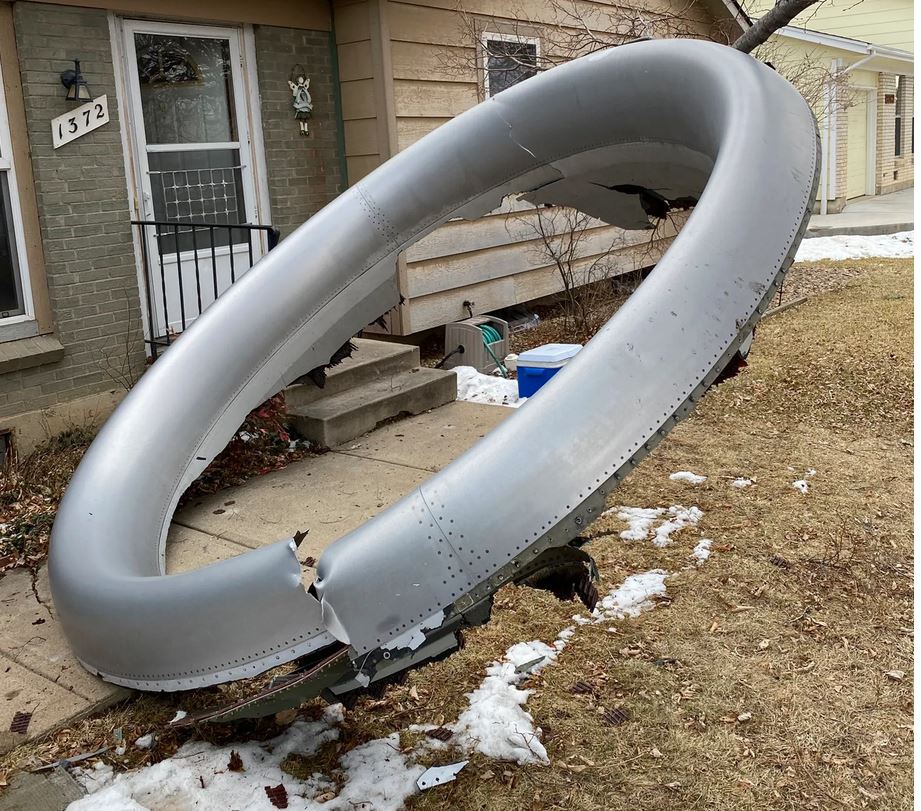
Boeing 777 Engine failure.
On the 20th February this year, a United Airlines Boeing 777 left Denver airport in Colorado, bound for Hawaii. As it was passing through 13,000 feet on its climb out, it suffered a major engine failure. The crew declared an emergency and returned to Denver, landing safely about 20 minutes after departure.
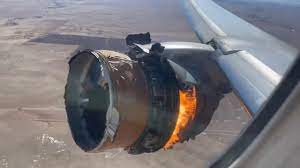
Thankfully no-one was injured, those passengers on the aircraft, although being very scared, were quite safe as the 777 is an amazing aircraft and the crew were very experienced and had been trained for emergencies such as this, but it was lady luck who looked after those on the ground. Great chunks of the Pratt and Whitney PW4077 engine fell from the aircraft and landed in built up areas a short distance from the airport missing everyone on the ground and narrowly missing several houses.
Such an event is extremely rare and happens when huge spinning discs inside the engine suffer some sort of failure and breach the armoured casing around the engine that is designed to contain the damage.
“That unbalanced disk has a lot of force in it and it’s spinning at several thousand RPM and when you have that much centrifugal force, it has to go somewhere,
Pilots practise how to deal with such an event frequently and would have immediately shut off anything flammable in the engine, including fuel and hydraulic fluid, in the 777 using a single switch.
Although trained for such an event, the crew must be commended for getting the aircraft back to Denver and landing it safely. A one engine landing, with the other engine on fire on a very heavy aircraft with a full load of fuel, is no easy matter.
Well done to them.
Click the video below to see the whys and hows it happened.
![]()
The Missing Vulcan and the Falklands War 1982.
During the 1982 Falklands War, Operations Black Buck 1 to Black Buck 7 were a series of seven extremely long-range ground attack missions by Royal Air Force Vulcan bombers of the RAF Waddington Wing against Argentine positions in the Falkland Islands, of which five missions completed attacks. The objective of the missions was to attack Port Stanley Airport and its associated defences. The raids, at almost 6,600 nautical miles (12,200 km) and 16 hours for the return journey, were the longest-ranged bombing raids in history at that time.
The Operation Black Buck raids were staged from RAF Ascension Island, close to the Equator. The Vulcan was designed for medium-range missions in Europe and lacked the range to fly to the Falklands without refuelling several times. The RAF's tanker planes were mostly converted Handley Page Victor bombers with similar range, so they too had to be refuelled in the air as well.
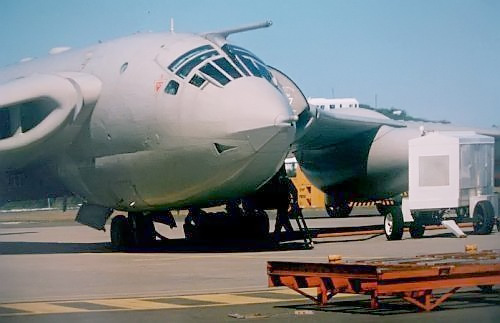
A total of eleven tankers were required for two Vulcans (one primary and one reserve), a daunting logistical effort as all aircraft had to use the same runway. The Vulcans carried either twenty-one 1,000-pound (450 kg) bombs internally or two or four Shrike anti-radar missiles externally. Of the five Black Buck raids flown to completion, three were against Stanley Airfield's runway and operational facilities, while the other two were anti-radar missions using Shrike missiles against a Westinghouse AN/TPS-43 long-range 3D radar in the Port Stanley area. Shrikes hit two of the less valuable and rapidly replaced secondary fire control radars, causing some casualties among the Argentine crews. One Vulcan was nearly lost when a fuel shortage forced it to land in Brazil.
The raids did minimal damage to the runway and damage to radars was quickly repaired. A single crater was produced on the runway, rendering it impossible for the airfield to be used by fast jets. Argentine ground crew repaired the runway within twenty-four hours, to a level of quality suitable for C-130 Hercules transports. The British were aware that the runway remained in use. Dismissed in some quarters as post-war propaganda, Argentine sources originally claimed that the Vulcan raids influenced Argentina to withdraw some of their Dassault Mirage III fighter aircraft from the Southern Argentina Defence Zone to the Buenos Aires Defence Zone. This dissuasive effect was watered down when British officials made clear that there would be no strikes on air bases in Argentina. It has been suggested that the Black Buck raids were pressed home by the RAF because the British armed forces had been cut in the late 1970s and the RAF may have desired a greater role in the conflict to prevent further cuts.
One of those Vulcans was returning to the UK after the raid when while refuelling, its fuel probe broke off meaning it could no longer be refuelled. This left it in mid ocean critically short of fuel. The aircraft diverted to Brazil and landed at Rio De Janeiro where the crew were arrested and held in custody for 7 days after which they were released, along with their aircraft and allowed to return to the UK.
It’s quite a story and you can see it below.
Carnation Milk.

Over 70 years ago, a little old lady from Wisconsin in the US had worked in and around her family dairy farms since she was old enough to walk, with hours of hard work and little compensation. When canned Carnation Milk became available in grocery stores in the 1940s, she read an advertisement offering $5,000 for the best slogan. The producers wanted a rhyme beginning with 'Carnation Milk is best of all.' She thought to herself, I know everything there is to know about milk and dairy farms. I can do this! She sent in her entry, and several weeks later, a black car pulled up in front of her house.
A large man got out, knocked on her door and said, "Ma'am, The president of Carnation milk absolutely LOVED Your entry.....So much, in fact, that we are here to award you $1,000 even though we will not be able to use it for our advertisements!"
He did, however, have one printed up to hang on his office wall. Click HERE to see it.
Task View.

Task View is a very handy little ‘gadget’ that was introduced by Microsoft in Windows 10. It is a virtual desktop manager that allows you to quickly switch between all of your open apps on multiple desktops. This makes multitasking and organizing with your opened apps much easier. To access it, you click the small icon (right) that sits on your Taskbar at the bottom of your screen. If it’s not there you can get it by doing the following:
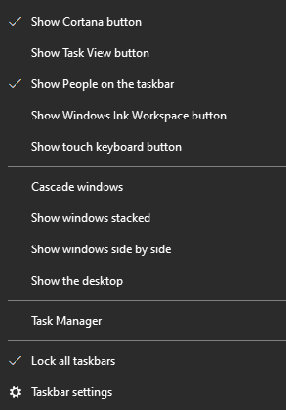
Right click on an empty spot on your Task Bar, the window at right appears, find an entry called ‘Show Task View button’ and click it, it will now show a tick beside the entry. This puts the Task View icon on your Task Bar.
You probably haven’t used it as it was only introduced with Windows 10, and done so without any fan-fare, so a lot of people don’t even know what it is or what it can do, which is a shame, because it is a very handy little tool.
It’s actually not all that new, something similar did appear way back in Windows 3.0 in 1990. Back then you held down the ALT and TAB keys together to produce a flattened view of all windows you had opened. Every version of Windows since then has also provided this window switching functionality but none as handy or as good as the Task View in Windows 10.
Apple computers have had this facility (Mission Control) for yonks also and until now theirs was always better.
Since the April 2018 Windows 10 Update, Task View now includes Timeline which, provided you’ve got a Microsoft Account, works like a time-machine allowing you to resume work on a project that you’ve worked on in the past. If you’ve got a PC and you’re working under Windows 10, you should have a Microsoft Account, they’re free and secure and allow you access to many useful Microsoft features.
To get one, click HERE, select 'Create a Microsoft account' and follow the instructions.
Using Task View
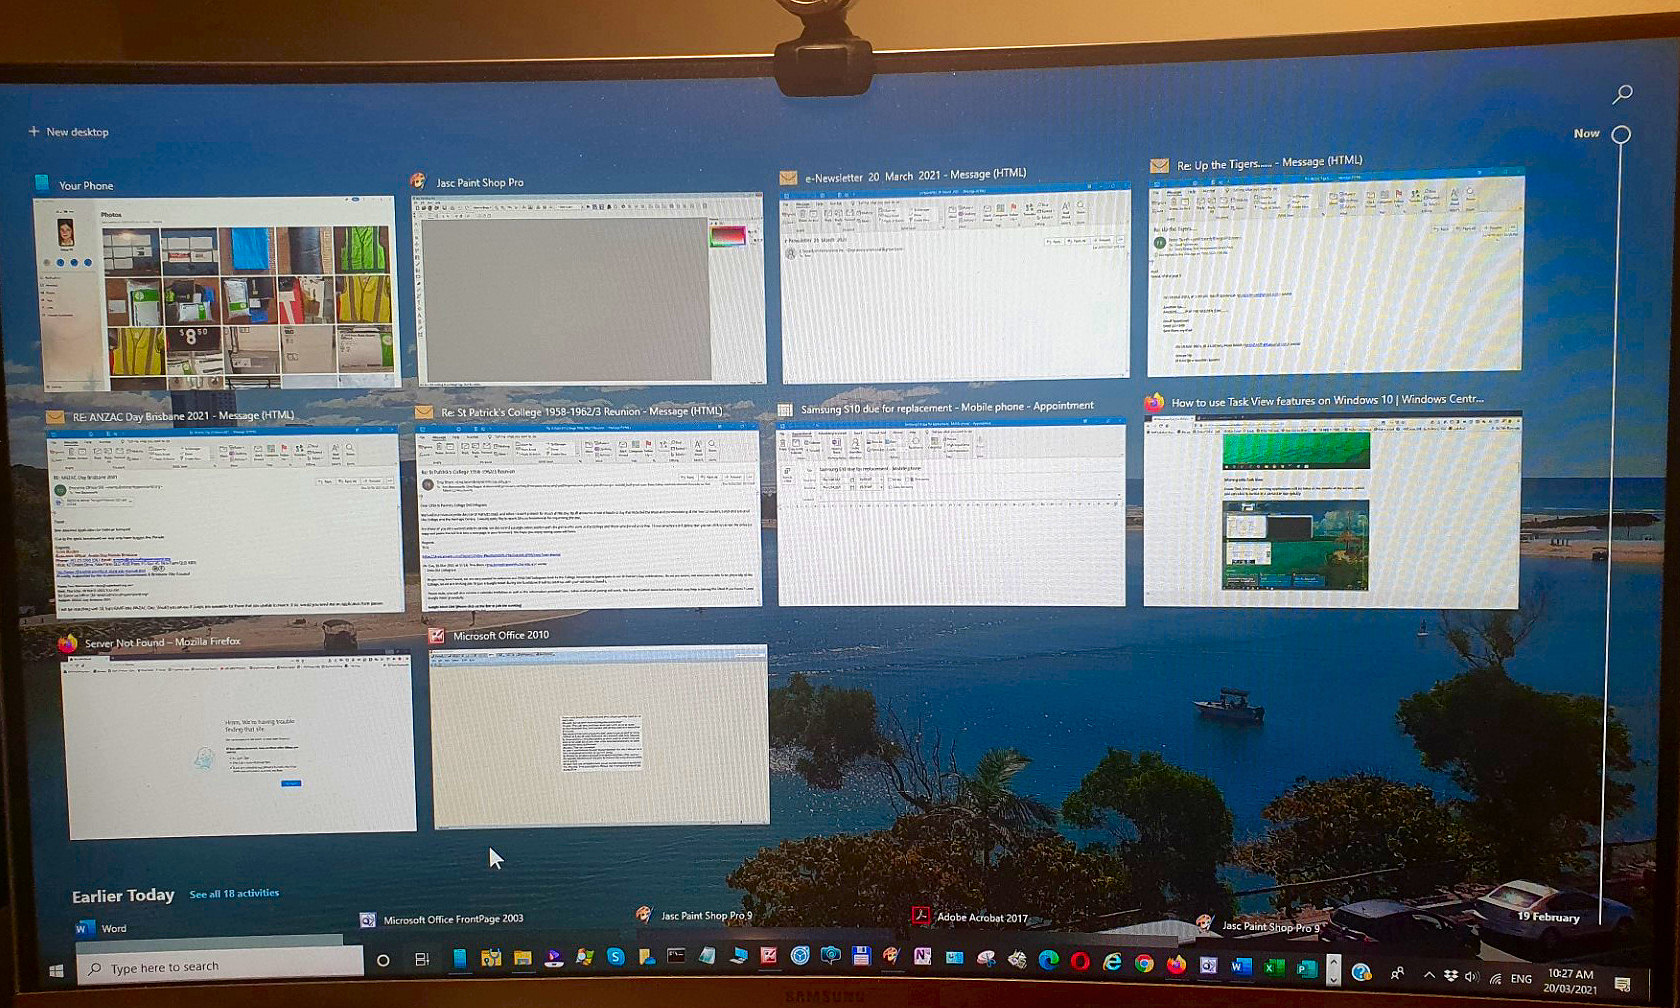
When you click the Task View icon on your Task Bar you will see all the Windows you’ve got open at that time and if you’ve got two screens, each screen will show which window you had open on that screen – pretty clever really.
If you want to resume working on one of the windows shown you just click it and it will open for you. Alternatively, you can right click a window and a small pop up window will appear giving you the option to snap it left or right, move it to a different desktop (or virtual desktops) or to show it on all desktops.
Different desktops.
Different, or virtual, desktops is an easy-to-use feature in Task View designed to help you organize related activities into groups. If you’ve got just one monitor, you can use Task View to give you as many ‘virtual’ monitors as you would want. Using this feature, you can create multiple environments that each will run different apps keeping your focus on a particular project. You can cut and paste from one ‘virtual desktop’ to another too. Typically, this feature comes in handy to keep work tasks separate from your personal tasks, or when multitasking between different activities, and you don't have a multi-monitor setup.
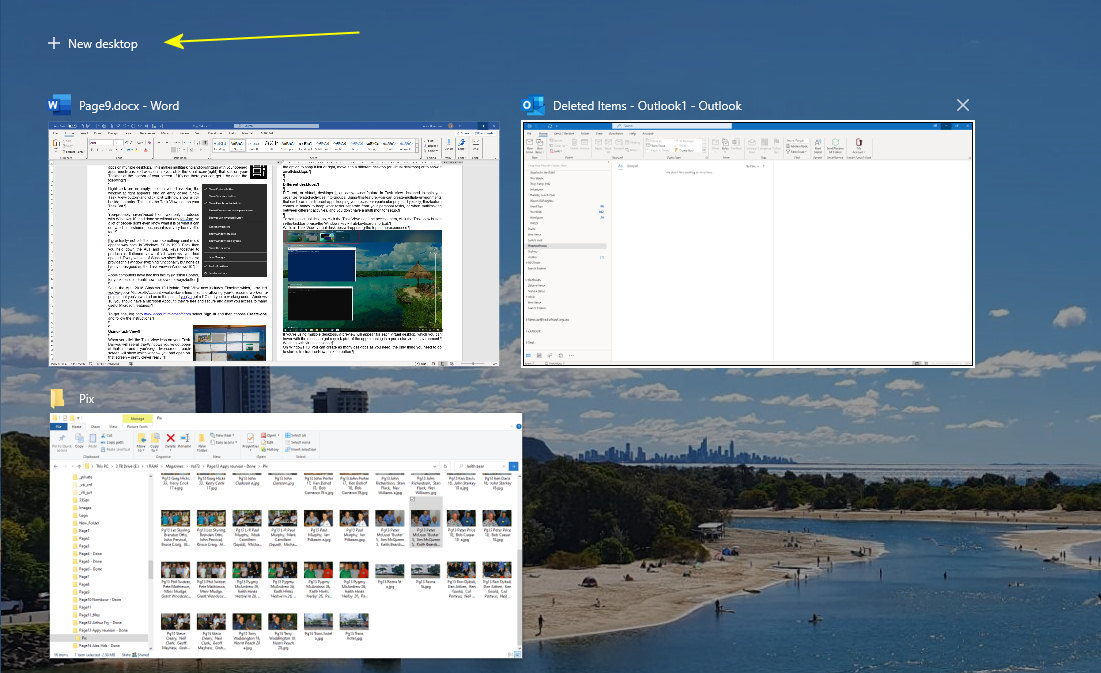
To setup a virtual desktop, click the Task View icon, you’ll notice up the top left of the Task View window are the words ‘+ New desktop’ (arrowed below) – click that and a clean new ‘virtual’ desktop appears. Now that you have two desktops open, you could, for example, run a word program on one desktop and an Excel on the other. You can in fact run anything on either.
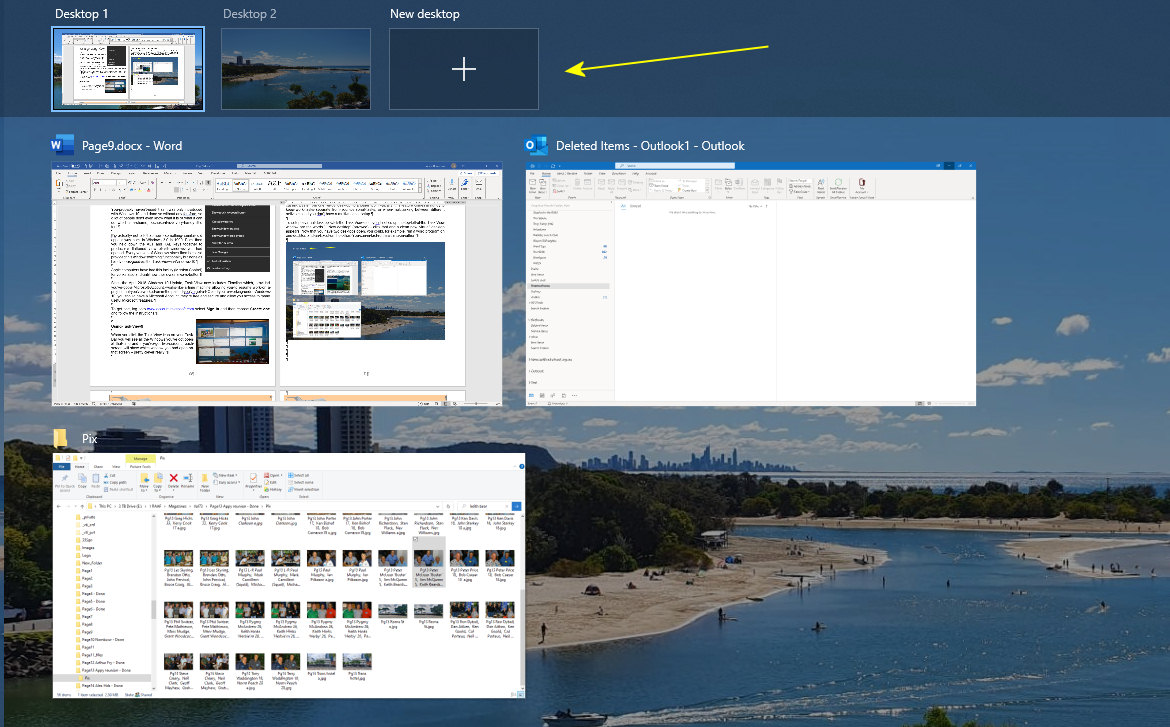
And you’re not restricted to two desktops, when you’ve set up Desktop number 2, you’ll notice, when you click the Task View icon, that at the top of the screen there is a bar which contains a preview of your original desktop, your ‘Virtual Desktop’ and a blank box with a large PLUS sign (arrowed below). By clicking that you can open a third desktop – and so on.
To switch from one to the other all you need to do is click on one of the desktops. If/when you’re finished with one of the desktops, run your mouse over that desktop, the familiar close button X will appear above it, just click that and the desktop disappears. If you had a program open in that virtual desktop, it just automatically moves over to your primary desktop – so you don’t lose anything.
Using Timeline
Timeline is a very handy feature that allows you to go back and work on a project that you had closed or stopped working on some time ago. You can find and re-open things that you were reading in your browser, an Office document, an app that you started on your computer, or from another device connected with the same Microsoft account, including on your Android or iOS device. Remember, this only works if you have a Microsoft Account so it’s in your interest to set one up.
Accessing Timeline
To access Timeline, click the Task view button in the taskbar, on the right hand side of the screen you will see a vertical line with a circular slider at the top of the line (arrowed below), click on the slider and drag it down the line. You’ll see lots of windows open which will be what you were working on previously.
As the slider comes down the line it will show the date to which it is referring. To resume working on or looking at that item, just click it.
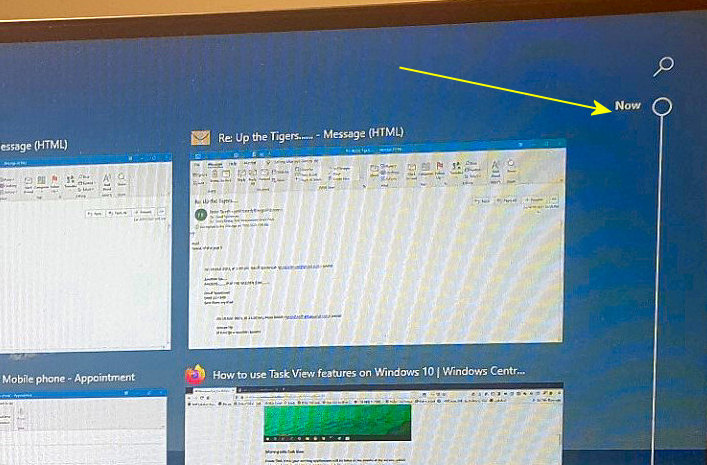
There is also a small magnifying glass at the top of the vertical line which is a search item, just click that, a small window will appear, you can then search for an item using keywords. If you need to delete activities, just right-click the item and select the Remove option or you can also select the Clear All to remove all the activities for a particular day.
As Timeline works across all your devices synced via your Microsoft Account, you'll notice that activities will include the name of the computer that started the task.
You can learn even more about Timeline HERE.
Task View is a very handy tool – have a play with it.

Velly Intelesting - but stoopid!!
Back Go to page: 1 2 3 4 5 6 7 8 9 10 11 12 13 14 15 16 17 18 19 20 Forward