|
|
||||||||||||||||||||||||||||||||||||||||||||||||||||||||||||||||||||||
|
||||||||||||||||||||||||||||||||||||||||||||||||||||||||||||||||||||||
|
Privacy Policy | Editorial Policy | Profit Policy | Join the Association | List of Members | Contact us | Index | Links |
||||||||||||||||||||||||||||||||||||||||||||||||||||||||||||||||||||||
|
Back Go to page: 1 2 3 4 5 6 7 8 9 10 11 12 13 14 15 16 17 18 19 20 Forward
|
||||||||||||||||||||||||||||||||||||||||||||||||||||||||||||||||||||||
|
Computers and Stuff.
Sam Houliston.
|
||||||||||||||||||||||||||||||||||||||||||||||||||||||||||||||||||||||
|
Report scams to the ACCC via www.scamwatch.gov.au or by calling 1300 795 995.
|
||||||||||||||||||||||||||||||||||||||||||||||||||||||||||||||||||||||
.jpg) |
||||||||||||||||||||||||||||||||||||||||||||||||||||||||||||||||||||||
|
Welcome again to Jaycar as the sponsor of Sam's "Computers and Stuff" page. As they are prepared to support us, please show your appreciation and support them. There's always a store near you, click HERE to find the closest.
|
||||||||||||||||||||||||||||||||||||||||||||||||||||||||||||||||||||||
|
Contents:
Create and print labels in Word
Getting the most out of Word.
Open the Command Prompt as Administrator Open two windows on the one screen
Useful Windows Commands.
|
||||||||||||||||||||||||||||||||||||||||||||||||||||||||||||||||||||||
|
I often worry about the safety of my children, especially the one that is rolling their eyes at me and talking back right now |
||||||||||||||||||||||||||||||||||||||||||||||||||||||||||||||||||||||
|
|
||||||||||||||||||||||||||||||||||||||||||||||||||||||||||||||||||||||
|
Open two windows on the one screen.
A lot of people these days have two screens (monitors) attached to the one computer, this is very handy as you can have two programs or features open at the same time and can easily move items from one screen to the other. For instance, you might have Word open on one screen and your photo directory (folder) open in the other, it is then a simple job to search for then drag a photo from one screen and imbed it into your Word file on the other, there’s no need to minimise the Word file while you search for the pic.
But – if you don’t have two screens, Windows has a feature where you can split your one screen into two and it’s dead easy to do.
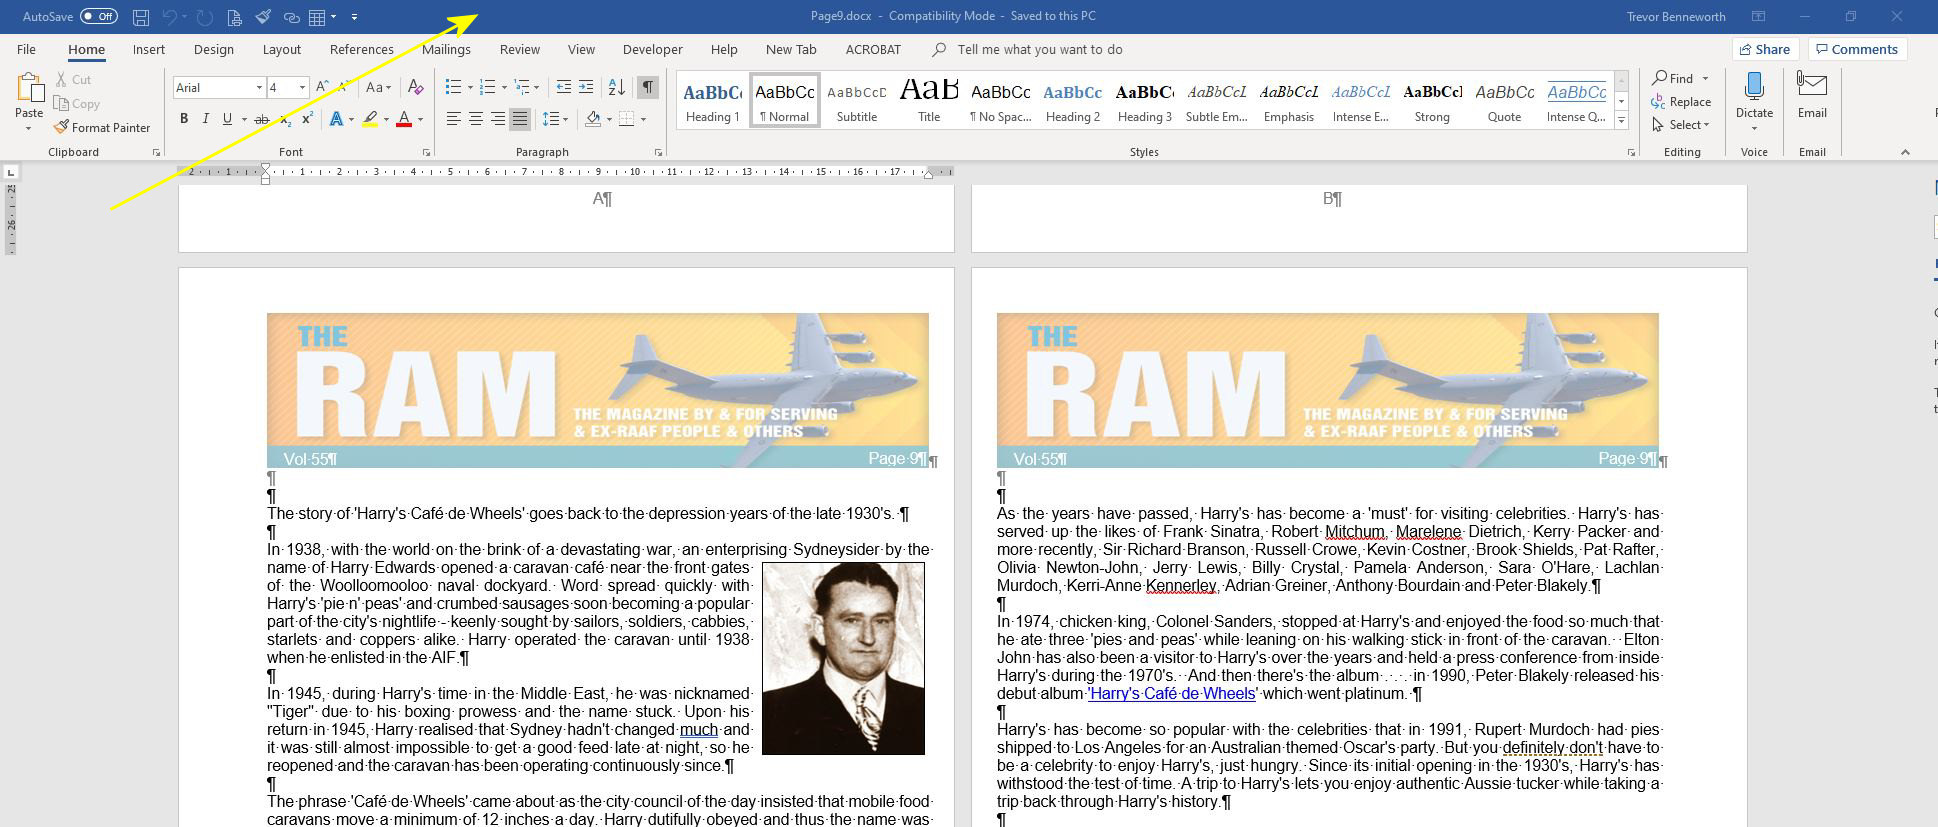
Let’s say you have a Word file open (you can do this with anything) click and hold the very top of the screen with your mouse (see arrow below) and drag the image to the left of your screen until you see a blank “ghost” in the background, when you see that unclick you mouse and your original screen will now take up half of your available screen leaving the other half on the right. |
||||||||||||||||||||||||||||||||||||||||||||||||||||||||||||||||||||||
|
|
||||||||||||||||||||||||||||||||||||||||||||||||||||||||||||||||||||||
|
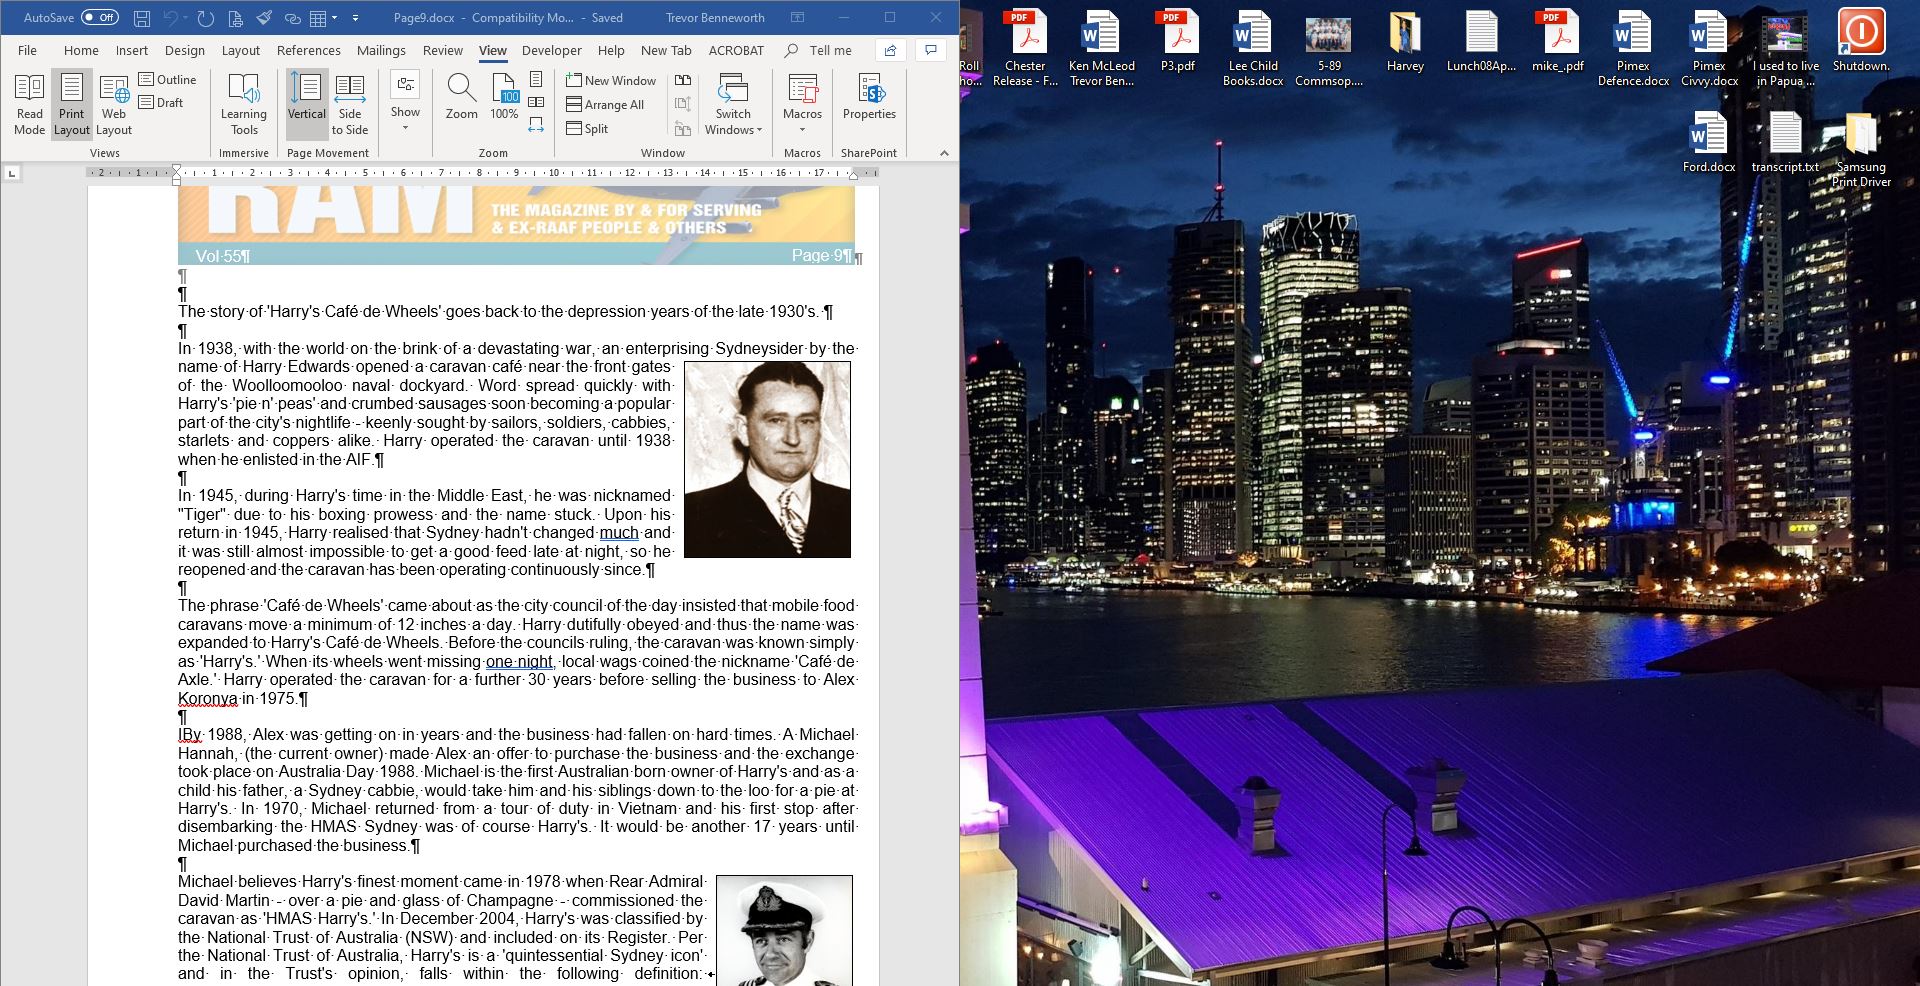
It will look something like this:
|
||||||||||||||||||||||||||||||||||||||||||||||||||||||||||||||||||||||
|
|
||||||||||||||||||||||||||||||||||||||||||||||||||||||||||||||||||||||
|
You can now click into the right half of the screen and open anything you wish and just drag anything from one side to the other. When you’re finished, just click the maximise button on the side you wish to keep.
|
||||||||||||||||||||||||||||||||||||||||||||||||||||||||||||||||||||||
|
Open the Command Prompt as Administrator.
There are times when you have to open the Command Prompt (what pre-historic man used to call the Dos Prompt - C:\) with Administrator privileges. This is very easy to do, once you know where to look. The easiest is to click the Start button (bottom left of your screen) then scroll down the “All Apps” list until you find the W section.
(Depending on your Start page configuration, you mightn’t see the All Apps list, if not, click the “All Apps” icon at the top left of the screen. This icon is small and has four square dots, one on top of each other, with 4 unequal lines, one on the right of each dot. This will open the alphabetical list of all the programs (now called Apps??) available on your computer).
At the W section, click on Windows System. You’ll find Command Prompt in here, right click it, select MORE, then click Run as Administrator.
Simples.
|
||||||||||||||||||||||||||||||||||||||||||||||||||||||||||||||||||||||
|
The more you weigh, the harder you are to kidnap. Stay safe, eat cake.
|
||||||||||||||||||||||||||||||||||||||||||||||||||||||||||||||||||||||
|
Some useful Windows commands.
There are some things you can only do from the command line—even in Windows. Some of these tools don’t have graphical equivalents, while others are just plain faster to use than their graphical interfaces.
If you’re into using PowerShell instead of the Command Prompt, you should note that all the commands we’re covering in this article work just the same in either tool. PowerShell is an improved version of the Command Prompt – we’ll ignore it in this article.
As the Command Prompt can be useful we suggest you pin it to the taskbar (that bar at the bottom of your screen) so you can get at it easily, follow the instructions above when looking for Administrator access, but when you get to MORE, click “Pin to Taskbar”.
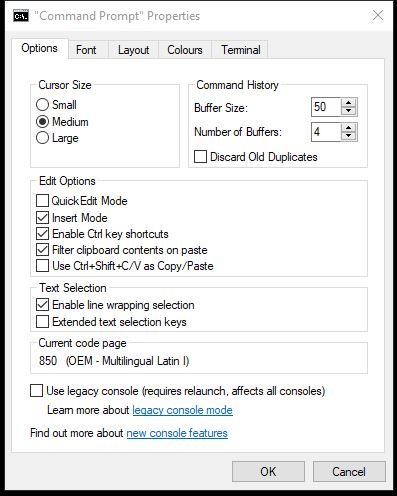
You could find that the font used in the Command Prompt is too small for you to read easily. If so, you can easily change it so it suits you, open the Command Prompt, then at the top of the page, right click in the title bar, to the right of the words “Command Prompt” and select properties.
This will open the window at right, select the Font tab and make any changes you want. You can also change the colour scheme too if you wish.
Open the Command Prompt, and type ipconfig and click enter. If you really want to know what’s going on Network wise with your computer, type ipconfig /all and press enter.
We’ve previously shown how to install a button on your desktop to shut down your computer, it’s HERE. Just as easily you can place a button on your desktop which will restart your computer. Just replace the command shutdown /2 /t 0 in the Shutdown Command with shutdown /r /t 0. Then just find a suitable icon for the restart command.
3. Scan System files for problems
Windows includes a system file checker tool that scans all the Windows system files and looks for problems. If system files are missing or corrupted, the system file checker will repair them. To use this tool, open a Command Prompt window as Administrator and type sfc /scannow. Ensure you leave a space between the sfc and the slash. You can read more info on this tool HERE.
4. Permanently delete files from a drive.
If you’re using the NTFS file system, when you delete a file all you really do is remove its header so that the computer can’t read it. Until it is overwritten by another file it is still on your hard drive and can easily be recovered with undelete software. If you’ve deleted a file or files and you don’t want anyone to be able to retrieve them, ever, Windows has a handy little program that will make all those deleted files completely un-recoverable by overwriting them with utter rubbish. You’ll need to open the Command Prompt as the Administrator, then enter the following cipher /w:c\ where c\ is the drive which contains the deleted files. Ensure there are no blank spaces between the / and the \.
It is completely safe to use as it does not touch your active files but only overwrites rubbish over files that have been deleted. But remember, once it’s done, it’s done – it is completely un-reversable.
5. Find the IP address associated with a Domain.
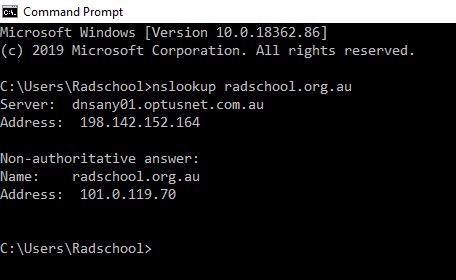
When you type a domain name (say, into a browser address bar), your computer looks up the IP address associated with that domain name. If you want, you can use a Windows command to find that information out for yourself. For example, if you want to find the IP address for Radschool.org.au you would open the Command Prompt, then type: nslookup Radschool.org.au.
You would find that the IP address for www.radschool.org.au is 101.0.119.70
|
||||||||||||||||||||||||||||||||||||||||||||||||||||||||||||||||||||||
|
|
||||||||||||||||||||||||||||||||||||||||||||||||||||||||||||||||||||||
|
It’s strange how drinking 8 glasses of water a day seems impossible, but 8 middies of beer goes down like a chubby kid on a seesaw.
|
||||||||||||||||||||||||||||||||||||||||||||||||||||||||||||||||||||||
|
Getting the most out of Word.
Here are some tips and tricks to help you get the most out of Word. We’re using Word 2016 but these tips work just as well with Word 2013 and Word 2010.
The ribbon is the bit across the top of your Word page that contains a number of Tabs (File, Home, Insert etc) under each are sub-headings which contain commands pertaining to that Tab. |
||||||||||||||||||||||||||||||||||||||||||||||||||||||||||||||||||||||
 |
||||||||||||||||||||||||||||||||||||||||||||||||||||||||||||||||||||||
|
For instance, the Tab HOME contains sub-headings Clipboard, Font, Paragraph etc, the Tab INSERT contains sub-headings such as Pages, Tables, Illustrations etc. Each sub-heading then contains a number of commands represented by an icon, for instance, under the Tab HOME, you have the sub-heading FONT which contains various commands to customise your word document fonts. And so on.
What you can do is add a new sub-heading with your own commands under a Tab. Here’s how:
Right click anywhere in the ribbon then select Customise the Ribbon. The Word Options window appears.
On the right side of the Word Options window are all the Ribbon Tabs; on the left side are all available commands. Click on the Tab that you wish to customize and then click on the area where you wish to place your new sub-heading. Click on the New Group button at the bottom of the right pane. Click Rename to name the group and choose an icon if you wish. Then from the left pane, click on a command you want to add to the new sub-heading and click Add. Do that for each command you wish to add.
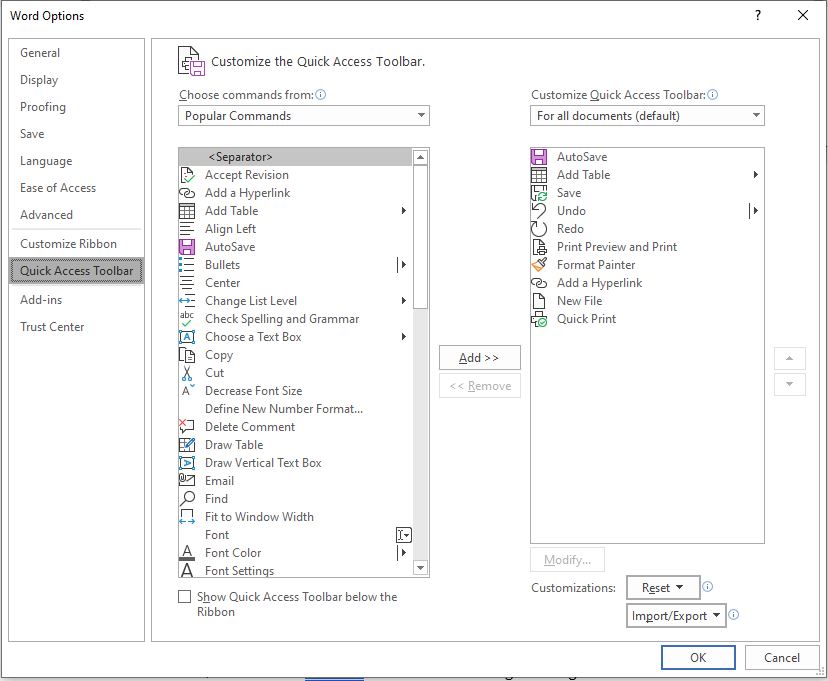
Customise the Quick Access Toolbar.
The Quick Access Toolbar rests at the top of your Word screen, just above the Ribbon. (You can move it to below the ribbon should you wish). You can access often used commands from here instead of having to chase these commands up via the normal menus. To add (or delete) commands from this tool bar, click the down chevron to the right of the Toolbar, the Quick Access Tool-bar Menu window appears. This menu contains several commands that you can add to the toolbar by clicking the command, a green tick will appear along side the command. If the command you want to add is not on the immediate menu, click More Commands at the bottom of the menu. The Options window opens (right).
You can select a command from the left window, click the Add button between the two windows which will add it to the right window which is the Quick Access Toolbar. If you wish to remove a command from the Toolbar, select it then click Remove.
Here’s a cool feature that many Word users may not know exists. Let’s say you want to run a certain command or task but have forgotten where or how to access it. At the end of the Menu tabs is a field that says: Tell me what you want to do. Type the task you want to perform in that field. Word conjures up a list of commands that match what you’re trying to do. You can choose the matching command, which hopefully will help you run the task. You can also get help on how to perform the task or run a Smart Lookup, which delivers more details on how to run that task.
Change the location of Word's Autorecover File.
Microsoft Word allows you to make an automatic backup of your working document. If the program crashes or your computer accidentally loses power, the AutoRecover feature will attempt to load the most up-to-date version of your document. If MS Word crashes, you’re quite often able to recover all or part of the file, but if you have a major computer problem and lose all your data, you could lose all your hard work if you’ve only stored it on the hard drive.
A solution is to move the AutoRecover file off your computer to services such as OneDrive, Dropbox or Google drive. You can also choose an external drive.
In Word 2016, to autosave into OneDrive, do the following. Open your File Explorer, in the left-hand window, open the OneDrive directory then make a subdirectory called “Autosave Documents”. Close File Explorer. In Word, go to File, then down the bottom, click OPTIONS, then SAVE. About a quarter of the way down the window, in the box titled, “AutoRecover file location:” click BROWSE then navigate to OneDrive\Autosave Documents.
Click OK then OK again.
|
||||||||||||||||||||||||||||||||||||||||||||||||||||||||||||||||||||||
|
I laughed so hard tears ran down my leg.
|
||||||||||||||||||||||||||||||||||||||||||||||||||||||||||||||||||||||
|
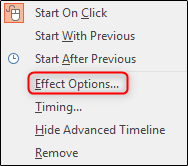
If you’re a regular user of Powerpoint, here’s a handy tip.
Adding quirky animations to your presentation gives your slideshow a little extra life. Not only will adding a typewriter or command line animation entertain your audience, but it will also keep them focused on the text.
Here’s how
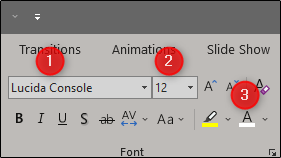
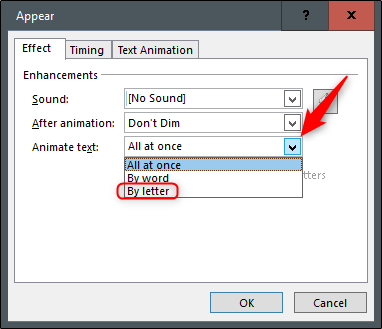
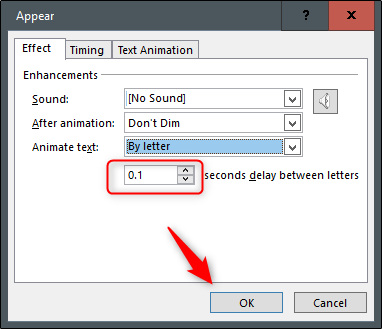
The typewriter and command line animations are very similar. The only differentiating factor is text style. If you’re going with the vintage typewriter look, we recommend going with a 12pt Courier New font in black. For the command-line look, we recommend using a 12pt Lucida Console font in white (or green) over a black background. Since the animations are identical, we’ll go with the command-line style as our example here.
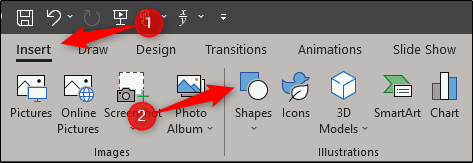
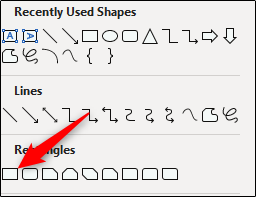
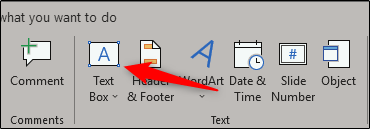
Go ahead and open PowerPoint and go to the slide where you want the animation. You’ll need to make sure you’ve got a black background to work against if you’re going for the command-line look. |
||||||||||||||||||||||||||||||||||||||||||||||||||||||||||||||||||||||
|
||||||||||||||||||||||||||||||||||||||||||||||||||||||||||||||||||||||
|
And that’s it. It’s a fun way to demonstrate commands during a presentation or to hold your audience’s attention with an old-fashioned typewriter animation.
|
||||||||||||||||||||||||||||||||||||||||||||||||||||||||||||||||||||||
|
My wife says sex is much better while on holidays. I can tell you it was a terrible postcard to receive.
|
||||||||||||||||||||||||||||||||||||||||||||||||||||||||||||||||||||||
|
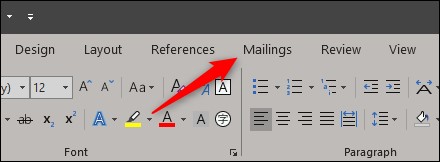
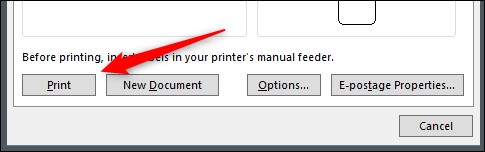
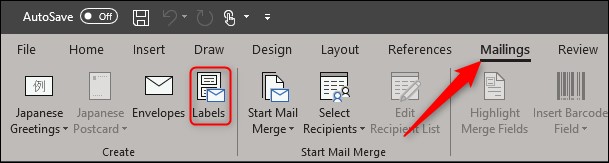
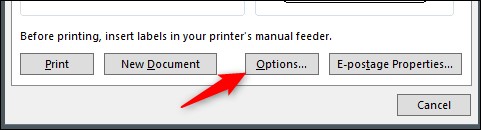
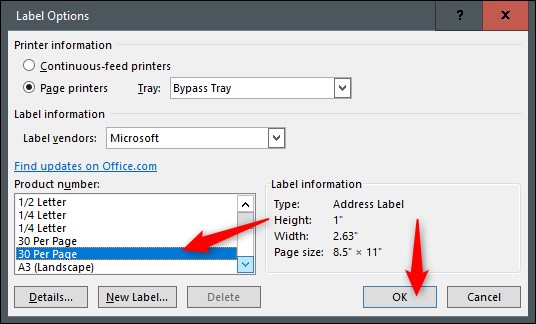
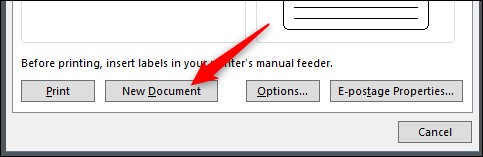
How to Create and Print Labels in Word.
If you’re looking to make customized labels, look no further than Microsoft Word. Whether for personal or professional use, Word provides a comprehensive feature set for creating personalized mailing labels.
There are two ways of doing this, you can print a whole page of labels with the same information or you can print each label with different information.
Here’s how to do it.
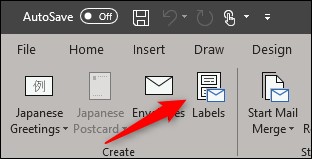
All labels with the same information.
When you consider how long Word has been around, it’s no surprise the application has evolved past creating only simple documents. Not only does it provide the tools to create personalized envelopes it also comes equipped to make custom labels to go with them.
|
||||||||||||||||||||||||||||||||||||||||||||||||||||||||||||||||||||||
|
||||||||||||||||||||||||||||||||||||||||||||||||||||||||||||||||||||||
|
|
||||||||||||||||||||||||||||||||||||||||||||||||||||||||||||||||||||||
|
Don't take life too seriously, nobody gets out alive anyway. |
||||||||||||||||||||||||||||||||||||||||||||||||||||||||||||||||||||||
|
|
||||||||||||||||||||||||||||||||||||||||||||||||||||||||||||||||||||||
|
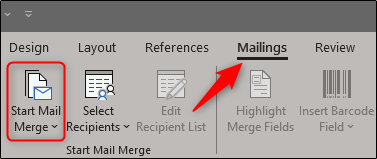
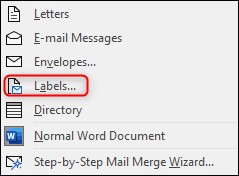
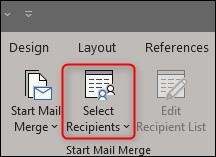
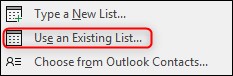
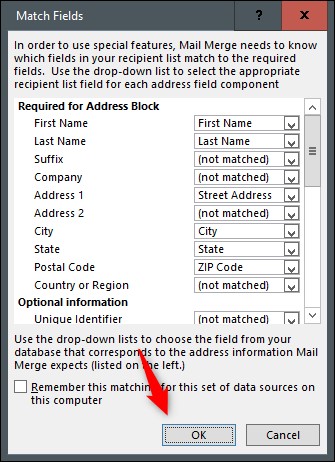
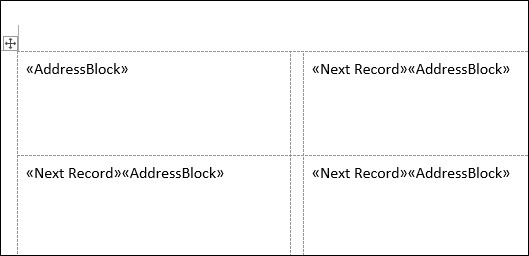
How to create Mailing Labels in Word.
Like most people, you are probably using Excel to organize and store your contacts. If you do, you should organise it so that each item of information, eg: First name, Second Name, Street Address, Town, State, Email etc is in a separate column in Excel, don’t set up your list with columns such as Name, Address etc, you’ll want to be able to access each piece of information separately and you can’t if you lump information into the one column.
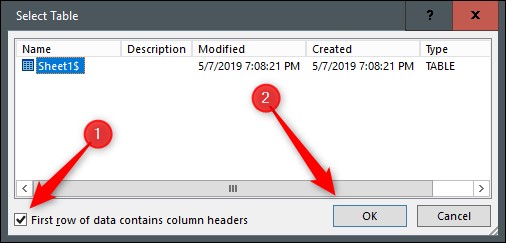
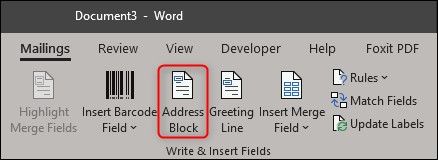
If your list is set up the correct way, you can use this information to print mailing labels using Word’s Mail Merge feature.
Here’s how.
|
||||||||||||||||||||||||||||||||||||||||||||||||||||||||||||||||||||||
|
||||||||||||||||||||||||||||||||||||||||||||||||||||||||||||||||||||||
|
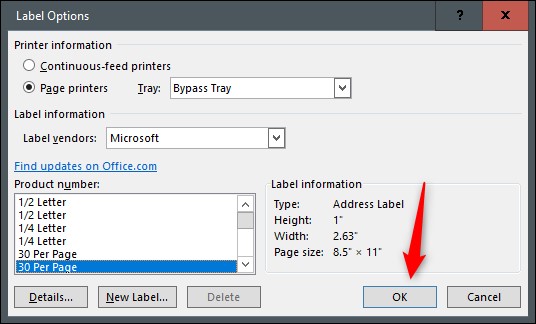
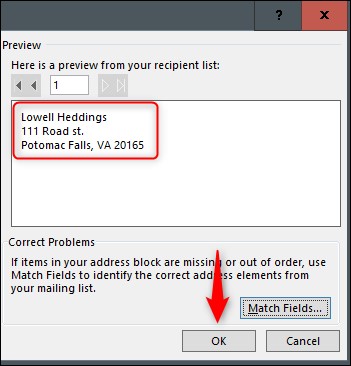
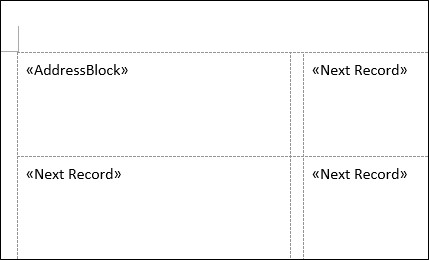
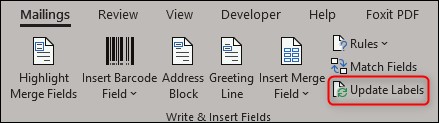
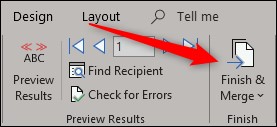
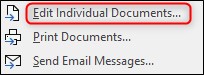
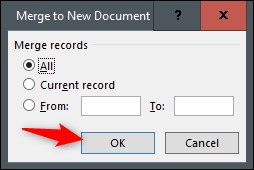
Your list from Excel will now be merged into the labels in Word.
|
||||||||||||||||||||||||||||||||||||||||||||||||||||||||||||||||||||||
|
Mirror mirror on the wall – What the hell happened?
|
||||||||||||||||||||||||||||||||||||||||||||||||||||||||||||||||||||||
|
|
||||||||||||||||||||||||||||||||||||||||||||||||||||||||||||||||||||||
|
|
||||||||||||||||||||||||||||||||||||||||||||||||||||||||||||||||||||||
|
|
||||||||||||||||||||||||||||||||||||||||||||||||||||||||||||||||||||||
|
|
||||||||||||||||||||||||||||||||||||||||||||||||||||||||||||||||||||||
|
|
||||||||||||||||||||||||||||||||||||||||||||||||||||||||||||||||||||||
|
|
||||||||||||||||||||||||||||||||||||||||||||||||||||||||||||||||||||||
|
|
||||||||||||||||||||||||||||||||||||||||||||||||||||||||||||||||||||||