
|
Vol 75 |
Page 4 |
Privacy Policy | Editorial Policy | Profit Policy | Join the Association | List of Members | Contact us | Index | Links
Back Go to page: 1 2 3 4 5 6 7 8 9 10 11 12 13 14 15 16 17 18 19 20 Forward

Computers and Stuff
Sam Houliston.
Contents.
Fix Gmail when it's not receiving emails.
Floppy disk formats over the years.
Make a USB drive readable on Macs and PCs.
Search Settings menu on Android.
What happens to your social media accounts when you die?
Why does Windows use letter for drives?
Win 11 to now run on older machines.
From idea to icon: 50 years of the floppy disk.
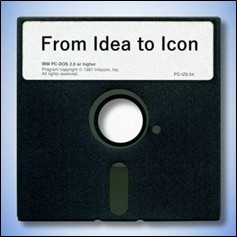
Fifty years ago, IBM introduced the first-ever floppy disk drive, the IBM 23FD, and the first floppy disks. Floppies made punched cards obsolete and its successors ruled software distribution for the next 20 years. Here’s a look at how and why the floppy disk became an icon.
Origins of the Floppy Disk.
Throughout the 1960s, IBM shipped many mainframes with magnetic core memory which could retain its contents when powered off. As the mainframe computer industry began to use solid-state transistor memory that lost its contents when powered down, IBM found itself needing a way to quickly load system software into these new machines at bootup to get them going. The conventional solution required loading data from stacks of punched cards or spools of magnetic tape, which could be slow and bulky.
That led to a search, beginning in 1967, for a new removable storage medium that could retain information without power and could be transported easily to remote computer installation sites. Soon, an IBM engineering team led by David L. Noble came up with a rotating flexible plastic disc impregnated with iron oxide that could hold a magnetic charge similar to magnetic tape. To improve reliability, the team placed the disc inside a plastic sleeve surrounded by fabric that could sweep away dust as the disc rotated.
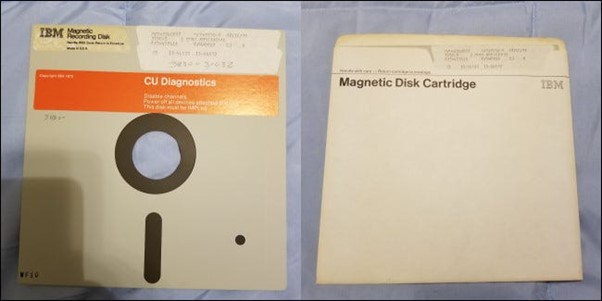
In 1971, IBM introduced the world’s first commercial floppy disk drive, the 23FD Floppy Disk Drive System. It used 8″ (20cm) square disks that held about 80 kilobytes. In a notable limitation, the drive could only read data, not write it. A special drive at IBM wrote the disks that would then be distributed to remote computer systems for loading system updates. Initially, IBM referred to its first floppy disk media as a “Magnetic Recording Disk” or a “Magnetic Disk Cartridge.”
IBM called its new disk a “floppy disk” because it was flexible, unlike the rigid aluminium platter hard disks that came before it. The idea for a floppy rotating disk was so novel that ComputerWorld described a competing floppy diskette technology developed by Innovex as a “sheet of magnetic tape” in 1972.
In 1973, IBM released a refined version of the 8″ floppy disk called the “IBM Diskette” (“Diskette” meaning a small disk—and also potentially referring to its secondary position relative to hard disks in a computer system.). With the IBM Diskette’s matching 33FD floppy drive, users could write data to the disk as well as read from it, so IBM hailed it as a new medium.
The new read-write IBM Diskette medium first found use in the IBM 3740 Data Entry System, which the firm designed to replace “keypunch” data entry systems in use at the time that would write data to stacks of paper-punched cards.
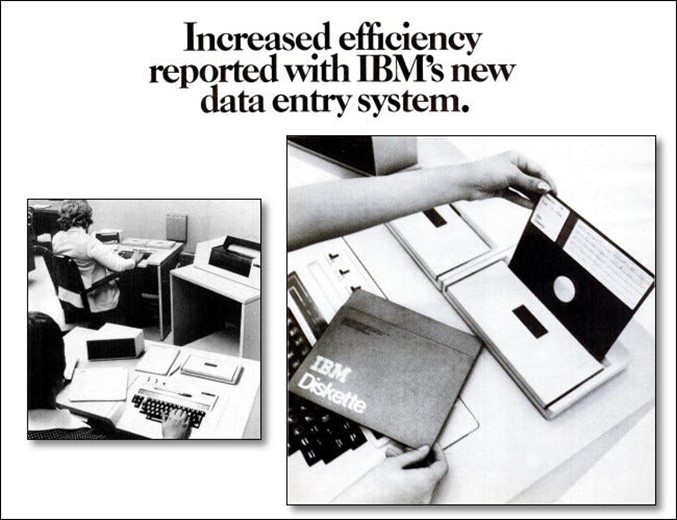
The IBM 3740 Data Entry System marked the first appearance of the “IBM Diskette.”
The floppy diskette represented a substantial breakthrough in computer data storage, with each diskette equivalent to about 3,000 punched cards in data capacity. Compared to huge stacks of punched cards, the floppy disk was small, portable, light, inexpensive, and re-writable.
Competing firms soon began creating 8″ floppy drives that could read and write IBM’s floppy disk format, and a new standard was born.
From Mainframes to PCs.
While initially used for mainframe computer systems, floppy disks quickly played a key part in the personal computer revolution of the mid-1970s. While initially, the high expense of 8″ floppy drives and controllers made many early PC hobbyists stick to paper tape or cassette drives for storage, floppy technology kept pushing forward. In 1976, Shugart Associates invented the 5.25″ floppy drive, which allowed for smaller, less expensive media and drives.
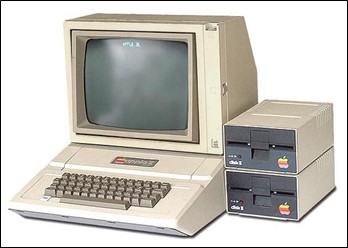
Consumer PC breakthroughs, such as Steve Wozniak’s Disk II system for the Apple II, brought floppy disk storage to the masses in the late 1970s. Although some inexpensive home computers still regularly used cassette tape drives for storage until the mid-late 1980s, floppy drives became standard equipment for early business-oriented personal computers by the late 1970s. In 1981, the IBM PC 5150 shipped with bays for two 5.25″ internal floppy drives, further cementing their use in the industry.
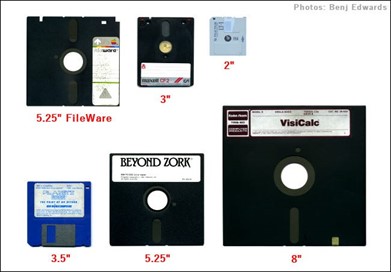
Interesting floppy formats through the years.
Over the course of four decades, dozens of manufacturers experimented with different floppy disk formats and densities. Here’s a list of a few notable ones.
-
8-inch Magnetic Disk Cartridge (1971): When introduced by IBM, the first 8″ floppies held a mere 80 KB of data and weren’t designed to be written by the user. But they set the template copied by later floppy disk formats.
-
8-inch IBM Diskette (1973): The first read-write floppy diskette system from IBM launched with the IBM 3740 Data Entry System. Initial disks could hold about 250 KB. Later 8″ diskette formats could hold up to 1.2 megabytes per disk.
-
5.25-inch (1976): Invented by Shugart Associates, the initial 5.25″ floppies could only hold about 88 KB. By 1982, a high-density 5.25″ floppy could hold 1.2 MB.
-
3-inch (1982): As a joint project between Maxell, Hitachi, and Matsushita, the 3-inch “Compact Floppy” shipped in a hard shell and initially held about 125 KB (single-sided format), but later expanded to 720 KB. It mostly found use in word processors and Amstrad computers, but never became widespread in the U.S.
-
5.25″ Apple FileWare (1983): This special 5.25″ floppy format with two read-head windows used only in the Apple Lisa computer could hold about 871 KB of data. Apple soon discontinued its use in favour of 3.5″ Sony drives in future models.
-
3.5-inch (1983): Several companies shipped the first 3.5″ floppy disks based on a Sony design that could hold 360 KB in its single-sided configuration, or 720 KB double-sided. Later versions could store up to 1.44 MB or 2 MB of data.
-
2-inch (1989): In 1989, both Sony and Panasonic debuted 2″ floppy drive formats that found use in Japanese word processors, still video cameras, and most notably, the Zenith Minisport laptop. Sony’s format could hold 812K of data, and Panasonic’s, 720K.
-
3.5″ Floptical (1991): Developed by Insite Peripherals, this obscure format used special disks similar to 3.5″ floppies that could hold 21 MB each thanks to optical head-tracking technology that increased track density dramatically.
-
Zip Disk (1995): Iomega’s 100 MB Zip Disk became an alternative floppy disk standard in the late 1990s and early 2000s. Later models held up to 750 MB of data.
-
3.5″ Imation SuperDisk (1996): The 3.5″ floppy format’s last stand, as far as new densities were concerned, came in the form of this 120 MB magnetic disk that achieved its high-data densities thanks to laser-tracking techniques. In 2001, Imation released a 240 MB version of the disk. As a bonus, SuperDisk drives could read regular 3.5″ floppies as well.
Floppy as Save Icon.
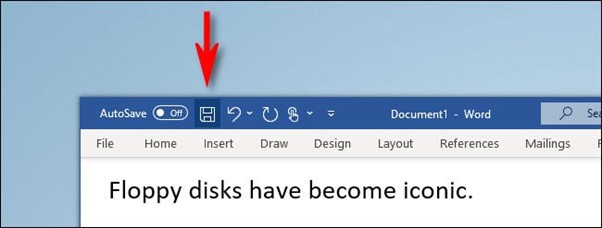
With so many people using floppy disks to store computer data on personal computers in the 1980s and 1990s, software programs in the GUI (Graphical user interface) era began to represent the act of saving data to disk with an icon of a physical floppy disk. Decades later, the trend persists in programs such as Microsoft Word and Microsoft Paint. This has led to some criticism due to the fact that many computer users today didn’t grow up using floppy disks, so they might not know what they are. For the past decade, there’s been a joke going around on the internet where someone represents a real floppy as a 3D-printed “Save” icon.
Skeuomorphism is everywhere in interface design, with gears representing the inner workings (Settings) of a computer, SLR cameras representing a camera app and vintage telephone receivers often used as “call” buttons or phone app icons. While some younger people might not know what a floppy disk is today, they have probably already learned that it represents the “save” action, even if they don’t know its origins.
Tech ancestry is in our language as well. A “dashboard” was originally a wooden panel at the front of a carriage designed to protect riders from mud kicked up by horses, but over time, the word gained new meanings as it began to represent different things, from car interiors to software interfaces. Will the floppy disk save icon end up that way, too? Only time will tell.
End of the Floppy.
After the introduction of the CD-ROM drive in the 1980s and its mass adoption in the 1990s, and then competition from Zip Disks, CD-Rs, USB thumb drives and beyond, the 1.44 MB 3.5″ floppy format seemed doomed by the late 1990s, but the format held out far longer than anyone expected, regularly shipping in PCs up until the mid-2000s thanks to its traditional role of providing BIOS updates to PC motherboards and as a cheap way of distributing device drivers for PC peripherals.
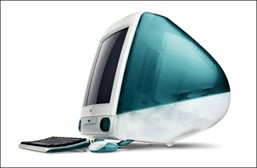
Apple made a decisive move against the floppy disk in 1998 with the release of the iMac, which controversially omitted any kind of floppy drive for the first time in Macintosh history. By that time, Apple assumed that people could transfer files through LANs, CD-ROM and over the internet and the company was largely right. Without the legacy reliance on BIOS upgrades by floppy, the Mac was free to cut its floppy ties earlier than most.
While some people still used floppies for quick data transfers by the late 2000s, the floppy’s commercial end had finally come. In 2010, Sony announced that it would cease production of floppy disks in March of 2011 due to dwindling demand and today, no one manufactures floppy disks or floppy drives. Still, legacy uses of floppies remain. As late as 2019, some United States nuclear weapons systems still relied on 8-inch floppies to operate properly, although they recently received a floppy-free upgrade. In August of 2020, The Register reported that Boeing 747 airplanes still receive critical software updates over 3.5″ floppy disks. Why stick with them? Because they’re a reliable, known technology, built into critical systems that aren’t easy to just swap out without potentially endangering lives.
Today, many vintage computer hobbyists still use floppies for fun, But if you still have important data on floppies yourself, it’s probably best to back it up to more modern formats (not CD-Rs!) because old floppy disks can lose data over time due to environmental damage or the loss of magnetic charge on the disk surface.
Either way, 50 years after the floppy disks’ launch, it’s amazing that the technology is still with us. I’d say that’s a big success and IBM is rightfully proud of itself for initially inventing the medium. Happy birthday, floppy disks!
Windows 11.
Windows 11 is now available though Microsoft warns it might not be available for many people. They say only those with recently bought computers will be able to download and use it. They say, through their "Windows PC Health Check" that your computer must meet a number of requirements otherwise it will not work - though if PC Health Check says the only problem is your computer doesn't have the required TPM (trusted Platform Module), there are ways to get over this. Running Windows 11 without TPM is unlikely to be less secure than running Windows 10 on the same machine.
The "fix" includes some tinkering with your registry, if you're not happy doing this, then DON'T. If you make an error when altering the registry you could lose everything, so, my advice, if you're not sure, leave it alone.
For those willing to have a go, here's how to do it, though make sure you do a thorough back-up first!!
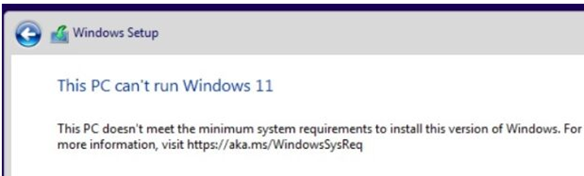
To make Windows 11 run without TPM you need to make three additions to the registry and you can do this while you are installing from a bootable USB. Just act as if there's no problem and try installing Windows 11 on a machine without TPM, you can do that from HERE. Eventually you will be told that your equipment doesn't measure up with a screen like that at right:
At this point, start a command prompt by using shift-F10 on your keyboard (look for "Open in Windows Terminal"). In the command prompt, open the registry editor by typing regedit.exe and hit enter.
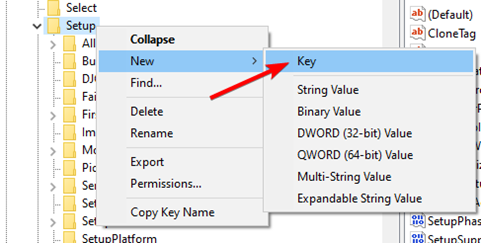
In the registry editor navigate to HKEY_LOCAL_MACHINE\SYSTEM\Setup and create a new (folder style) key by right-clicking the System 'folder' and using New > Key from the pop-up. Name the new key "LabConfig" (without the " but registry names are case-sensitive):
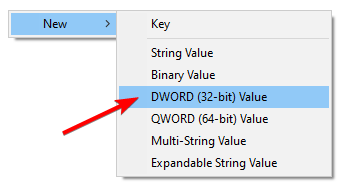
Click on the new LabConfig key to be presented with what looks like an empty folder. By right-clicking within that 'empty folder' create two items, both of type DWORD (32-bit) Value, and as you are creating these keys name them BypassTPMCheck and BypassSecureBootCheck:
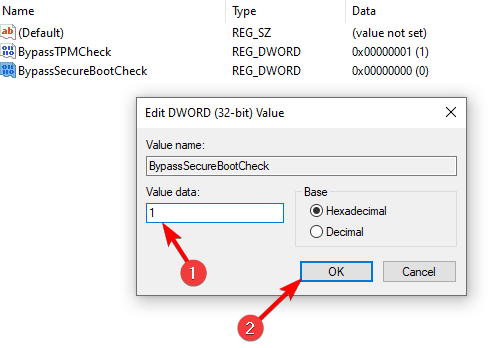
Double-click each of these two new DWORDs and set Value Data to 1:
At this point, the necessary registry changes have been made so exit from the registry editor. This will bring you back to the window saying that your machine doesn't measure up. In this window, simply click the back button and proceed from the previous screen. This time the installation process will be happy with your PC.
The golden rule of computers – If it ain’t broke, update it!
How to fix Gmail when it’s not receiving emails.

Gmail is something most of us use every day, most of the time without any problems. Unfortunately, some users run into the error of not receiving emails. There are multiple things you can try to start receiving your emails again, you can get this error on your phone, computer, or even your tablet, so here are solutions for all of these situations.
General Troubleshooting.
Check Google’s Servers.
Although it’s rare, Google servers do go down for maintenance or unplanned difficulties. You can check Google’s workspace status and see if Gmail is currently down or was down recently. If Google’s servers were temporarily down, then perhaps your email wasn’t handled properly. In that case, ask your sender to resend the email back to you.
Send Yourself a Test Email.
Another simple troubleshooting test you can do is by sending yourself an email. Try sending yourself two emails, one with a Gmail account and another one from another email service like Yahoo or Outlook. If you can receive emails from yourself, then chances are the emails you aren’t receiving are an isolated case.
Check Your Spam Folder.

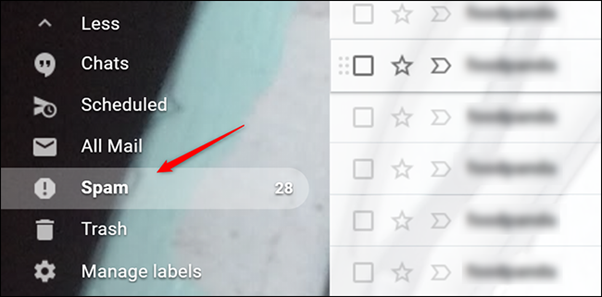
Don’t forget to check your spam folder! Google automatically filters some emails to spam, so the email you’re expecting may be over there. It’s on the left-side corner of your screen when you open the Gmail website or application. If your antivirus has an email filtering feature, then chances are the email you’re expecting is either here or in the trash.
Check Your Trash.
Similarly, you’ll want to check your Trash. Perhaps you mis-clicked or accidentally deleted an email you were expecting. Again, this is especially common for antivirus software to delete emails that it thinks are viruses.
Go to All Mail.
Finally, there’s an All Mail option at the left side of your screen that shows all the emails related to your account. If you can’t find the email you’re expecting in the Trash or Spam, then perhaps the All Mail tab will have it. This is also where archived emails are stored. Since all it takes is a simple swipe left or right to archive your email, you may have accidentally sent it there.
On your computer.
Unlike on your phone where your app may be outdated, your PC’s browsers are always up to date. This makes it more reliable, especially for problems like this where a network or connectivity bug could be your problem.
Log Out and Back Into Your Account.
Logging out of your Gmail account and back into it can help troubleshoot the problem by forcefully syncing your Gmail to Google’s servers. This should show any emails that were missing on your device.
Check Your Gmail Account Storage.
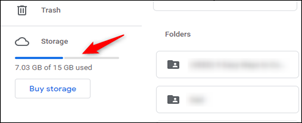
Unfortunately, unlimited storage isn’t free. Gmail has a storage limit and once you hit it, you’ll stop receiving messages. You can easily check your account storage by opening your Google Drive. Your storage space (should be 15 GB by default for free users) will show on the left side of your screen, at the bottom of the menu. If your storage is full, you can buy more from, Google, it’s not expensive, (see HERE) or you’ll have to delete files from your Google Drive or the emails in your Trash to clear this out.
Gmail doesn’t automatically delete your emails when you throw them in the Trash. Google keeps it for you for 30 days before deleting it themselves, however, it takes up space while it’s in the Trash.
Double check your Gmail filter settings.
Filtering your emails is often a necessity, especially if you start receiving random spam emails from bots and advertisers, unfortunately, it’s possible the email you’re expecting to receive has been filtered as well. The Gmail mobile app’s settings are limited, so you’re better off using your computer for this. If you don’t have a PC, you can open Gmail on the browser app of your phone. Just make sure to tick on the “Show desktop version” option on your browser app.
On your PC:
-
Open your Gmail account and click on the gear icon at the top-right corner of your screen to go to your Settings.
-
Look for and click on “See all settings”.
-
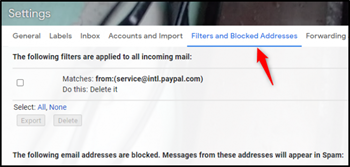
Go to “Filters and Blocked Addresses”.
-
Look through the email addresses that you have blocked or created filters for. Unblock or un-filter the email address you want to receive emails from.
-
If you unblocked or unfiltered any email address, then ask them to resend their email to you. Your Gmail account should now receive the email without a problem.
Disable Gmail Email Forwarding.
Email forwarding is a useful option for users who have two or more email address. This makes it so that emails sent to one of your email address are forwarded to another. If this was turned on by some mistake, then that one won’t be receiving anything new.
-
Open the Gmail website and click on the gear icon to go to your settings.
-
Click on “See all settings”.
-
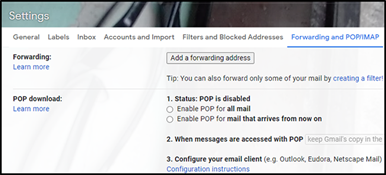
Navigate to the “Forwarding and POP/IMAP” tab.
-
Disable the forwarding option and save your changes before refreshing your Gmail.
Disable Your Antivirus Program.
This step only applies to those who are using IMAP in a desktop client on Windows. Some antivirus programs have an email filtering feature. This filters out emails that your antivirus thinks are a potential virus or has malicious intentions. You’ll want to try and disable this feature from your antivirus program and either refresh Gmail or ask your sender to resend the email.
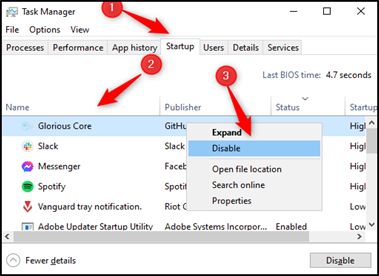
Alternatively, you can also disable your antivirus program from running on Startup through the Task Manager.
-
Press Ctrl+Shift+Esc to open up the Task Manager.
-
Go to “Startups” and look for your antivirus software.
-
Right-click your antivirus program and select “Disable” to disable it from running on startup.
Restart your computer and see if that fixed your email problem. Ask your sender to resend the email as well. If that fixed your problem, don’t forget to turn on your antivirus when you’re done! You can let it run on startup again by repeating the steps above but clicking on “Enable” instead.
The nicest thing about the future is that it always starts tomorrow.
How to make a USB drive that can be read on Macs and PCs.
By default, Windows and Mac file systems don’t play well together, so when it comes time to transfer files between them on a USB stick, you’ll need to make special arrangements. Here’s how to format a USB stick to work on both systems.
The File System Is the Key.
Windows 10 and MacOS use two different file systems by default. A file system determines how an operating system writes data to a hard disk or a USB drive. Windows 10 uses a file system called NTFS, and MacOS currently uses APFS by default.
So here’s the problem: If you format a USB drive as APFS on a Mac, Windows 10 won’t read it without third-party tools (and will actually ask to format it) and likewise, if you format a USB drive as NTFS on Windows, Macs can read it but not write to it (although there are some ways around it).
If you’re frequently using both Macs and PCs with the same drive, the ideal solution is to configure a USB drive with a file system that both operating systems can read. That file system is called exFAT, and it’s designed for flash media cross-platform compatibility. This is how to do it.
If the USB drive that you want to use as a universal transfer drive contains any data that you want to keep, you’ll need to back up that data onto another disk or a cloud backup service first. Formatting a drive always erases all of the data on the drive. If the USB drive is formatted with the Mac file system, you’ll need to use a Mac to transfer the data off of the drive. If the USB drive is formatted as a Windows drive, it’s probably best to back it up with a Windows Machine.
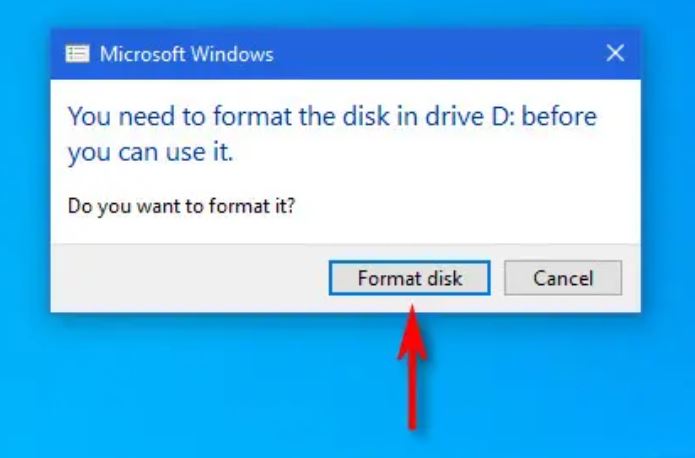
First, plug the USB drive that you’d like to format as a universal Mac/Windows drive into your Windows machine. If Windows says that it doesn’t recognize the drive (and you’ve already backed up any data on it), click “Format Disk.” If Windows recognizes the drive, open File Explorer and navigate to “This PC.” In your “Devices and Drives” list, right-click the USB drive that you want to use as a universal drive and select “Format” from the list.
In the “Format” window that appears, click the drop-down box labelled “File System” and select “exFAT.” Then, type in a name for the drive in the “Volume Label” box (if you’d like) and click “Start.” Next, you’ll see a warning that reminds you that you’re about to lose all of the data on the disk that you’re going to format. If you’re ready, click “OK.”
Windows will format the drive with the exFAT file system. When you see a “Format Complete” window, click “OK.” The next time that you open File Explorer, you’ll see the formatted USB drive in your “Devices and Drives” list. You can copy data to the drive as you normally would and the drive will also be readable and writable on a Mac.
You now have to set up the drive to work on a Mac.
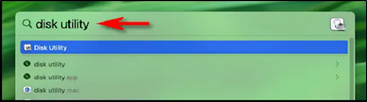
First, find a free USB slot on your Mac and plug in the USB drive that you’d like to set up as a Windows and Mac disk. To format a USB drive with the exFAT file system on a Mac, you’ll need to use a tool called “Disk Utility” created by Apple that ships with MacOS. To run it, press Command+Space on your keyboard and type “disk utility,” and then click the Disk Utility icon. (Or, you can open Launchpad, type “disk,” and then click the Disk Utility icon.)
When Disk Utility opens, look at the sidebar in the “External” section
and select the USB drive that you just inserted. (Warning: Triple-check
that you’re selecting the correct drive in the Disk Utility list.
Everything on that drive is about to get erased). After selecting the
USB drive, click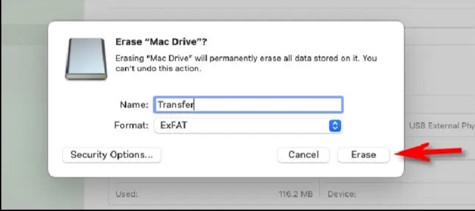 “Erase” in the toolbar near the top of the window. In the “Erase” pop-up
that appears, click the drop-down menu labelled “Format.” In the fie
system format menu, select “exFAT” from the list.
“Erase” in the toolbar near the top of the window. In the “Erase” pop-up
that appears, click the drop-down menu labelled “Format.” In the fie
system format menu, select “exFAT” from the list.
Disk Utility will erase and format the USB drive as exFAT. When it’s finished, click “Done,” and you’re ready to go. Quit Disk Utility and you can copy files to your newly formatted USB drive as usual.
You can then insert it into a Windows PC and read from it or write to it with no trouble.
Paddy calls Jetstar to book a flight. The operator asks "How many people are flying with you?"
Paddy replies "How would I know, it's your bloody plane!"
How to search the Settings Menu on Android
The Android Settings menu can sometimes feel like a disorganized mess. Things have slowly gotten better over the years, but it still varies greatly by the device. Thankfully, you can now simply search for the setting you want.
As with many things Android-related, the Settings menu looks different depending on your phone or tablet’s manufacturer. But first, you need to open the Settings.

Swipe down from the top of the screen (once or twice, depending on your device’s manufacturer) and tap the gear icon to open the Settings menu. What we’re looking for is a search bar or some sort of search icon, like a magnifying glass, at the top of the Settings.
Here’s the search interface on a Samsung Galaxy:
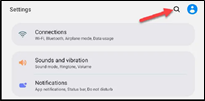
Click the small magnifying glass, a window will appear containing the word “Search,” start to type for whatever you’re looking. The results will start to appear underneath. Pay attention to the small text that indicates which section of the Settings the result is from.
Tapping a result will take you to that spot in the Settings. It’s as simple as that.
What do you call Bob the Builder when he retires? Give in?
What happens to your online accounts when you die?

We’re all going to die someday, but the same can’t be said for our online accounts. Some will persist forever, others might expire due to inactivity and some have preparations in place for when you pass away. So, let’s have a look at what happens to your online accounts when you go offline forever.
A State of Digital Purgatory.
The easiest answer to the question of what happens to your online accounts when you die is “nothing.” If Facebook or Google is never notified of your death, your profile and inbox will remain there indefinitely. Eventually, they might be removed due to inactivity, depending on the operator’s policy and your own preferences.
Some jurisdictions might attempt to regulate who can access the digital assets of someone who has died or is otherwise incapacitated. This will vary depending on where in the world the account holder was (or is) located and could even require legal challenges to resolve. You’ll likely be notified of this by the service operator since they must comply with local laws first and foremost. Unfortunately, expired accounts often become the target of thieves who take advantage of the compromised passwords and outdated security practices used by their deceased owners. This can cause great distress to family members and friends and it’s why networks like Facebook now have built-in safeguards.
Two scenarios usually play out when someone with an internet presence passes away, either the accounts exist in a state of digital purgatory, or the account holder explicitly passes on ownership or login details. Whether or not that account can still be used depends ultimately on the service operator, and these policies differ quite wildly.
If you were hoping to pass on a digital library of movies and music, then you might be disappointed to hear that this is often forbidden in the terms and conditions. Or, if a family member needs information stored in your inbox, they might have to provide a subpoena or court order to gain access.
What Do the Tech Giants Say?
If you’re wondering whether a particular service has an explicit policy regarding its users passing on, you’ll need to look up the terms of use. With that in mind, we can get a good idea of what to expect by looking at what some of the largest websites and online services say. The good news is that many provide users with tools that allow them to decide what happens to their accounts and who gets to access them after they die. The bad news is that most accounts deem that content, purchases, usernames, and other associated data cannot be transferred.
Google, Gmail, and YouTube.

Google owns and operates some of the biggest services and storefronts on the internet, including Gmail, YouTube, Google Photos, and Google Play. You can use Google’s Inactive Account Manager to make plans for your account in case of your death. This includes when your account should be considered inactive, who can access it and what they can access and whether or not your account should be deleted. In the event of someone passing who hasn’t used the Inactive Account Manager, Google lets you submit a request to close accounts, request funds, and obtain data.
Google states that it is unable to provide passwords or other login details, but will “work with immediate family members and representatives to close the account of a deceased person where appropriate.” Since Google owns YouTube, and YouTube videos can continue to earn revenue even if the channel belongs to someone who has passed away, Google might pass on revenue to eligible family members or legal next of kin.
![]()
Social media giant Facebook now allows users to nominate “Legacy contacts” to manage their accounts should they pass away. You can do this using your Facebook account settings, (HERE) and Facebook will notify anyone who you specify. Doing so requires that you decide between memorializing your account or permanently deleting it. When an account is memorialized, the word “Remembering” appears before the name of the person, and many account features are restricted.
Memorialized accounts remain on Facebook and the content that they shared remains shared with the same groups. Profiles don’t appear in friend suggestions or the “People you may know” section, nor do they trigger birthday reminders. Once an account is memorialized, nobody can log in again. Legacy contacts can manage posts, write a pinned post and remove tags. Cover and profile pictures can also be updated and friend requests can be accepted. They cannot log in or post regular updates from that account, read messages, remove friends, or make new friend requests.
Friends and family can always request memorialization by providing evidence of death, or they can request the removal of the account.
Twitter.

Twitter doesn’t have any tools for deciding what happens to your account when you die. The service has a 6-month window for inactivity, after which your account will be deleted. Twitter states that it “can work with a person authorized to act on behalf of the estate, or with a verified immediate family member of the deceased to have an account deactivated.” This can be done using the Twitter privacy policy inquiry form.
Apple.

Your Apple accounts will be terminated when you die. The “No Right of Survivorship” clause in their terms and conditions (which can differ between jurisdictions) states: “Unless otherwise required by law, You agree that your Account is non-transferable and that any rights to your Apple ID or Content within your Account terminate upon your death.” Once Apple receives a copy of the death certificate, your account will be deleted along with all associated data. That includes photos in your iCloud account, movie and music purchases, apps that you have bought, and the contents of your iCloud Drive or iCloud inbox.
It is recommended that you set up Family Sharing so that you can share photos and other purchases with family members, since trying to rescue photos from a deceased account will likely prove fruitless. If you need to notify Apple of someone’s death, then the best way to do so is the Apple Support website. If Apple doesn’t receive confirmation of your death, then your account should remain intact (at least for the short term). Passing on Apple account credentials upon your death would allow friends and family members to access accounts in your stead, if only temporarily.
Microsoft and Xbox.

Microsoft seems pretty open to allowing surviving family members or next of kin access to the account of someone who has died. The official terms state that “If you know the account credentials, you can close the account yourself. If you don’t know the account credentials, it will be closed automatically after two (2) years of inactivity.” Much like other services, if Microsoft never learns of your passing, then the account should remain active for two years at least. Just like Apple, Microsoft provides no right of survivorship, so games (Xbox) and other software purchases (Microsoft Store) cannot be transferred between accounts. Once the account has been closed, the library will disappear with it.
Microsoft states that it requires a valid subpoena or court order to consider whether or not it will release a user’s data, which includes email accounts, cloud storage, and anything else stored on their servers. Microsoft is, of course, bound by any local laws that state otherwise.
Share your passwords.
The easiest way of ensuring that your accounts are at least managed by someone you trust is to pass on the login credentials directly. Service providers might still decide to terminate the account when they learn of the owner’s passing, but loved ones will have a head start in collecting any photos, important documents, and anything else they need.
Husband's call:
"Honey, it's me. I don't want to alarm you but I was hit by a car as I was leaving the office. Paula brought me to the hospital. They have checked me over and done some tests and some x-rays. The blow to my head was severe. Fortunately it did not cause any serious internal injury, however I have three broken ribs, a compound fracture in the left leg, and they think they may have to amputate my right foot."
Wife's Response:
“Who's Paula?"
Why does Windows still use letters for drives?
Windows typically assigns your system drive the letter C: and gives different letters to other storage devices. That’s unusual—MacOS and Linux don’t use letters. Windows can access drives without letters, so why does it use them?
Where Do Drive Letters Come From?
Like many things in Windows, such as, how it uses backward instead of forward slashes, drive letters date back to the days of MS-DOS (in fact, even a bit earlier). This is the reason the Windows system drive uses the letter C:, A: and B: were reserved for floppy disk drives. Drive letters were carried over to MS-DOS from CP/M, an older operating system. They offered a way to access logical and physical storage devices containing files. To access a file named README.TXT on the second floppy disk drive, you’d just type B:README.TXT.

The need for drive letters is apparent on the command line. If there were no drive letters, how would you quickly specify paths to files on different devices? This was the system MS-DOS inherited, and Microsoft has stuck with it since.
While drive letters might seem less important now that we’re using graphical desktops and can simply click on icons, they do still matter. Even if you only access your files through graphical tools, the programs you use have to refer to those files with a file path in the background and they use drive letters to do so.
Drive letters aren’t the only possible solution, however. Apple’s macOS, Linux, and other Unix-like operating systems use a different method of accessing different partitions and storage devices.
Rather than being accessible at a letter, a device can be made accessible at a directory path in the file system. For example, on Linux, external storage devices were traditionally mounted at /mount. So, rather than accessing a DVD drive at D:, you might access it at /mount/dvd. This goes down to the “root” of the file system. Linux and MacOS don’t have drive letters, so the base part of the file system isn’t a letter, instead, they have a root directory, which is /. The system drive is “mounted” (made available) at / instead of C:\. Other drives can be mounted at arbitrary folders, if you want your home directory stored on a different drive, you can mount it at /home. The contents of the drive will then be accessible at /home.
You Can Access Drives on Windows Without Letters
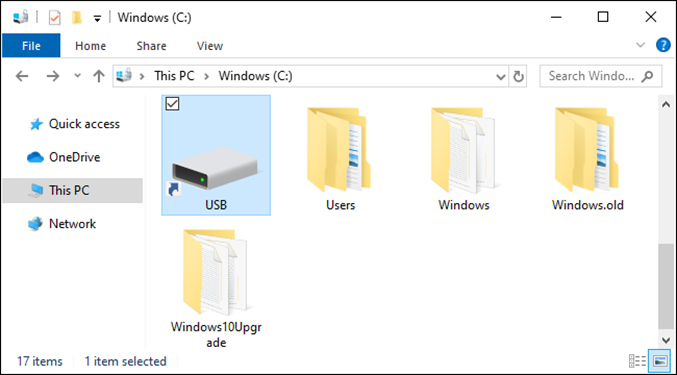
So why can’t you mount drives on Windows like this, making them accessible at arbitrary paths instead of letters? Why can’t you access your USB drive at C:\USB\, for example?
Well, you can! But it’s a bit complicated – and really, why would you want to?
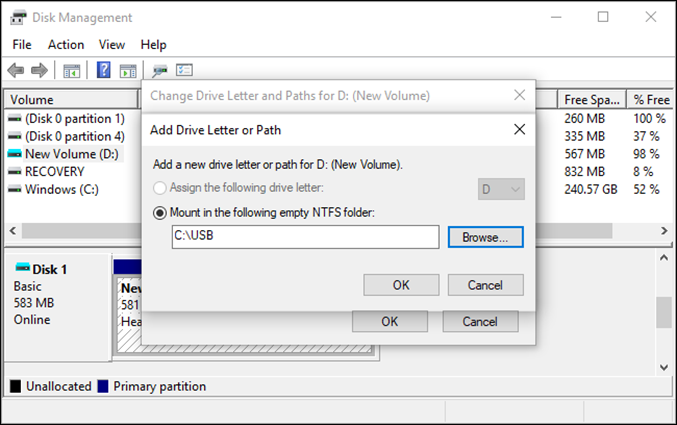
Modern versions of Windows now let you mount storage devices at a folder path, too. This option is available in the Disk Management tool. Right-click a partition on a drive, select “Change Drive Letters and Paths,” and then click “Add.” You can use the “Mount in the following empty NTFS folder” option to make a storage device available at a folder path just as you can on Unix-like operating systems.
To do this, though, you’ll have to mount the drive at a folder path on an NTFS volume and that NTFS volume must be mounted at a drive letter.
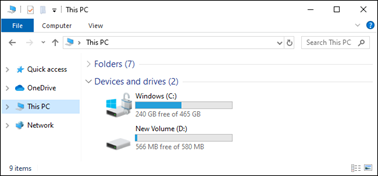
So, even if you did run out of drive letters from A: to Z:, you’d still be able to mount additional storage devices and access them in Windows. You’re not just limited to 26 drives on modern versions of Windows.
You can also change which drives use which letters from Disk Management although, you can’t change your C: drive to another letter. Even changing a letter like D: to E: can cause problems. For example, if you have a shortcut pointing at drive D: and the files are suddenly at E:, the shortcut will break.
Why does Windows still use letters?
If drive letters (like C:) are an ancient artifact and Windows can work without them, why does it still use them? The reason is simple and explains many Windows design decisions, backward compatibility.
Early versions of Windows had to be compatible with MS-DOS software and modern versions of Windows must be compatible with older Windows software. Drive letters just keep getting carried forward. After all, things are enough of a mess with just drive letters! Technically, it’s possible to install Windows so that C: isn’t your system drive. You could install it to drive G:\ and have G:\Windows, G:\Users, and G:\Program Files folders. C: doesn’t have to be your primary drive and this is officially supported by Windows, however, many Windows applications assume you’re using a C: drive, and you’ll have problems if you aren’t. If Windows applications can’t imagine you not using C: as your system drive letter, imagine how they’ll break if you don’t have any drive letters at all.
You might wonder why Windows still displays drive letters. After all, File Explorer could hide them and just show the words “System Drive” or “USB Flash Drive,” but File Explorer already shows simple descriptions like that, and sometimes, you might want to know the drive letter. Many applications show paths like D:\Folder\File.doc.
Money will buy a fine dog, but only kindness will make him wag his tail.
Microsoft backs down: Windows 11 will run on most PCs.
One of the most significant sticking points with Windows 11 is the strict system requirements, however, Microsoft has just announced that any PC can install the Windows 11 ISO, opening up the new OS to just about anyone who wants to install it.
BUT!, and it’s a big BUT! This works on an older machine by wiping everything on that machine and then installing Windows 11, it is not an upgrade of Windows 10. If you do this, make absolutely sure you have backups of everything on your computer that you wish to keep BEFORE you start as once you’ve loaded Window 11 you’ll have to reload everything again. It will be like you’ve just bought a new computer.
Windows 11 running on older PCs
Microsoft is mostly sticking to the original Windows 11 system requirements, though the company did add a few more processors to the list of supported models, however, it will only enforce restrictions when upgrading from Windows 10 to Windows 11—a fresh installation with a Windows 11 ISO would have no such restrictions.
Of course, there’s no guarantee that Windows 11 will run well on older PCs since Microsoft is optimizing it for newer, more powerful computers, however, at least you’ll be able to try for yourself to see whether it’ll work. Microsoft also said it intends for this workaround to be used by businesses that wanted to evaluate Windows 11, not so much by regular users. The company doesn’t even plan to advertise this method to consumers.
You’ll still need to have a 64-bit 1GHz processor with two or more cores, 4GB of RAM, and 64GB of storage to even think about running Windows 11, but at least your PC won’t have to fall into Microsoft’s stricter list of supported CPUs.
Of course, many more casual PC users will run the Windows 11 upgrade process, be told they can’t install the OS, and never think about downloading an ISO to install Windows 11, but for those willing to go through that extra layer, it’s nice to see that Microsoft has backed off and relaxed its stance.
Other processors getting full Windows 11 approval
Microsoft also announced that some other processors are getting Windows 11 support. There’s the Intel Core X-series, Xeon W-series, and select devices running the Intel Core 7820HQ chips. While these aren’t a ton of new processors, any additional computers getting the easy Windows 11 upgrade path is a good thing.
Back Go to page: 1 2 3 4 5 6 7 8 9 10 11 12 13 14 15 16 17 18 19 20 Forward