
|
Vol 72 |
Page 4 |
Privacy Policy | Editorial Policy | Profit Policy | Join the Association | List of Members | Contact us | Index | Links
Back Go to page: 1 2 3 4 5 6 7 8 9 10 11 12 13 14 15 16 17 18 19 20 Forward

Computers and Stuff

Welcome again to Jaycar as the sponsor of Sam's "Computers and Stuff" page. As they are prepared to support us, please show your appreciation and support them. There's always a store near you, click HERE to find the closest.
Contents.
Ad shortcuts to the Start menu.
Delete Gmail messages in bulk.
Google to stop its unlimited free storage.
How to cut and paste in Windows 10.
QR Codes
![]()
How to Copy, Cut, and Paste on a Windows PC.
Copy, cut, and paste are three basic operations that every Windows user should know by heart. The concepts behind them apply to nearly every application you’ll ever use. Here’s how they work.
Understanding the Clipboard

When you copy or cut something (such as a block of text, an image, or a link), Windows temporarily stores the data in a special memory location called the Clipboard. Think of it as a temporary holding pen. When you Paste the information you copied, Windows retrieves the contents of the Clipboard and puts it where you want it to go.
Typically, the contents of the Clipboard reset when you restart your PC, although it is possible to pin items to the clipboard in Windows 10 using an opt-in feature called Clipboard History (See later). You can then recall them as many times as you want quickly by pressing the Windows+V keyboard shortcut.
(Windows+ means holding down the Windows key on your keyboard then pressing the letter, in this instance, hold down the Windows key and press the letter V).
In Windows 10, you can even synchronize your Clipboard between devices using the cloud, but that is an optional setting you have to turn on in System Settings. Not only can you paste from your clipboard history, but you can also pin the items you find yourself using all the time. You can do that by:
-
To share your clipboard items across your Windows 10 devices, select Start > Settings > System > Clipboard. Choose Automatically sync text that I copy under Sync across devices. The sync feature is tied to your Microsoft account, or your work account, so remember to use the same login information on all your devices.
-
To get to your clipboard history at any time, press Windows logo key + V. You can also paste and pin frequently used items by choosing an individual item from your clipboard menu.
The Difference Between Copy and Cut.
![]()
When you copy something, Windows makes a copy of the information you want to the Clipboard and also leaves it in its original location. In contrast, when you perform the cut operation, Windows copies the information to the Clipboard but also removes the information from the original location. That means you typically use copy to duplicate information and cut to move the information from one location to another. These fundamental concepts apply across almost every application, so let’s go over the various different ways to copy, cut, and paste in Windows.
How to Copy, Cut, and Paste Using Keyboard Shortcuts.
It’s important to know the three fundamental keyboard shortcuts for Copy, Cut, and Paste have been included in Windows for decades. Microsoft borrowed these shortcuts from the Mac, which still uses them with the Mac’s special Command key instead of Ctrl.
| Copy: |
After selecting one or more items using your mouse or keyboard, press Ctrl+C. The information will be copied to the clipboard. |
| Cut: |
After selecting one or more items, press Ctrl+X, and the information will be copied to the clipboard and removed from the original location. |
| Paste: |
Select a destination by clicking on an area (or by placing your cursor in the position where you want the information to go), then press Ctrl+V. |
Alternative Copy, Cut, and Paste Keyboard Shortcuts.
If you need to copy in a program that interprets Ctrl+C as a break character (such as a terminal emulator), you can use Ctrl+Insert instead. To cut, use Shift+Delete. To paste, press Shift+Insert. These shortcuts aren’t as commonly used today, but they are still almost universally recognized in Windows.
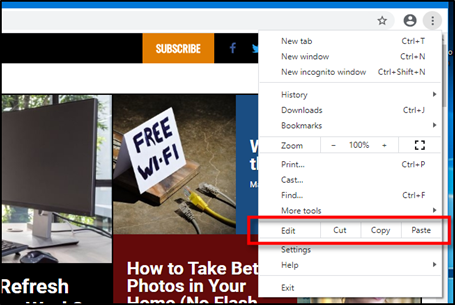
How to Copy, Cut, and Paste Using Right-Click.
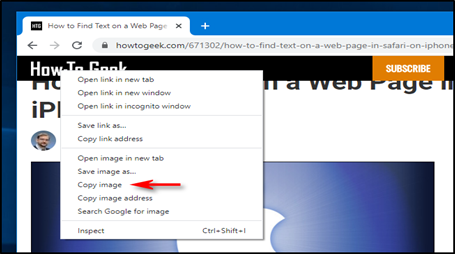
In many programs, you can copy, cut, and paste using the right button on your mouse. First, select an element of a document (such as a web page), then right-click, and you’ll likely see a context menu that includes Copy or Cut commands.
You can then right-click in a destination document and select Paste to put the contents of the Clipboard in that location.
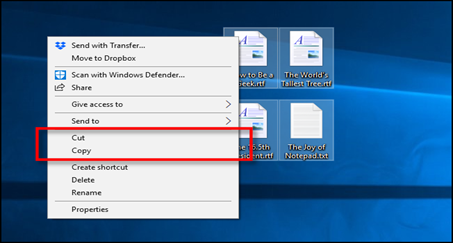
The same principle works in File Explorer and on your Desktop. Select a file, folder, or group of files you’d like to Copy or Cut. Right-click on the files, and you’ll see a context menu pop-up. Select “Copy” if you’d like to duplicate the file somewhere else. Select “Cut” if you’d like to move the file to another location.
Then navigate to the new location and right-click where you’d like to put the files. The destination right-click can be inside a folder window, on the desktop, a drive on your computer, or even directly on a folder icon itself.
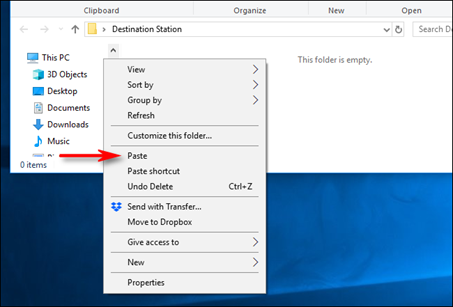
Select “Paste” in the right-click menu that pops up.
The files you just Cut or Copied will appear in the new location. Very handy!
How to Copy, Cut, and Paste Using Application Menus
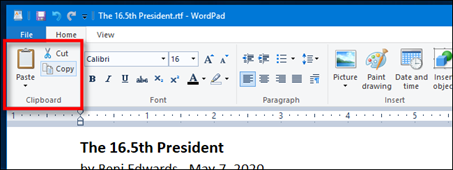
You can also Copy, Cut, and Paste by selecting menu items with a mouse or touch screen. In programs with a Ribbon-style interface, you’ll typically see a Clipboard or Edit block that contains Copy, Cut, and Paste buttons.
In programs with compressed or hamburger-style menus (like Chrome and Firefox), you can often find the Copy/Cut/Paste functions in a section labelled Edit.
Also, many older Windows programs include a series of drop-down menus at the top of the application window. Among them, you’ll often find a menu titled Edit (which you can often call up by pressing Alt+E). In that menu, you can usually find Copy, Cut, and Paste commands.
How to Empty Your Clipboard
To erase the contents of your Clipboard, just copy something new. Simply copying any word on a web page or document will replace the contents of the clipboard with whatever you just copied. You might want to do this after copying something sensitive like a password or credit card number, ensuring that you won’t accidentally paste it into another application.
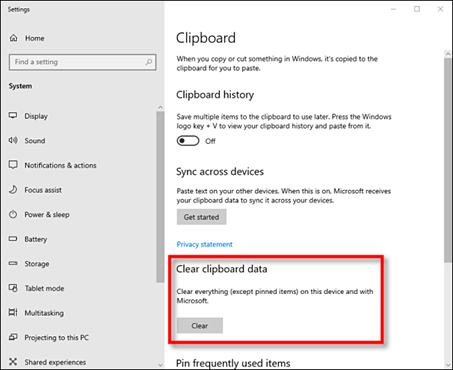
If you’d like to clear the data in your Clipboard History, you can manually erase it yourself. Open System Settings, then navigate to System > Clipboard. Find the section called “Clear Clipboard Data” and click on the “Clear” button.
You can also create a custom shortcut that will clear your Windows Clipboard. See HERE.
How to Enable and Use Clipboard History on Windows 10
Windows 10 takes copy and paste to another level with a feature called Clipboard history, which lets you see a list of items you have copied to the clipboard recently. Just press Windows+V..
What Gets Stored in Clipboard History?
Clipboard history first appeared in Windows 10’s October 2018 Update (Version 1809). Currently, Clipboard history supports text, HTML and images less than 4 MB in size. Larger items won’t be stored in the history.
Clipboard history stores a maximum of 25 entries, with the oldest items disappearing as new ones appear. Also, unless an item is pinned to the Clipboard, the Clipboard history list will reset every time you restart your computer or device.
How to Enable Clipboard History in Windows 10
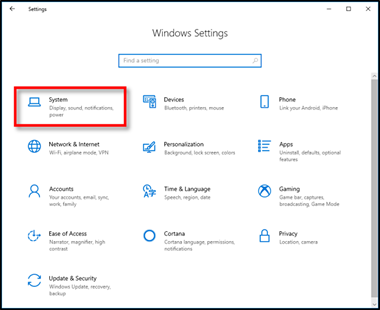
First, click the “Start” button, and then click the “Gear” icon on the left side of the Start menu to open the “Windows Settings” menu.
You can also press Windows+i to get there.
In Windows Settings, click on “System.”
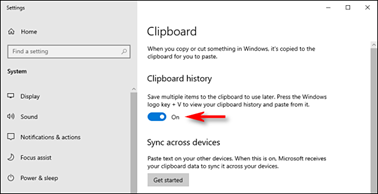
On the Settings sidebar, click on “Clipboard.” In Clipboard settings, locate the section called “Clipboard history” and toggle the switch to “On.”
Clipboard history is now turned on. You can now close Settings and use the feature in any application.
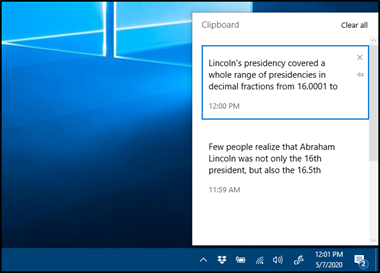
How to View Clipboard History in Windows 10
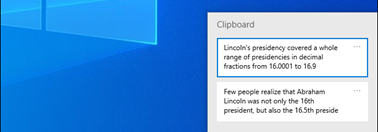
Once you have enabled Clipboard history, you can call up a list of items you have copied recently while using any application. To do so, press Windows+V.
A small window will pop up. The most recent items you’ve copied are at the top of the list.
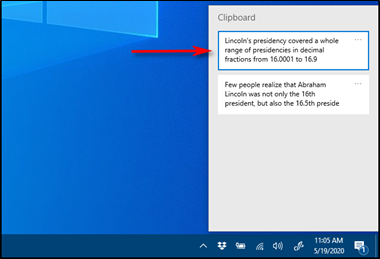
You can click on any item in the Clipboard history list to paste it into an open application.
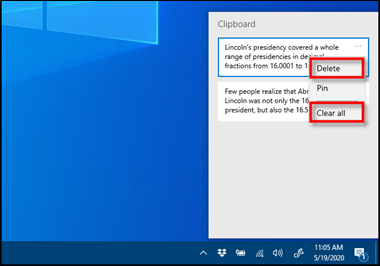
To remove items from Clipboard history, click on the ellipses (three dots) beside the item you’d like to delete. Select “Delete” from the small menu that pops up.
If you’d like to remove all the items from Clipboard history, click “Clear All” In the ellipses menu.
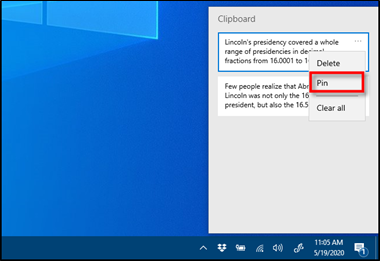
It’s also possible to pin an item on the Clipboard history list. That way, it will stay on the list even if you reboot the computer or click a “Clear All.” To do so, click on the three-dot menu and select “Pin.” You can unpin the item later by selecting “Unpin” from the ellipses menu.
The Clipboard history interface has a slightly different look to it on older versions of Windows 10. Here are instructions for those running an earlier version.
After using the Windows+V keyboard shortcut, a small floating window will pop up either near the application you are using, or if all windows are closed or minimized, in the lower-right corner of your screen. The most recent items you have copied will be at the top of the list.

While the Clipboard history window is open, you can click on any item in the list to paste it into an open application or document.
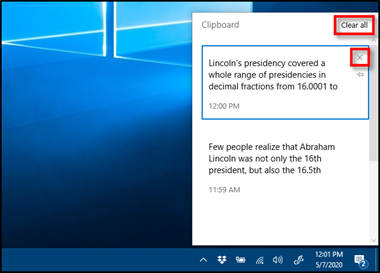
To remove items from Clipboard history, click the small “X” beside an item on the list. Or you can clear the entire list by clicking “Clear All” in the upper-right corner of the Clipboard history window.
You can also pin an item to the Clipboard history list by clicking on the tiny pushpin icon beside the item. That way, the item will remain on the Clipboard history list even if you reboot the computer or click “Clear All.”
How to Disable Clipboard History in Windows 10
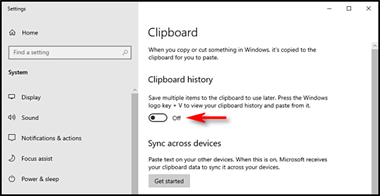
To turn off Clipboard history in Windows 10, navigate to Settings > System > Clipboard. Locate the option titled “Clipboard history” and toggle the switch to “Off.”
Once disabled, if you press Windows+V, you will see a small window alerting you that Windows 10 cannot show your clipboard history because the feature is turned off.
My wife said that if I don't get off my computer and help with the dishes, she'll slam my head onto the keyboard,
but I think she's jokindsg67fromhews qweradfa msdfp0asdf56asdfasdf90sdfjkaqmmasdfjk.
How to Delete Gmail Messages in Bulk.
When you start a fresh Gmail account, it seems like you have all of the space you'll ever need. But after several years of emails, that may not be the case. If you're looking to free up some space, follow these instructions for how to delete old emails in Gmail.
Here's how to search for and delete Gmail messages in bulk:
Search by date.
In the search bar, you can type the date in a YYYY/DD/MM format to filter out emails before a certain date. If you type before:2014/01/01, you'll see a list of all of the emails you received prior to the 1st Jan, 2014.
You can also search by how old emails are. If you type older_than:1y, you'll receive emails older than 1 year. You can use m for months or d for days, as well.
If you want to delete them all, click the Check all box, then click "Select all conversations that match this search," followed by the Delete button.
Labels and Categories.
If you want to get more specific than a date or time, you can refine your search by looking through the categories the emails are kept in or the labels you assigned them to.
If you have a label called "XYZ," you can search for label:XYZ to find those emails. If you want emails that Gmail has classified as being in your social or promotions folders, try category:social or category:updates.
Combinations.
Now you can take what you've learned and combine them. If you type older_than:1y label:XYZ, you'll see all emails older than 1 year with the label you assigned. For those who have organized inboxes, this is an efficient way to search through and then delete old emails you never use anymore.
If you're looking to get even more advanced, Google offers a full list of search operators to filter through your email and find what you no longer need, including how large messages are, whether they have stars and who sent the email in the first place. With these tips, you'll be able to teach others how to delete old emails in Gmail, and save money on online storage.
A couple lived near the ocean and used to walk the beach a lot. One summer they noticed a girl who was at the beach pretty much every day. She wasn't unusual, nor was the travel bag she carried, except for one thing; she would approach people who were sitting on the beach, glance around furtively, then speak to them. Generally the people would respond negatively and she would wander off, but occasionally someone would nod and there would be a quick exchange of money and something she carried in her bag. The couple assumed she was selling drugs, and debated calling the Cops, but since they didn't know for sure they just continued to watch her.
After a couple of weeks the wife said, "Honey, have you ever noticed that she only goes up to people with boom boxes and other electronic devices?" He hadn't, and said so. Then she said, "Tomorrow I want you to get a towel and our big radio and go lie out on the beach. Then we can find out what she's really doing." Well, the plan went off without a hitch and the wife was almost hopping up and down with anticipation when she saw the girl talk to her husband and then leave.
The man walked up the beach and met his wife at the road. Well, is she selling drugs?" she asked excitedly. "No, she's not," he said, enjoying this probably more than he should have. "Well, what is it, then? What does she do?" his wife fairly shrieked. The man grinned and said, "Her name is Sally, and she's a battery salesperson." "Batteries?" cried the wife. "Yes," he replied.
She sells “C” cells by the seashore.
Sorry!
Windows Process Explorer. A More Powerful Task Manager.
If the built-in Windows Task Manager isn’t powerful enough for you, you should try Process Explorer. This is a free program from Microsoft and is part of the SysInternals suite of useful system tools. Process Explorer is packed with features and information not included in the Task Manager. You can view which program has a particular file open and unlock the file, for example. The default view also makes it easy to see which processes have opened which other processes.
Process Explorer also has a powerful search capability that will quickly show you which processes have particular handles opened or DLLs loaded. (DLL stands for "Dynamic Link Library." A DLL (.dll) file contains a library of functions and other information that can be accessed by a Windows program. When a program is launched, links to the necessary .dll files are created. If a static link is created, the .dll files will be in use as long as the program is active. If a dynamic link is created, the .dll files will only be used when needed. Dynamic links help programs use resources, such as memory and hard drive space, more efficiently.)
The unique capabilities of Process Explorer make it useful for tracking down DLL version problems or handle leaks and provide insight into the way Windows and applications work.
Here's how to get it:
Go HERE then click "Download Process Explorer" If you're running Google Chrome or MS Edge, click ProcessExplorer.zip which appears down the bottom left of your screen, if you're a Firefox user, select Open with Windows Explorer. You will be asked to extract all files, select a folder in which to save the files, we suggest you click BROWSE, then navigate to your Programs folder, right click, select new and then create a folder called Process Explorer. Unzip the files into there.
Go back to your desktop, right click a vacant spot, select New then Shortcut, browse to the folder in which you saved the unzipped files and select procexp.exe. Click OK then NEXT. When it asks for a name, type Process Explorer then click Finish. This will save an Icon on your desktop which will open Process Explorer. If required, you can click and hold it and drag it down to your Taskbar to make it readily available when every you want it.
Understanding The Tree View.
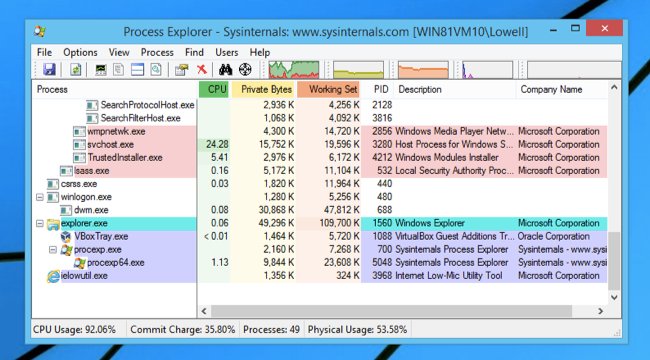
When you first launch Process Explorer, you are presented with a lot of visual data right away – there is a hierarchical tree view of the processes running on your computer, including CPU and RAM usage using numerical values for each process. There are some little mini activity graphs running at the top in the toolbar, showing you the CPU usage, which can be clicked on to display in a separate window.
There’s definitely a lot going on, and it would be easy to be overwhelmed by everything on the screen.
The initial display gives you a set of columns that include:
-
Process – the name of the executable file along with its icon if one exists.
-
CPU – the percentage of CPU time used by the file in the last second.
-
Private Bytes – the amount of memory allocated to this program alone.
-
Working Set – the amount of actual RAM allocated to this program by Windows.
-
PID – the process identifier.
-
Description – the description, if the application has one.
-
Company Name – this one is more useful than you think. If something isn’t quite right, start by looking for processes that aren’t by Microsoft.
You can customize these columns and add many other options, or you can just click on any of the columns to sort by that field. If you’ve ever used Task Manager before, you’ve probably sorted by Memory or CPU, and you can do that here as well. Clicking on Process will flip between sorting by the process name, or going back to the default tree view, which is very useful once you get used to it. The view is updated once per second, but you can go to View > Update Speed and customize how often it updates, the lowest being 0.5 seconds and the top level being 10 seconds. If you are using it for troubleshooting the default value is probably fine, but if you want to use it as a CPU monitor sitting in the system tray, 5 or 10 seconds might use less CPU while it runs in the background.
You can also pause the view under the same sub-menu, or by simply hitting the Space bar. This will freeze the view as a snapshot in time, which can be useful if you are trying to identify a process that starts and quickly dies, or if you have decided to sort by CPU usage and all the rows keep jumping around. In the case of a quickly closing process, however, you would want to add extra columns to the default view for anything you might need to know, because clicking on a defunct process in the list won’t show much in the details view if the process isn’t running, even if you paused everything.
Understanding all those Colours.
There are definitely a lot of colours in a typical Process Explorer list, which can be a little confusing for the beginner however, it’s really important to learn what all these colours mean, because they aren’t there just for show — they each mean something important.
Whenever you can’t remember what one of the colours means, you can go to Options > Configure Colours on the menu to pull up the Colour Selection dialog. This is basically a quick cheat sheet to what everything means.

Based on the colours in the picture above, here is what each of the selected items mean (the others aren’t really important).
-
New Objects (Bright Green) – When a new process shows up in Process Explorer, it starts out as bright green.
-
Deleted Objects (Red) – When a process is killed or closes it will usually flash red right before deleting.
-
Own Processes (Light Blueish) – Processes running as the same user account as Process Explorer.
-
Services (Light Pink) – Windows Service processes, although it’s worth noting that they might have child processes that are launched as a different user, and those might be a different colour.
-
Suspended Processes (Dark Gray) – When a process is suspended it can’t do anything. You can easily use Process Explorer to suspend an application. Sometimes crashed apps will briefly show up in gray while Windows is handling the crash.
-
Immersive Process (Bright Blue) – This is just a fancy way of saying that the process is a Windows 8 application using the new APIs. In the screenshot earlier you might have noticed WSHost.exe, which is a “Windows Store Host” process that runs Metro apps. For some reason Explorer.exe and Task Manager will also show up as immersive.
-
Packed Images (Purple) – these processes might contain compressed code hidden inside of them, or at least Process Explorer thinks that they do by using heuristics. If you see a purple process, make sure to scan for malware!
Since there is obviously some overlap between these different scenarios, the colours will be applied in an order of precedence. If a process is a service and is suspended, it will display in dark gray because that colour is more important.
Verifying Application Identity
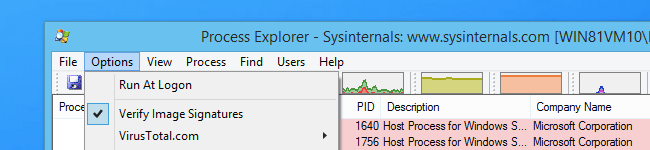
One really useful option that we’re surprised isn’t enabled by default is found at Options > Verify Image Signatures.
This option will check the digital signature for each executable file in the list, which is an invaluable troubleshooting tool when you are looking at some suspicious application that is running in the list.

The vast majority of reputable software should be digitally signed at this point. If something isn’t, you should look very carefully at whether you should be using it.
Taking Action on a Process
You can quickly take action on any process by right-clicking on it and choosing from one of the options, or by using the shortcut keys if you prefer. Those options include:
-
Window – has options including Bring to Front, which can be useful to help identify the window associated with a process. If there are no windows for that process, it will be grayed out.

-
Set Priority – you can use this to configure the priority of a process. This is mostly useful for taming a runaway process that you don’t want to kill.
-
Kill Process – just like you’d imagine, this quickly kills that process.
-
Kill Process Tree – This kills not just the item in the list, but also the children of that parent process.
-
Restart – spectacularly useful while testing, this just kills the process and then restarts it. It’s worth noting that killing processes might result in lost data.
-
Suspend – this handy option is great for troubleshooting when a process is out of control. You can simply suspend the process rather than kill it, and check to see if anything is out of whack.
-
Check VirusTotal – this is a new option that we’ll explain further along. It’s quite handy really, as it checks the process for viruses.
-
Search Online – this will just search the web for the name of the process.
And obviously if you open up Properties that will take you to even more useful information about the process
Running as Administrator

While you don’t absolutely have to run Process Explorer as Administrator, without doing so many of the useful features won’t work, and you won’t be able to see as much information about each process.
To open as Administrator, just right-click the icon and choose the option from the menu.
Forcing Process Explorer to Always Open as Administrator

If you want to make sure that Process Explorer always opens as Administrator without having to remember to right-click on it, go back to the folder in which you unzipped the files, right click procexp.exe, select Properties, then click the Compatibility folder, then down the bottom, click the Run this program as administrator box.
Using Process Explorer to Replace Task Manager.

Since Windows 8, Task Manager has been greatly improved from previous versions. It’s still not as powerful as Process Explorer, but it’s probably easier for the average person to use, so don’t change the novice's computer to default to Process Explorer.
But, assuming you want some real power in your hands, it works really well as a replacement for Task Manager.
To make Process Explorer replace Task Manager, all you have to do is choose Options then click Replace Task Manager from the menu. That’s it, then every time you click Task Manager, you'll get Process Explorer.
Using Process Explorer to Quickly Search VirusTotal.

If you are working on a problem PC and want to figure out if a process is a virus, you can save yourself some time by using Process Explorer. Just right-click on anything in the list to see the option.
The first time you run it, you’ll be asked to accept the VirusTotal terms of use, but after you do so, you will see the VirusTotal results show up right there in the list.
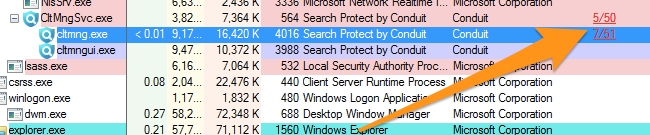
You can click on the result to go to VirusTotal and see the details. It’s a great new addition to one of the best utilities ever.
I've got a new bumper sticker, it says "Toot your horn if you think I'm sexy!"
Then I just sit at green lights until I feel better about myself.
Google Photos to lose its unlimited Free Storage.
If you've been using Google Photos to store your HD photos you will have appreciated how good it is, up until now it offered unlimited space for all your pics and you had access to them no matter where you were.
Unfortunately, all that's about to change. Starting on the 1st June 2021, Google Photos will no longer offer free unlimited storage. See HERE.
From the 1st June 2021, all the photos you upload will count towards your Google account's storage limit. If you have a Google account, you automatically get 15GB or free storage but this is shared between Google Photos, Google Drive and Gmail. 15GB might sound a lot but if you've had a Gmail account for a while and once you store a few pics and videos it very soon runs out. From 1 June, if you want more room, you'll have to pay for it.
But there's some good news, there's a grandfather clause here, everything you've stored up to 1 June 2021 won't count towards your free 15GB. (What does that suggest??)
Also, extra storage is relatively cheap, you can get an extra 100GB of storage for a little over US$2.00 per month. If you want more than 100GB there are other plans available too. You can upgrade HERE.
If you want to download your photos and videos form Google Photos and store them somewhere else, though why you would want to is beyond us as there is nowhere else as good (Apple only provide 5GB of free space), Google has provided an easy to use routine which is called Google Takeout - you'll find that HERE.
Alternatives
There are of course alternative sites though in our opinion, none as as good as Google's.
-
iCloud Photos: If you use an iPhone, iPad, Mac, or other Apple devices, you might want to use Apple’s iCloud Photos. If you take photos with your iPhone, it’s nicely integrated without any third-party apps required. iCloud Photos does have more limited free storage, only 5 GB free, but you can get 50GB of storage for $0.99 per month. You can even purchase 200GB of storage for $2.99 per month and share that with your entire family. (The 50GB plan can’t be shared.) You can also pay for iCloud storage as part of an Apple One subscription bundle.
-
Amazon Photos: If you already pay for Amazon Prime, Amazon offers free unlimited full-resolution photo storage. Amazon isn’t the first service many people think of when it comes to photo storage, but it’s a good option.
-
Microsoft OneDrive: The OneDrive app can automatically upload photos and videos from your phone to your OneDrive storage. OneDrive is integrated into Windows 10 and available on other platforms. If you pay for Microsoft 365, you have 1 TB of OneDrive storage space to store all those photos.
-
Dropbox: If you already use and pay for Dropbox, you could upload your photos to Dropbox instead of Google Photos. Like other services, Dropbox’s app can automatically upload photos from your phone, however, Dropbox only offers 2 GB of free space and only offers more expensive storage plans starting at $9.99 per month. Dropbox likely isn’t the best choice unless you’re already invested in it.
Google Photos is still a fine photo storage solution, especially if you use Android devices and other Google services, but it’s no longer free for everyone, and that’s a big change. If you’re an iPhone user who’s been using Google Photos instead of iCloud Photos because Google Photos is free, it might be time to consider switching.
Guys, just to let you know I had the Russian Covid-19 vaccination yesterday
and I can tell you there are absolutely no negative sideffski efectovski Kto moxet 3to np0йвфщнрэжщ кервйяг8 Вцйщджэъ
How to add Folder Shortcuts to the Start Menu’s Left Sidebar on Windows 10.
The Windows Start menu, which is accessed by clicking the Windows Icon down the bottom left of your screen, includes a handy list of shortcuts to common locations (such as Pictures, Downloads, Settings) in a tiny sidebar. Using Settings, you can customize which shortcuts appear there. Here’s how to do it.
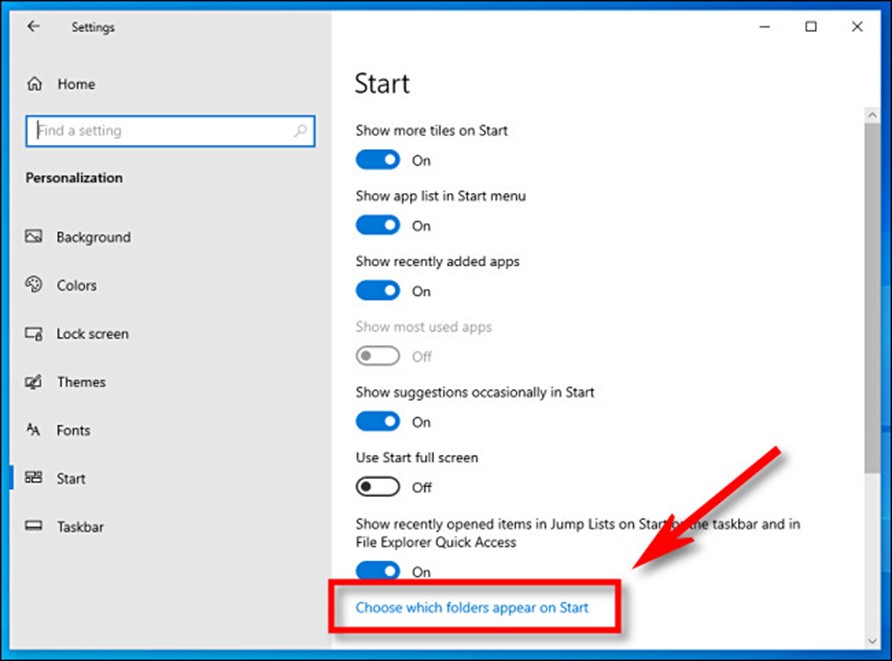
First launch "Settings" by either clicking the Windows Icon down the bottom left of your screen the clicking the "Gear" icon, or, an easier way is to just hold down the Windows key and press the letter I (that an i not an L). In the settings window, click "Personalization". In the Personalization window, click "Start" in the left hand side bar, the scroll down until you see "Choose which folders appear on Start".
This opens a long list of common folder locations and shortcuts, each one with an off/on switch. To make one appear in your start menu move the switch across to ON, to remove it, move the switch to OFF
Next time you open Start, you'll see the shortcuts you're enabled in a vertical list on the far left side of the start menu.

A quick guide on the QR Code.
If the Covid-19 epidemic did one thing - it brought the QR (Quick Response) code system out from near obscurity to everyday usage. The code itself has been around for ever but was used primarily by industry. It was developed in Japan back in 1994 as a replacement for the barcode which could only hold a small amount of information. As it wasn't patented by the developers, when it was added to the ISO International Standards in 2000, it could be be used freely right across the globe.
How do QR Codes work?
The modern-day QR Code consists of 7 parts. Each of these parts creates a sort of pixel pattern that looks similar to a crossword puzzle. Each element has a specific purpose that conveys certain information through the Code such as the print direction, timing, error tolerance, and empty spaces to differentiate the Code from what surrounds it. Able to store up to 7089 digits or 4296 characters, including punctuation marks and special characters, the Code can equally encode words and phrases such as internet addresses.
|
|
Positioning detection markers.
Located at three corners of each code, it allows a scanner to accurately recognize the Code and read it at high speed, while indicating the direction in which the Code is printed. They essentially help quickly identify the presence of a QR Code in an image and it's orientation. |
|
Alignment markings
Smaller than the position detection markers, they help straighten out QR Codes drawn on a curved surface. And, the more information a Code stores, the larger it is and the more alignment patterns it requires. |
|
|
|
|
|
|
|
Timing pattern.
Alternating black/white modules on the QR Code with the idea of accurately helping configure the data grid. Using these lines, the scanner determines how large the data matrix is. |
|
Version information
With currently 40 different QR Code versions, these markers specify the one that is being used. The most common ones are versions 1 to 7. |
|
|
|
|
|
|
|
Format information.
The format patterns contain information about the error tolerance and the data mask pattern and make it easier to scan the Code. |
|
Data and error correction keys.
The error correction mechanism inherent in the QR Code structure is where all your data is contained, also sharing the space with the error correction blocks that allow up to 30% of the Code to be damaged. |
|
|
|
|
|
|
|
Quiet zone.
This is similar to the importance of white space in design, that is it offers structure and improves comprehension. For whom or what you may ask? For the scanning program. In order to distinguish the QR Code from its surroundings, the quiet zone is vital. |
|
|


What information can you put into a QR Code?
The QR Code has evolved over the last few years. It is no longer constrained to characters or numbers. With a customizable, mobile-friendly landing page, for instance, you no longer need to link to a website in order to provide your audience with information. Additionally, it can store a gallery of pictures, video playlist, sound demo, PDF, information on how to reach you or your business, and so much more. This truly makes it a one-stop QR Code solution for marketers and businesses.
The popular types of QR Codes.
|
Linking to multiple app stores with just one scan, it makes the promotion and download of your mobile apps much more efficient by reaching a wider target audience, regardless of the scanner’s cellular operating system. |
|
|
Digital magazines, brochures, eBooks, with this Code you can simultaneously boost your marketing, save on printing costs, and offer customers the chance to save and share documents all from the palm of their hand. |
|
|
Share all of your social media platforms on a mobile-friendly landing page. Whether it’s Twitter, Snapchat, YouTube or Instagram, your audience can choose which platform to follow you on. |
|
|
Remove the hassle of couponing for your customers with this Code. With one scan, they can save your promotion to their mobile devices, share it on social media or by email, and redeem it with ease at your nearest location or online store. |
|
|
Let your audience get to know you a little better at their own convenience. If you don’t have a website, then this QR Code is the perfect, mobile-friendly platform to let customers know your mission statement, how to reach you, your physical store locations, opening hours and how to find you with Google Maps. |
Make your own QR Code.
Once you already have an idea of the kind of information you want to share with your target audience, go to QR Code Generator and select the appropriate type of Code, input the necessary information and design your QR Code to fit your brand image or your own personal taste.
If you want to put an icon on your desktop which will take you straight to the QR Code Generator page, here's how:
-
Open your desktop and right click an empty area and select New then Shortcut.
-
In the box below "Type the location of the item" type: https://www.qr-code-generator.com/solutions/ then click Next.
-
In the box below "Type a name for this shortcut" enter QR Generator.
-
This will put an Icon on the Desktop titled QR Generator, right click the icon, scroll down to Properties, then select Change Icon.
-
Click browse and select SHELL32.dll. You'll find this file in the C:\windows\system32 directory.
-
Select an Icon then click OK and OK again.
A man and his wife walked into a dentist's office. The man said to the dentist, "Doc, I'm in one hell of a hurry. I have two buddies sitting out in my car waiting for us to go play golf. So forget about the anaesthetic and just pull the tooth and be done with it. We have a 10 am tee-off time at the best golf course in town and it's 9:30 already. I don't have time to wait for the anaesthetic to work!" The dentist thought to himself, "My goodness, this is surely a very brave man asking to have his tooth pulled without using anything to kill the pain." So the dentist ask him, "Which tooth is it sir? The man turned to his wife and said, "Open your mouth Honey, and show him."
Back Go to page: 1 2 3 4 5 6 7 8 9 10 11 12 13 14 15 16 17 18 19 20 Forward