
|
Vol 74 |
Page 4 |
Privacy Policy | Editorial Policy | Profit Policy | Join the Association | List of Members | Contact us | Index | Links
Back Go to page: 1 2 3 4 5 6 7 8 9 10 11 12 13 14 15 16 17 18 19 20 Forward

Computers and Stuff
Sam Houliston.
Contents.
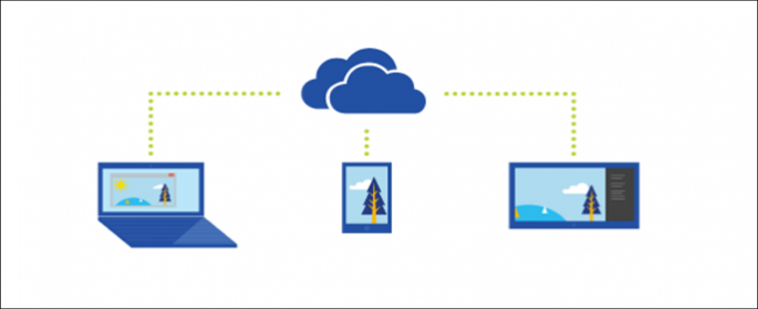
Check storage availability on Onedrive.
How to take a screen shot with Snipping Tool.

Windows 11
Windows 10 has been with us for a while now, for most it was a good operating system and most were happy with it, but! - it's time for a change. Microsoft has decided to upgrade it.
Windows 11 is on the way!
From the end of 2021, Microsoft will begin gradually rolling out its new operating system, Windows 11. Like it did with Win 10, Win 11 will be a freeby but only if your computer has the right stuff. A lot of people will not be able to run it if their current equipment is not up to scratch.
For those that understand these things, you'll need a computer that has UEFI firmware that is Secure Boot capable. In the old money, computers ran a BIOS but that was superseded by UEFI some time back and you'll also need a version 2 or later TPM module chip. If you haven't got these you're stuck with Windows 10, but don't worry, 10 will work fine and Microsoft will continue supporting your software until October 2025. By then we'll probably all need new computers anyway.
If all this sounds a bit daunting, don't worry, you can click HERE (scroll down until you see the section "GET READY"). Microsoft say they will have the PC Health Check soon which will tell you if your computer is suitable for Windows 11.
You'll sure to read more on this over the coming months as upgrade time approaches, but if you're interested, you can see what's the difference between the two HERE.
Facebook Data Breach.
You can now access information on 533,000,000 Facebook accounts from 106 countries, available free on certain hacking forums. Information includes the full name, phone number, Facebook ID, location, past location, birthdate, email address (sometimes), account creation date, relationship status, and bio.

This data was leaked by Facebook in 2019 and 2020, but for some reason they didn't bother to report it publicly or inform their users. Someone ran across the data posted on hacker sites in January and made it public. In fact, Facebook still hasn't notified users or acknowledged the data breach.
Facebook has managed to lose control of their data so many times it's hard to keep track. Facebook has had four other large data breaches in the past three years. The US Federal Trade Commissioner (FTC) fined them $5 billion for this in 2019. It apparently didn't make much of an impression.
It's usually not a big deal if your information was copied by the hackers. You'll enjoy more scam and phishing phone calls, texts, and emails as a side benefit of your Facebook account, and who knows? you might really want a new auto warranty. Besides, it's not that hard to replace all your credit cards!!
You can check this site to see which, if any, data breaches you've been included in. It's normally nothing to worry about, since you no doubt are highly diligent about avoiding online scams, phishing attempts, and other means of making new online friends.
An interesting bonus: If you download your own copy of these 533 million records, you'll have Facebook boss Mark Zuckerberg's cell phone number in this data, along with the rest of his account information (assuming he didn't wimp out and change it).
In other news, Facebook has been catching some flack for auto-generating pages for white supremacy and militia groups, without the aid of hackers. There have also been more than a few articles about Facebook accomodating right-wing disinformation.

How to share Files and Folders from OneDrive in Windows 10.
With OneDrive, it’s easy to share files and folders securely and easily with other people. They won’t need to install any special applications or sign up for a new account. In fact, they can use any web browser to get to the files you share with them, and you have a complete control in your hand—your files will only be shared with the people you choose.
This is how to share files and folders from your OneDrive and different permissions you might want to know about before sharing. This assumes you have the latest Windows 10 and Office updates. Microsoft does change OneDrive options with its upgrades and if you’re not right up to date some of these commands might not be familiar to you. We suggest you keep your computer up to date at all times, you can do this by clicking the “Start” button, (bottom left of your screen), click “Settings” then “Update and Security”. Follow the prompts to update your computer.
Share a File or Folder from the Desktop
In Windows 8.1, OneDrive was integrated into the operating system through an app that you couldn’t uninstall and settings were easily accessible from PC settings. Users were able to upload their files and folders easily and even share them without having to use the web interface of OneDrive all the time. OneDrive for Windows 10 is improved and brings better integration with the File Explorer. You’re just a click away to share a link of file or folder.

Sharing a file as a link has many advantages, particularly when sending them through email. Email can be rejected by servers when attachments are too large and even if a large email makes it to your recipient, the recipient might not be happy for having big attachment in their mailbox. OneDrive makes it easy to share a link to a file that can be sent by email, Facebook, or as a text message.
Here's how to do it.
Open OneDrive in File Explorer (used to be called Windows Explorer) and locate the file or folder you want to share. Right-click the file or folder to reveal the context menu and select “Share”.
After a few seconds a notification will appear letting you know that a link has been prepared.
Down the bottom left of that little window you’ll see “Copy Link” (arrowed), click that, another window will open with a link to the item you selected, click “Copy”.
Now all you have to do is open your email software and compose a message to the person to whom you wish to send the information, paste the link in the body of the email (hold down the Ctrl key and press V) and send the email. The recipient will receive your email with a link which when opened will allow them to access the information in your OneDrive.

OneDrive gives you a few options when sharing information this way.
That little pop up window which contained the “Copy Link” (above) has another useful feature. In the top section of that window is a bordered section which says “Anyone with the link can edit” click the chevron (>) and another sub-window appears with several options:
-
Allow editing If you want the person to whom you sent the folder/file to be able to edit and change the folder/file, leave this ticked. If you only want them to be able to read the data, un-tick this item.
-
Set expiration date If only want to give the recipient access to the shared data for a certain amount of time click it, a calendar will appear, select the date and it will appear in the Window. From midnight the day before the date you selected, the folder/file will be unobtainable to your recipient.
-
Set Password You can password protect the data you’re sending to another person by installing a password here. You will then need to give the password to that person by either a Txt message, phone call or another email. This protects your data as only that person will be able to access your information by inserting the password to open the link.
-
More Apps. Most people won’t have this option so we won’t go into it here.

How to check how much OneDrive storage you have left.

Microsoft OneDrive is a popular cloud storage service that boasts deep integration with Windows 10. If you’re a OneDrive user, you probably want to keep tabs on how much storage you’re using. Here is how to do it.
Like the cloud storage offerings from Google and Dropbox, OneDrive includes free storage (5GB) and paid plans for additional storage. Regardless of which tier you’re on, it’s important to make sure that you don’t run out of storage.
What Counts Toward OneDrive Storage?
Unlike Google’s cloud storage, OneDrive doesn’t count email toward your storage. Microsoft Outlook includes its own free 15GB of storage. You can upgrade your Outlook storage independently from OneDrive.
The services that do count toward your OneDrive storage include Microsoft 365 apps. Synced files and notebooks from Word, Excel, PowerPoint, and OneNote. Of course, anything that you manually upload (including photos and videos) counts as well.
For Windows users, OneDrive is built in and acts as an extra disk on your hard drive. Anything uploaded to the OneDrive folder also counts toward your storage.
How to Check OneDrive Storage
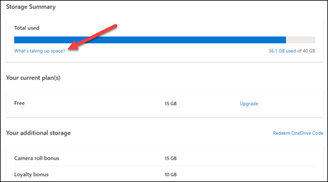
The easiest way to check your OneDrive storage is to go to onedrive.live.com/managestorage in a web browser. There, you’ll see a breakdown of how much storage you’re using. Select “What’s Taking Up Space” to see the largest files you have stored.
On this same screen, you can click “Upgrade” to buy more storage and “Redeem OneDrive Code” if you have one to enter.
That’s all there is to it. Keep an eye on this page to make sure that you don’t go over your limit.
A Pessimist sees a dark tunnel.
An Optimist sees a light at the end of the tunnel.
A Realist sees a freight train.
The Train driver sees 3 idiots standing on the tracks.
How to take a Windows 10 screenshot without a keyboard.

What if you need to take a screenshot in Windows 10, but you don’t have a “Print Screen” key on your keyboard—or you don’t have a keyboard at all? Luckily, it’s easy to capture your screen using only a mouse thanks to a built-in tool called Snipping Tool. Here’s how.
As this is a very handy tool you should have it on your task bar, to do that, follow these instructions:
Click “Start” (bottom left of your screen), under “All Apps”, scroll down to find then click “Windows Accessories.” Right click “Snipping Tool”, ´then “More” then “Pin to Taskbar.”
Then when you have something on your screen that you would like to keep, just click the Snipping Tool and the Snipping Tool window will appear. This gives you a few options, first of which you should see is the “Mode” option.
Mode gives you 4 options which are set and forget, once set they will stay that way until you change them.
Free-form snip: This allows you to draw a free-form shape around an object.
Rectangular snip: Drag the curser around an object to form a rectangle. This is the most popular and one you will probably use all the time.
Window snip: This will allow you to capture a pop-up window or a dialog box.
Full-screen snip: This allows you to capture the full screen.
Normally when you open the Snipping Tool, you won’t need to change an Option. To capture all or part of what is on your screen, click the Snipping Tool on the task bar at the bottom of your screen, the Snipping window opens, click NEW, this greys out your screen, position your mouse curser next to the section you wish to capture, click and draw your mouse over that section then unclick. Another window appears which will contain the section you selected.
This gives you a number of options across the top of the window:
File: Here you get the option to (1) Start a new snip, (2) Save the snip, (3) Send it via email, (4) Print it.
Edit: (1) Copy it to the clipboard, (2) Edit it with Paint.
Tools: (1) Pen – this allows you to draw on the item in different coloured pens, (2) Highlighter allows you to highlight part of the item, (3) Rubber, this allows you to remove what you added with the Pen or the Highlighter.
Options: There are a number of options in this window, Windows has defaulted them to certain values, you are advised to leave them be.
Help: This section contains all help instructions.
If my body was a car:
* It would be time to trade it in for a new model, I’ve got bumps, dents and scratches in my finish and my paint is getting a little dull.
* My headlights are out of focus and it’s hard to see things up close.
* My traction is not as graceful as it once was. I slip and slide and skid and bump into things. even in the best of weather.
* My whitewalls are stained with varicose veins.
* It takes me hours to reach my maximum speed.
* My fuel rate burns inefficiently.
* Almost every time I sneeze, cough or sputter, either my radiator leaks or my exhaust backfires.
How to update Safari on Mac
It’s a good practice to keep your web browser constantly updated for security reasons, but Apple Safari on Mac doesn’t have an update button. Here’s how to keep Safari updated.
Keeping Safari Updated
Every year, Apple releases new features for Safari, and you usually install them without realizing it because they’re linked to macOS updates that you get in System Preferences. But, because Safari is a browser, Apple often lets you update to the latest version of Safari without installing the next big OS release. For example, while Safari 14.0 came bundled in macOS Big Sur, macOS Catalina users can still update to it. Apple also provides regular security updates to older versions of Safari, which is the main reason why we recommend that you keep it updated.
How to Update Safari in System Preferences
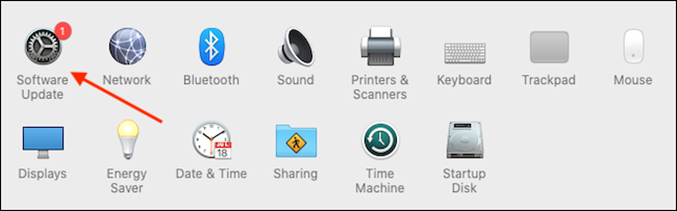
To update Safari, you’ll have to use the Software Update feature in System Preferences. To get there, click the Apple icon in the top-left corner of the screen. In the menu that appears, choose the “System Preferences” option.
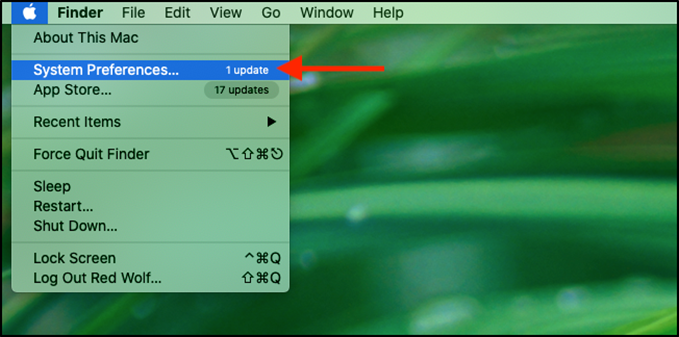
In System Preferences, click “Software Update.”
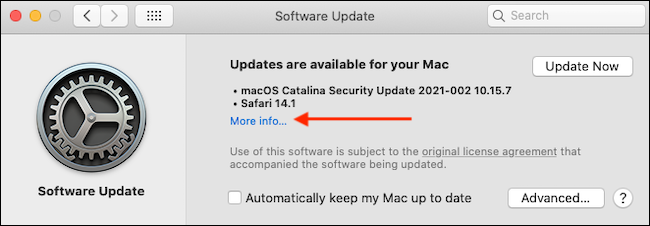
The Software Update panel will show you whether there are any software updates available for your Mac. If there are, you have two choices.
-
If you want to install the latest operating system along with the latest version of Safari, just click the “Update Now” button and follow the process.
-
If you only want to install an update to Safari, click “More Info” under the list of available updates to see a detailed list of all updates.
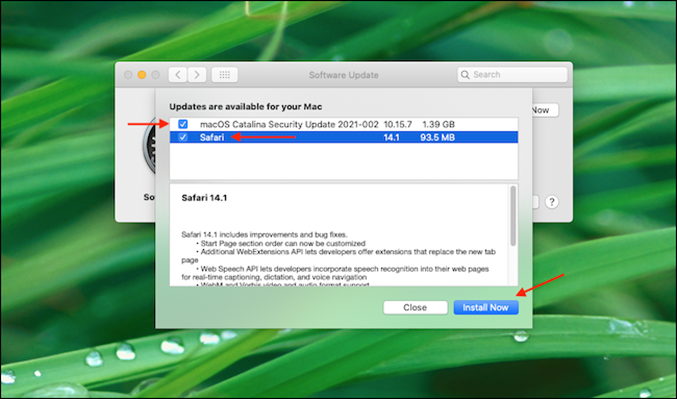
After clicking “More info,” a panel will appear listing the updates available for your Mac. Make sure that the “Safari” update is selected and uncheck “macOS” if you don’t want to install a system update along with it. When you’re ready, click “Install Now.”
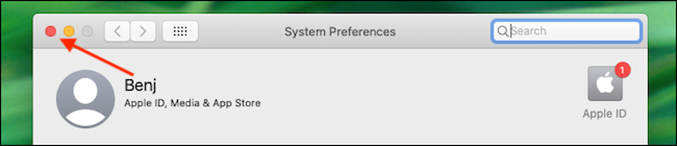
After a while, the Safari update will be installed on your Mac. Once the update process is finished, you can safely quit the System Preferences app using the red Close button in the corner of the window.
Since this process is somewhat confusing and non-obvious, we recommend enabling the auto-update feature to keep Safari and your Mac updated. Good luck!
How to force restart an Android phone when it’s not responding
Rebooting an Android device is usually a simple thing to do, but that’s not the case when your phone or tablet is stuck and won’t respond to any input.
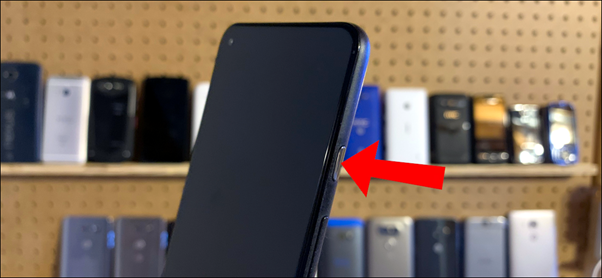
The specific situation we’re talking about is when the screen is unresponsive and the power button does nothing. Usually, if an app is frozen, you can still go to the home screen or reboot the phone like normal, however, if the entire phone is stuck, you’ll need to try something else.
It’s important to note that what we’re doing here is not a factory reset. A factory reset is when you completely wipe your device of all data and start over from scratch. What we’ll be doing is sometimes called a “hard reset” or “hard reboot.” You’re only restarting the device, not deleting anything. It may feel like you’re doing something “wrong,” but this process is harmless.
Some Android devices have special button combinations to do a hard reboot, but there’s one trick that almost always works for any device. All you need to do is press and hold the power button for at least 20-30 seconds. It’s going to feel like a long time, but keep holding it until the device powers off.
Samsung devices have a slightly quicker method. Press and hold the volume down key and the power/side key for seven seconds. It’s really as simple as that! Press, hold, and wait.

Remove the Battery
This method is not as relevant as it used to be as newer phones are water proof and you can’t get to the batteries as easily as you once could, but it will still apply to some devices. If your Android device has a removable battery, you can simply pull it out to reboot it.
Carefully remove the back cover and pry the battery out as safely as you can. Wait a few seconds, and then put it back in. Power on the device like you normally would.
You’re all set! An unresponsive Android phone can be a pain, and you might think that something serious is wrong, but in most cases, a simple reboot will solve the problem.
Sometimes I just want someone to hug me and say
“I understand your pain, it’s going to be ok, here’s a coffee and two million dollars.”
Why Android phones slow down over time and how to speed them up.

If you’ve had your Android device for a while, you’ve probably started to notice some lag that wasn’t there before. Apps load a bit slower, menus take a bit longer to show up. This is actually (and unfortunately) normal, here’s why.
This problem isn’t unique to Android, either, try using an older iPad with a new version of iOS and feel how slow it’s become, but the solutions are slightly different for each platform, so let’s talk about why this happens on Android—and how to fix it.
Operating System updates and heavier apps require more resources.
Your Android phone doesn’t have the same software it had a year ago (it shouldn’t, at least). If you’ve received Android operating system updates, they may not be as nicely optimized for your device and may have slowed it down, or, your carrier or manufacturer may have added additional bloatware apps in an update, which run in the background and slow things down.
Even if you haven’t seen a single operating system update, the apps running on your device are newer. As developers gain access to faster smartphone hardware, games and other apps may be optimized for this faster hardware and perform worse on older devices. This is true on every platform: as the years go by, websites become heavier, desktop applications want more RAM, and PC games become more demanding. You aren’t still using Microsoft Office 97 on your computer, for example—you’re using a newer version with more features that require more resources. Android apps are the same way.
How to Fix It:
There’s not much you can do to alleviate this. If your operating system seems slow, you could install a custom ROM that doesn’t have the bloatware and slow manufacturer skins many devices include—though keep in mind that this is generally for more advanced users and is often more trouble than it’s worth. If your apps seem slow, try switching to “lite” versions of the apps you’re already using.
Background Processes Can Slow Things Down.
You’ve probably installed more apps as you continue to use your device, some of which open at startup and run in the background. If you have they can consume CPU resources, fill up RAM, and slow down your device. Similarly, if you’re using a live wallpaper or have a large amount of widgets on your home screen, these also take up CPU, graphics, and memory resources. Slim down your home screen and you’ll see an improvement in performance (and maybe even battery life).
How to Fix It:
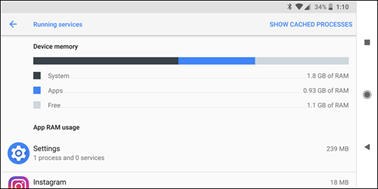
Disable live wallpapers, remove widgets from your home screen and uninstall or disable apps you don’t use. To check what apps are using background processes, visit the Running Services menu in Developer Settings (on Marshmallow and above). If you don’t use an app that’s running in the background, uninstall it. If you can’t uninstall it because it came with your device, disable it.
You’ll find instructions on how to access Running Services HERE.
Solid-state drives slow down as you fill them up, so writing to the file system may be very slow if it’s almost full. This causes Android and apps to appear much slower. The Storage screen in the Settings menu shows you how full your device’s storage is and what’s using the space. Cache files can consume quite a bit of storage space if allowed to grow unchecked, so clearing cache files can free up disk space and make your file system perform better—at least, until those caches inevitably fill up again.
How to Fix It:
Photos and videos that you’ve taken with your camera are going to be the largest culprit here, so back them up and delete them from your phone often. You’ll find ways to free up space on your Android device HERE. Uninstall apps you don’t use, delete files you don’t need, and clear app caches to free up space.
What Not to Do
Any good list of how to speed up your aging device should also include what not to do. Really, it can be summed up in one basic sentence in this situation: don’t use task killers.
I’m likely beating a dead horse here, but it’s crazy how many people still have this antiquated idea that task killers are somehow required to make an Android device perform its best by killing background tasks. This is just wrong—don’t install a task killer for any reason, regardless of how laggy your device is. Just follow the steps in this guide.
There’s a video on “how to” HERE.
Back Go to page: 1 2 3 4 5 6 7 8 9 10 11 12 13 14 15 16 17 18 19 20 Forward