
|
Vol 71 |
Page 4 |
Privacy Policy | Editorial Policy | Profit Policy | Join the Association | List of Members | Contact us | Index | Links
Back Go to page: 1 2 3 4 5 6 7 8 9 10 11 12 13 14 15 16 17 18 19 20 Forward

Computers and Stuff

Welcome again to Jaycar as the sponsor of Sam's "Computers and Stuff" page. As they are prepared to support us, please show your appreciation and support them. There's always a store near you, click HERE to find the closest.
Contents.
Difference between digital and optical zoom.
Disable Chrome's resource-hungry extensions.
Hide Microsoft Edge's adverts on new tab page.
Microsoft's Edge's crapware blocker.
Troubleshoot Window 10's search indexer.
![]()
What’s the difference between digital and optical zoom?
Zoom, like a lot of camera specs, is a bit more complicated than advertising campaigns would have you believe. Smartphone manufacturers like Samsung are now boasting 10x, 50x, or even 100x zoom. But is this even possible? Let’s look at the differences between optical and digital zoom.
What Does Zoom Actually Mean?

What is zoom, and what does it mean to have a 5x or 10x? In terms of optical physics, not a lot because there’s no such thing as zoom.
Lens magnification (how much a lens magnifies distant objects) is a function of its focal length and the resulting field of view. A lens with a longer focal length (relative to the size of the image sensor) has a smaller field of view. This makes distant objects appear closer than they would through a lens with a shorter focal length.
There are enough factors at play that lenses aren’t sold based on how much they magnify objects; rather, they’re sold based on their focal length.

Zoom, as we use it now, is basically a marketing concept popularized by compact cameras. Originally, it was the ratio between the shortest and longest focal lengths of a lens. So, a 10mm-100mm lens had 10x zoom, while a 25mm-100mm lens had a 4x zoom. This meant a lens with 10x zoom didn’t necessarily make things look 10 times bigger.
Smartphone manufacturers, however, use zoom slightly differently. A 1x zoom is broadly accepted as the field of view of the main camera. Smartphones like the iPhone 11 Pro add an even wider lens and call it a 0.5x zoom, rather than resetting 1x to the new widest angle.
Unlike with compact cameras, this means you can expect mostly the same rough magnification with different 10x-zoom smartphones.

If you want to know more, you can check out this piece on how zoom specs are calculated. All you really need to know, though, is zoom depends on the underlying focal length of a lens and the size of the sensor—and that it’s a bit disconnected from reality.
But what’s the difference between optical and real zoom (I’ll keep using this word for the sake of convenience, but what I really mean is “apparent magnification” or “narrower relative field of view”)?
How Optical Zoom Works
Optical zoom is when the physical properties of a lens genuinely magnify distant objects. For example, a telescope is all optical zoom. If you view the moon through one, it looks bigger. There’s no loss in quality—objects just appear closer.

That’s the problem with digital zoom. While optical zoom magnifies without losing image quality, digital zoom reduces it. And the more you zoom in, the worse the image quality gets. Digital zoom, however, is having a bit of a moment. Optical zoom is expensive, both in terms of production cost and the trade-offs necessary to add it to a smartphone. Periscope lenses are a relatively new development (at least in smartphones), so there’s still some figuring out to do. Thus, smartphone manufacturers are using the following tricks to make digital zoom better and minimize quality loss:
-
Using incredibly high-resolution sensors: Samsung’s Galaxy S20 has a 64 MP telephoto camera. Such a high-resolution sensor means there’s more image to crop and, therefore, more digital zoom to be had.
-
Pixel binning: Combining multiple pixels into a single super-pixel offers better quality on digitally zoomed-in images, rather than just cropping afterward.
-
AI and machine learning: These are showing a lot of promise in the area photography. Camera manufacturers have been able to use it to automatically increase the quality of digitally zoomed-in images.
-
High levels of digital zoom, though, aren’t possible without optical zoom. These crazy 50x and 100x zooms are only possible because they’re a hybrid of optical and digital zoom. A real optical lens does some of the heavy lifting, while the digital techniques provide more apparent zoom.
-
Samsung might be pumping up its zoom numbers, but there are genuine enhancements in lens technology underlying some of the hype.
-
Making the Most of Zoom
-
The current focus on camera zoom in smartphones is interesting. At a certain point, though, it just gets silly.
A 5x or even a 10x optical zoom lens opens up a lot of interesting shooting options for people. It also makes dedicated cameras even more of a niche indulgence. With that kind of zoom, you can photograph your kids playing sports, wildlife in your back garden and anything else you can’t physically get closer to.
While digital zoom isn’t automatically a bad thing (especially when it’s not overused), there are some downsides to zooming in too much. There’s the loss in image quality, of course, but also, photos just get harder to take. At 20x or 30x zoom (which is roughly equivalent to a 1,000mm on a DSLR), you have to hold your phone incredibly still to get a good shot. The slightest twitch will result in a blurry photo, and whatever you’re trying to photograph moving out of frame. That’s also assuming you’re shooting in good lighting. In low light, you’ll need a tripod for your smartphone to get anything resembling a sharp photo.
Graves with a sense of humour.

What you need to know about the new Microsoft Edge browser.
Are you using Windows 10? If so, Microsoft is installing a new browser on your PC via Windows Update. The new browser is still called Microsoft Edge, but it’s based on the same code as Google Chrome. Chromium forms the basis of Google Chrome, so the new Edge feels very similar to Google Chrome. It includes features found in Chrome, supports Chrome browser extensions and has the same rendering engine as Google Chrome.
If a website was designed for Google Chrome and didn’t work properly in the old Edge, it’ll now work properly in the new Edge. Like Google Chrome, the new version of Microsoft Edge will be updated every six weeks. You won’t have to wait for major versions of Windows 10 released every six months just for browser updates, as you did with the Legacy Edge browser.
When Will You Get the New Edge?
Microsoft released the stable version of its new Edge browser on Jan. 15, 2020. On June 3, 2020, Microsoft began rolling it out to all Windows 10 users via Windows Update. You can still download the new Edge from Microsoft’s website (HERE) if you don’t want to wait for Windows Update to install it. After installation, it will replace the old Edge browser with the new version. The original version of Edge is now officially called the “Legacy” version of Edge. Technically, the old Edge will remain installed for compatibility reasons, but Windows will hide it. You can tell you’re using the new Edge because it has a new logo. It’s a blue-and-green swirl rather than simply a blue “e”, as the old Edge was.
Can You Stop Microsoft From Installing It?
You can stop Windows Update from installing the new Edge if you like, but we don’t recommend it. Windows Update will just replace the old Edge browser on your Windows 10 PC with a new, more modern one that works better. If you ignored the old Edge, you’re free to ignore the new Edge. However, Microsoft understands that some businesses will want to block their PCs from installing the new Edge. Microsoft offers a Chromium Edge update blocker toolkit (HERE) that will set a “DoNotUpdateToEdgeWithChromium” registry value, ensuring PCs don’t automatically download and install the new Edge.
Microsoft announced it would replace Edge’s EdgeHTML rendering engine with the Chromium rendering engine in December 2018. That announcement was shocking at the time, after all, Microsoft had always gone its own way with web browsers. Even EdgeHTML was originally based on the Microsoft Trident rendering engine used by Internet Explorer. Microsoft explained this decision was made “to create better web compatibility for its customers and less fragmentation of the web for all web developers.
Even if you use Google Chrome, Microsoft’s work on the Edge browser will improve Chromium.
While Edge and Chrome are now pretty similar under the hood, they’re still different. Edge strips out Google’s services and, in many cases, replaces them with Microsoft ones. For example, Edge syncs your browser data with your Microsoft account rather than a Google one.
The new Edge offers some features Chrome doesn’t. For example, Edge has a built-in tracking prevention feature and a potentially unwanted program (PUP) blocker. In keeping with the old Edge’s interface, there’s a favourites button to the right of the address bar on Edge’s browser toolbar. Microsoft is also porting other features from the old Edge over, including “collections” for capturing snippets of web pages and storing them in the same place. You might prefer the new Edge if you trust Microsoft more than Google—or if you just want a browser with built-in tracking protection features and Chrome’s rendering engine.
Either way, Windows 10 users who stick with the included browser will now have a more modern, capable browser with an open-source rendering engine that’s updated more frequently and better supported by websites. That’s a win for everyone.
Microsoft’s new Chromium-based Edge browser is available for Windows 10, Windows 8.1, Windows 8, Windows 7, macOS, iPhone, iPad, and Android. Microsoft will even release a version of it for Linux in the future. Chrome already supports all these platforms, so that makes porting the new Edge much simpler for Microsoft.
While Microsoft and Google engineers are clearly cooperating, there’s no truce in the browser wars. However similar their browsers now are, Google still wants you to use Chrome and Microsoft wants you to use Edge. For example, you can install extensions from the Chrome Web Store in the new Edge, but, when you do so, Microsoft will warn you that extensions from the Chrome Web Store “are unverified and may affect browser performance.” After you agree to that, Google will warn you that it “recommends switching to Chrome to use extensions securely.”
Even though Edge is based on the same underlying code as Google Chrome, many Google websites will still show popups recommending you switch to Chrome. For example, when you visit Google News in Microsoft Edge, you’ll see a message saying Google recommends Chrome, encouraging you to “try a fast, secure browser with updates built in.” Microsoft is recommending Chrome users switch to Edge, too, for example, Bing encourages Chrome users to download Edge. Windows 10’s Settings app says the new Edge is “recommended for Windows 10” when you’re choosing your default web browser, too.
Mozilla is in the line of fire, too. Microsoft is already showing “suggestion” ads in Windows 10’s Start menu recommending Edge over Firefox. “Still using Firefox? Microsoft Edge is here,” reads the ad.
The more things change, the more they stay the same.
How to enable Microsoft Edge's new crapware blocker.
|
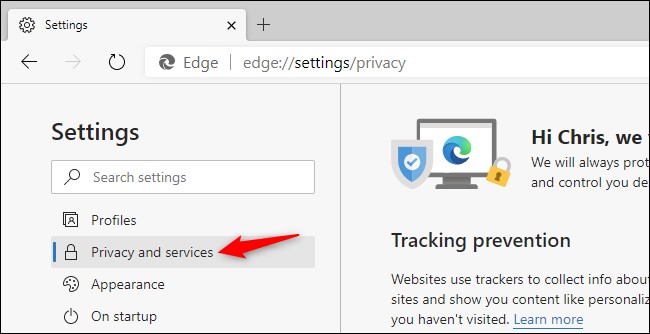
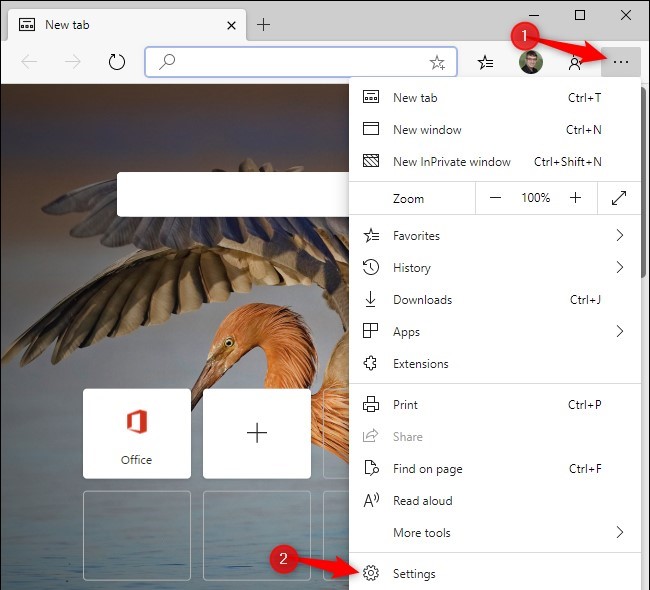
To enable the crapware blocker in the new Microsoft Edge, click Menu > Settings.
|
|
|
Click the “Privacy and services” option in the left pane.
|
|
|
Scroll down to the bottom of the list here. Under Services, enable the “Block potentially unwanted apps” option.
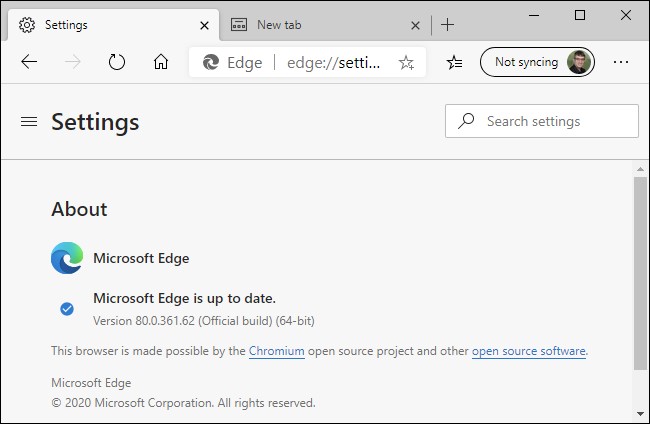
(If you don’t see this option, you haven’t upgraded to Microsoft Edge 80 yet. To see which version of the new Microsoft Edge you have, click menu > Help & feedback > About Microsoft Edge.)
|
|

You can now close the Settings page. Microsoft Edge will be more aggressive about blocking downloads that contain potentially obnoxious software.

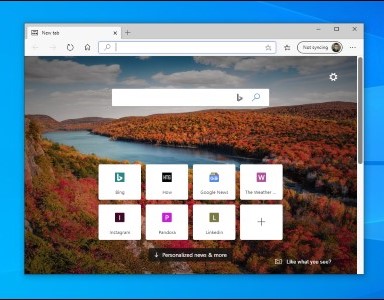
How to hide the article feed on Microsoft Edge’s new tab page.

When you open a new tab in Microsoft Edge, you might be greeted with an “Informational” page full of tabloid-style news, local weather, and plenty of advertisements. If you’d rather not see this feed, it’s easy to disable. Here’s how.
First, open Edge and create a new tab by clicking the plus sign (+) to the right of the current tab or you can press Ctrl+T (or Command+T on Mac). On the “New Tab” page, locate the “gear” icon to the right of the page (see red arrow) and click it.

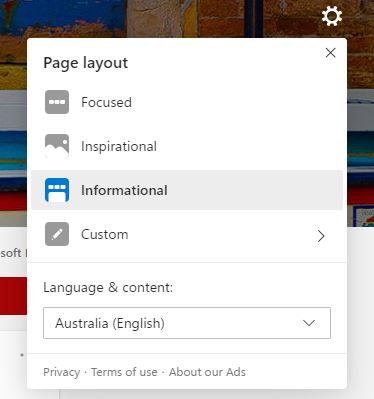
In the menu that pops up, you have several options. First, you will see that the “Page Layout” is probably currently set to “Informational”.
If you’d like to quickly choose a different style with a less intrusive news feed, click “Inspirational” (which is a search bar with quick links and a fancy photograph background), or “Focused” (a search bar with quick links and no photo background).
However, both of those options will still include a “My Feed” section if you scroll down below. To completely turn off the feed, choose “Custom” from the list.
When the “Custom” menu appears, click the drop-down menu below “Content” and select “Content off.” This will turn off the “My Feed” section of the New Tab page.
Also, if you want to further simplify the New Tab page, turn off the switches beside “Show Quick Links” and “Image Of The Day.”
After that, if you turned all the custom options off, you’ll be left with a plain Microsoft logo and a simple search bar.
Much less cluttered—now your mind can breathe again. Happy browsing!

How to troubleshoot the Windows search indexer on Windows 10.

Do you have a problem with the search function in Windows 10’s Start menu or File Explorer? Whether Windows can’t find your files, indexing is using too much CPU or search isn’t working, Microsoft’s Indexer Diagnostics tool can help fix your problem.
This tool provides insight into the inner workings of the Windows Search indexer service and it can help you identify problems and fixes. It’s similar to the Diagnostic Data Viewer—a power user tool that provides extra information you can’t normally see about Windows 10’s internals.
To get started, download Microsoft’s Indexer Diagnostics tool from the Microsoft Store. Launch it and give it administrator access—it needs those permissions to access and update the Windows search indexer.
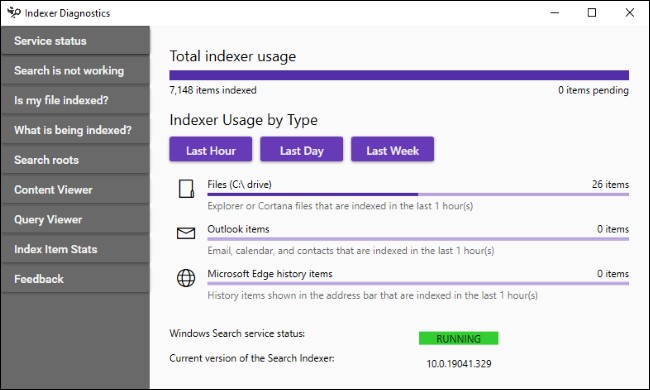
Click between the tabs in the left pane to view information about the indexing service, its status, which files it’s indexing, and what it’s searching. There are also various troubleshooting tools on this pane. The main pane is “Service Status,” which will show you how many items the indexer has in its database, and how many files it’s indexed in the last hour, day, and week.
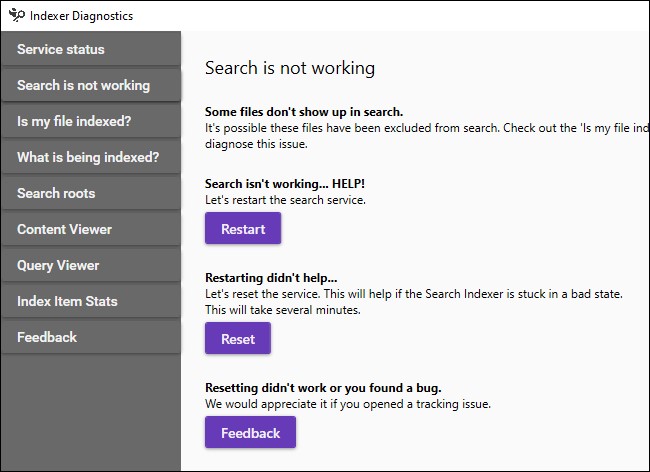
If Windows search isn’t working at all, click “Search Is Not Working” in the left pane. Use the “Restart” button to quickly restart the search service to fix problems. If that doesn’t help, click the “Reset” button to reset the state of the indexing service. This will take several minutes. As the interface points out, a reset “will help if the Search Indexer is stuck in a bad state.”
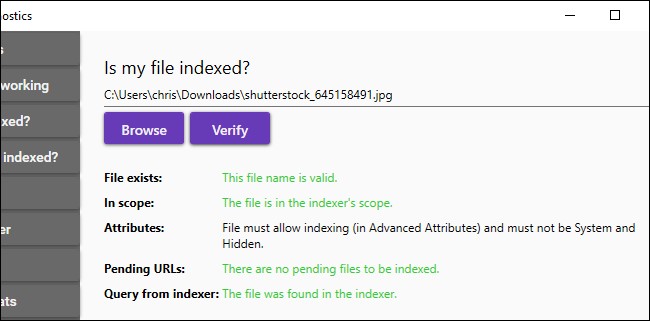
If search can’t find a file, click “Is my file being indexed?”, browse to the file you want Windows to find, and click “Verify.” Windows will tell you whether the file is found in the search index and, if not, will explain why the search indexer is ignoring it so you can address any problems.
Other tools available in Indexer Diagnostics include:
-
What is being indexed? – Displays the paths being indexed and any excluded paths that aren’t being indexed. You can add and remove included and excluded paths here.
-
Search roots – Shows you where Windows will begin searching—for example, in the root of the C:\ directory.
-
Content Viewer – View the files the indexer is indexing, and the precise time it indexed them. For example, if the search indexer was using a lot of CPU at a specific time, you can see what files it was indexing at that time and consider excluding them from “What is being indexed?”.
-
Query Viewer – Monitor what search queries are being sent to the Windows search indexer. You can click “Start Listening,” perform searches and see exactly what’s going on in the background.
-
Index Item Stats – View how many items are indexed per each app on your system. You can also export details about the index to a CSV file.
-
Feedback – This tab lets you collect traces and logs that will monitor the indexer’s resource usage and functions. There’s a “File Bug” button here that will let you file reports about problems with the indexer with Microsoft.
Many of these functions are only useful for developers working on the search indexer or people sending bug reports to those developers, but it’s still great to have such insight into the inner workings of Windows 10.

![]()
How to find and disable resource-hungry Chrome extensions.

Google Chrome is a resource-intensive browser. You might be used to closing tabs to free up RAM, but extensions run constantly in the background and take a lot of resources. Here’s how to find and disable resource-hungry Chrome extensions.
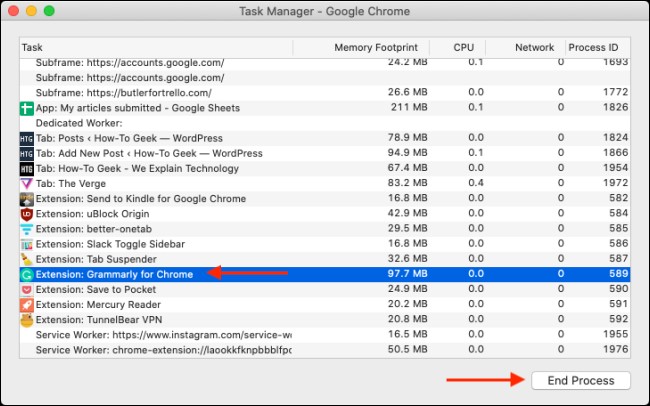
Just like your Windows or Mac computer, Chrome has its own task manager built-in. From here, you can see how many resources a tab, app, or extension is taking up. To get here, click the “Menu” button (3 dots) found in the top-right corner of the Chrome toolbar and go to More Tools > Task Manager.

Here, you’ll find all active extensions at the bottom of the list. You can also click the “Memory Footprint” tab to sort all processes based on the RAM usage.
Now, go through this list and identify memory-hungry extensions. There could be extensions that are taking up well over 500 MB RAM. It’s not unusual for small extensions to use 50-100 MB RAM.
You can’t disable or delete extensions from here (more on that later), but you can temporarily disable the extensions. If an extension has gone rogue and is using a lot more memory than it should, you can select it and then click the “End Process” button to stop it from running.
The extension will now crash, and you won’t find it in the Chrome toolbar. When you restart the Chrome browser, the extension will work again. To reload a crashed extension, go to Menu > More Tools > Extensions and click the “Reload” button.
During the process of finding resource-hungry Chrome extensions, you might come across some extensions that you have no use for. You might also come across extensions that you will need to delete because they are using too much RAM. To disable or delete an extension, click the Menu button (top right) and then go to More Tools > Extensions.

Here, you’ll see all your installed extensions in a grid. From the top, you can search for a particular extension. To disable a Chrome extension, click the corresponding toggle button.
The extension will disappear from the Chrome toolbar, and you won’t be able to access it.
One of the most amazing things about the Internet age is how we can download useful programs and apps to complete most any task we can imagine at absolutely no cost whatsoever. But, free downloads can often have a dark side. Most websites offering free software downloads seem to be plastered with misleading ads, often in the form of fake “Download” buttons. These misleading ads attempt to trick users into visiting completely irrelevant websites by placing a honking fake “Download” button on the ad itself. Folks then click on the fake Download button thinking that’s the button they need to click in order to download the program they came for.

These unethical free download sites also use another trick to earn money while offering free downloads: They attach add-on programs to the program the user came to retrieve. These add-on programs are usually completely unrelated to the program listed on the download page. They are “added on” to the requested program because the company behind them paid the download site’s owner a fee for doing it. In addition to the irritation of finding out you just downloaded a program that you neither need or want, these add-on programs are often malware that hijack your web browser and/or refuse to be uninstalled from your system.
The vast majority of these add-on programs can be removed from the download procedure by unchecking a box on the download page, but that box is often placed in a location where it’s easy to miss by a casual observer. Even worse, it’s sometimes placed on a different page and hidden behind an obscure link.
But the news about free downloads isn’t all bad…
There are a handful of reputable free download sites that offer clean, no add-on downloads on pages that don’t have misleading ads on them. One of these is OlderGeeks.com and it’s a great spot to look whenever you need to download a free program to solve whatever problem happens to pop up. The owners of OlderGeeks developed the site from the ground up with the intention of offering clean free software downloads without all the negatives that come with using other similar websites.
You won’t find any ads on the OlderGeeks website and you definitely won’t find any unwanted programs being attached to the programs you download from the site. The site is funded from donations. Everyone is welcome to take advantage of the no-ads and no add-on download experience at OlderGeeks at no charge whatsoever.
You can find the site HERE

The CDs you burned are going bad, here’s what you need to do.
If you used a computer between 1997 and 2005, you probably burned valuable data or music to at least one recordable CD (CD-R) or DVD-R. Unfortunately, these have a limited lifespan and many have already become unreadable. That’s why it’s important to back up your recordable discs before it’s too late—here’s how to do it.

CD-Rs and DVD-Rs store data on a layer of dye that is melted by the laser when the data is written. This dye layer isn’t completely stable and can chemically break down over time, causing data loss. Also, the reflective layer on the top of the disc can oxidize, making the data difficult to read. As a result, many CD-R and DVD-Rs burned in the late ’90s and early ’00s are now unreadable in modern optical disc drives. And for those that remain, the clock is ticking.
Estimates on the lifespan of CD-R and DVD-Rs vary wildly, from between two and 100 years. In 2004, the U.S. Library of Congress sponsored a study that estimated the shelf life of recordable discs available at that time. It simulated the aging of CD-R and DVD-Rs stored in perfect environmental conditions (that is, a room temperature of 50 percent humidity with no sunlight, and no rough handling). The study concluded that most recordable discs stored in ideal conditions would last at least 30 years, but the results varied wildly by brand. However, it also stated that “discs exposed to more severe conditions of temperature and humidity would be expected to experience a shorter life.”
So, if you store your CD-R or DVD-Rs in a hot attic, you might find a higher portion of them have gone bad. If you have a batch of 30 vintage consumer-grade CD-Rs, you might expect a few of them to be unreadable, however, it depends on the quality of the disc, the type of dye used, the speed at which they were recorded, and how they were stored.

In 2010, the Canadian Conservation Institute published a detailed analysis of CD-R and DVD-R longevity that broke down estimated lifespans based on the dye and reflective layer composition. Like the Library of Congress report, the estimates varied wildly, from between five and 100 years, depending on disc composition. Unfortunately, the 100-year-minimum lifespan estimate only applies to expensive, high-end gold-backed CD-Rs that very few people used.
Even under ideal conditions, there’s still cause for alarm. Even if a consumer-quality recordable disc has been stored in the perfect place, it might last (on average) about 30 years. Many recordable discs are already 15-25 years old, which means it’s time to back them up now.

To back up your old CD-Rs or DVD-Rs, you’ll need a computer and a compatible CD or DVD optical drive to read the discs. Some people have had more success using older drives, claiming they tend to read older discs better than modern ones. This is anecdotal evidence, though as older drives can be hard to get, unless you find one on eBay. If you decide to look for an older model, focus on the big-name brands. Sony, for example, was known for making high-quality drives. Of course, whether a vintage drive will work with a modern computer is another issue, entirely.
If you’d like to try a newer drive to read your discs, you can easily purchase one online. Most new optical drives should work just fine, as long as a CD-R or DVD-R hasn’t begun to degrade.
There are several ways in which you can copy the data from your CD-R and DVD-Rs.
Option 1: Copy the Data Directly
If your PC or Mac recognizes the data on your CD-R and DVD-Rs, the easiest way to back it up is to just manually copy the files over to your hard drive or SSD. To do this, just place the CD-R or DVD-R in the optical media drive, and then open it on your computer. It’s best to do this with some kind of organizational structure if you’re backing up a lot of discs. For example, you could create a separate folder for the contents of each disc. Name the folder something that will identify its contents, such as “CD-R: Photos from Tom’s 2002 Wedding.”
Option 2: Create Disk Images
Sometimes, a CD-R or DVD-R might be from a platform you don’t use anymore and you might not be able to read it properly. For example, say you burned a CD-R for a game console development kit, but Windows can’t read it. In cases like those, consider making a disk image of the disc, instead. A disk image captures the entire structure of an optical disc, including all the file data and the file system (if there is one), in a way that can be replicated later on another disc, if necessary. Good utilities for making disk images include WinImage for Windows and MacOS’s built-in Disk Utility app.
Back Go to page: 1 2 3 4 5 6 7 8 9 10 11 12 13 14 15 16 17 18 19 20 Forward